background image


19 


4. Manual Massage Modes 

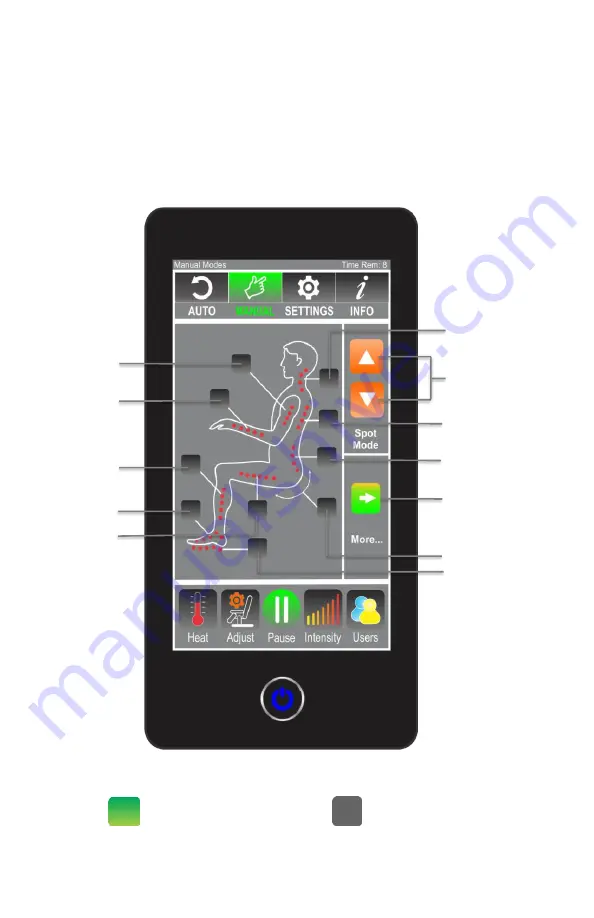
The i7 PLUS allows users to easily customize the massage profile 
and save them under 5 different user profiles. Touch a button on 
the body diagram screen to 

add or remove

 the massage for 

specific parts of the body.  For back massage, first select a back 
area, then press more for massage options. The selected massage 
profiles will be highlighted in a green color on the buttons (Fig.10). 


Fig.10: Manual Mode Descriptions 


  Program is active          

 Program is inactive 


Spot Back Massage
Press and release
Do not hold the buttons

Bicep Massage

Hand & Arm
Massage

Calf Massage

Foot Massage

Foot Roller

Leg & Buttock
Massage

Seat Swing

Lower Back Massage

Mid Back Massage

Neck & Shoulder
Massage

More Options

Summary of Contents for iROBOTICS 7 PLUS

Page 1: ......

Page 2: ...you will soon be telling your friends and family about the health benefits of using a massage chair at home and how enjoyable and easy it is to operate the Luraco i7 PLUS massage chair Customer Assist...

Page 3: ...4 Seat cushion and pillow assembly 12 5 Step 5 Connect remote control and other electrical accessory devices 15 IV UNDERSTANDING REMOTE CONTROL FEATURES 16 1 Quick Instruction for Remote Main Screen 1...

Page 4: ...amily of quality medical massage chairs The Only Massage Chair Line that is Researched Developed and Assembled in USA All other massage chairs are imported from Asia FDA CE and UL listed Built for saf...

Page 5: ...sage chair Comforting acupressure point arm massages and unique stretch program with genuine leather at all massage touch surfaces Head Arms Shoulders and Feet Nine automatic and limitless customizabl...

Page 6: ...r switch to the off position then remove plug from outlet 11 Connect this chair to a properly grounded outlet only See Grounding Instructions 12 Do not remove the back cushion and do not play with rol...

Page 7: ...plug provided with the product if it does not fit the outlet have a proper outlet installed by a qualified electrician Followed by either instruction a or b below a This product is for use on a norma...

Page 8: ...ical issues or any other concerns please consult your doctor before using the massage chair DO NOT Allow children or pets to play near the chair especially during operation Use any massage function on...

Page 9: ...space over 81 inches enough for full recline mode Do place on level floor Do wear suitable clothing at all times while using Note Do not use the chair as a bed or to sleep on over a long period of tim...

Page 10: ...shock Do not operate with more than one person Do not use when wearing head ornamentation as it can result in injury Do not stumble over electrical wires or connections Do not touch the inner parts of...

Page 11: ...using mild detergent and let air dry Do not spray pesticide on device Do not use a damp cloth on the electronic components which can cause shock and damage Fig 2 Space Requirement III INSTALLATION IN...

Page 12: ...e Armrests Please refer to Fig 3 and Fig 4 and follow the steps 1 5 below to install the armrests 1 Assemble armrest air tubes Fig 3 Make sure the color marks numbers are matched 2 Fix air tubes Make...

Page 13: ...peat steps 1 thru 4 for the second armrest assembly ATTENTION Be sure no objects are behind the chair before reclining For a higher intensity foot massage you can remove the gentle pads located on top...

Page 14: ...onnector with matched wire color Fig 5 Back Cushion Installation Step 4 Pillow and Foot Roller Gentle Pad Assembly Connect the air pipe on the pillow to the pipe on the back of the chair as shown in F...

Page 15: ...s on top of the rollers as shown in Fig 7 below Note The gentle pads are already installed in the chair Fig 7 Adding Removing Foot Roller Gentle Pads and Remote Controller Installation Adding Gentle P...

Page 16: ...the armrest Fig 8 Side Panel 2 Plug the power cord to the back of the chair 3 Power is turned on off by a switch on the back Switch to position I to turn on and position 0 to turn off 4 Use the remote...

Page 17: ...to customize a massage profile that best fits the body needs for optimal results After an optimized profile is created user can save it under Users Profile User can then recall the saved profile next...

Page 18: ...t the i7 gives the user control of the massage intensity for different parts of your body Intensity levels are also stored in user profile when saved Users Allows user to save customized massage profi...

Page 19: ...y depression and headaches Sport Massage Mode Geared towards people involved in sporting activities to help prevent or treat injuries It focuses on areas of the body that are overused and stressed fro...

Page 20: ...ge first select a back area then press more for massage options The selected massage profiles will be highlighted in a green color on the buttons Fig 10 Fig 10 Manual Mode Descriptions Program is acti...

Page 21: ...protection Fig 11 Note The default passcode to unlock all features of the chair is 1111 Fig 11 System Setting Description Massage Time Setting End of Cycle Chair Position Setting Voice Response Langua...

Page 22: ...Tablet or Laptop 5 Listen relax and enjoy Note When Bluetooth is connected the chairs voice response features will be muted Disconnecting Bluetooth will resume the voice response features automatical...

Page 23: ...reset and sensors and electronics to be reinitialized We recommend a chair reboot whenever you feel a chair reset is needed 7 Chair Adjustment Allows user to adjust the chair to their preferred positi...

Page 24: ...f from pain due to muscle related injuries and other causes is cited as a major benefit of massage In one study cancer patients self reported symptomatic relief of pain Acupressure or pressure point m...

Page 25: ...he iRobotics 7 PLUS Medical Massage Chair has the capability to operate an optional health monitoring device made by OMRON The device measures blood pressure and heart rate of the user Connect the blo...

Page 26: ...16 Wrist Blood Pressure Heart Rate Monitor Fig 17 Display Screen Power connector is located in the bottom of the device Use the cable provided to connect this device to the chair See Fig 8 for more d...

Page 27: ...comfortably on the chair in the upright position with your legs uncrossed and your feet flat on the footrest and place your elbow on the armrest in order to relax before starting blood pressure measur...

Page 28: ...be on continuously Control Red If this Red LED is on it means the control is not properly connected has technical issue or is still booting up Problem Issue Possible Cause Trouble Shooting Method ALWA...

Page 29: ...se Suddenly stops working 1 Bad power connection 2 Auto program timer is up 1 Unplug and reinsert power cord to the chair 2 Normal operation Loud buzzing sound from speakers 1 Speaker malfunction 2 Ba...

Page 30: ...chair User Weight Up to 300 lbs User Height Up to 6 7 Power Consumption 150 Watts Max Recline Angle 120 170 Degrees Roller Track Length 32 in 81 cm Pre programmed Functions 9 Automatic Timer Shut Off...

Page 31: ...cludes an additional 6 months for parts at no cost to the customer Does not include Alaska Hawaii Puerto Rico and International sales What is NOT covered This warranty does not cover any loss or damag...

Page 32: ...ot covered under this limited warranty This warranty is non transferable and applies only to the original purchaser at the original location where it was delivered Implied Warranty Any implied warrant...

Page 33: ...rs of original chair purchase See Section IX for further information Note Extended warranty plan is available for in home use application only Luraco does not offer this plan for commercial use How to...

Page 34: ...tion costs related to the removal or replacement of any products or rework charges whether or not such damages are based on tort including negligence warranty breach of contract or any other legal the...

Page 35: ...plications and therefore such inclusion and or use are at the customer s own risk IX EXTENDED WARRANTY REGISTRATION Your purchase already comes with a comprehensive 3 Year Warranty However you can sti...

Page 36: ......

Reviews: