background image


Fig.4: Armrest Installation 


d. Install 2 black head screws to secure the armrest metal plate onto the seat frame (Fig.3). 
e. Repeat steps (a to e) for the armrest assembly on other side. 


ATTENTION!


  Be sure no object is behind chair before reclining 

  For a higher intensity foot massage, you can remove the gentle pads located on top of the foot rollers 

(Fig.7) 

  For a higher intensity neck and shoulder massage, you can flip the pillow to the back of the chair 


Summary of Contents for iRobotics 7 series

Page 1: ...perience that you will soon be telling your friends and family about the health benefits of using a massage chair at home and how enjoyable and easy it is to operate Luraco i7 Series massage chair Customer Assistance For assistance with this product please visit www luracochair com Or call Luraco Technologies Customer Care toll free at 1 800 483 9930 To save time please note your model number and ...

Page 2: ...ly 10 4 Step 4 Seat cushion and pillow assembly 10 5 Step 5 Install remote control and other electrical accessory devices 11 IV UNDERSTANDING REMOTE CONTROL FEATURES 12 1 Quick instruction to remote main screen 13 2 Start Stop the chair 13 3 Automatic massage modes 13 4 Manual massage modes 14 5 System setting 15 6 MP3 music player 16 7 Chair adjustment 17 8 Health information 18 V HEALTHCARE DEVI...

Page 3: ...nding Unique features of up to 5 personal user memory settings so the whole family can enjoy Multi Sectional intensity controls patent pending Integrated Health monitoring features to measure Blood Pressure and Heart Rates optional patent pending Multi Language Human voice response system User recommendations of up to 6 7 and weight up to 300 pounds FDA CE and UL listed Developed and Made in the U...

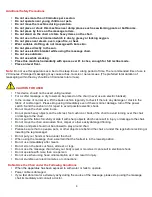
Page 4: ...shion and do not play with roller mechanism 13 Do not remove the bottom seat and do not play with actuators 14 Keep the cord out of heavy traffic areas To avoid fire hazard NEVER put the cord under rugs near heat generating devices 15 Always unplug the power cord from the electrical outlet immediately after use and before cleaning 16 Always check the volume before using the ear plugs 17 Do not ope...

Page 5: ...metal screw b This product is for use on a normal power circuit and has a grounding plug that looks like the plug illustrated in sketch A in the Figure below Make sure that the product is connected to an outlet having the same configuration as the plug No adapter should be used with this product Fig 1 Grounding Instruction MEDICAL WARNINGS Pregnant women People with distorted joints broken bones s...

Page 6: ...ck in the fabric of cushion part Please stop using immediately even if there is minor damage turn off the power switch Send the cushion in for repair to avoid possible electric shock Do not move the chair while in use Do not place heavy objects on the armrest foot cushion or back of the chair to avoid turning over the chair or damage to the chair Do not pull the fabric forcefully or stab it with s...

Page 7: ...dust from collecting Do not store in a hot humid damp place or in direct sunlight or heat Cleaning Methods Before cleaning unplug from electrical source to avoid shock Clean the cloth surface with neutral detergent or special mild detergent for cloth Use leather cleaner and leather conditioner Dust can be cleaned off with a damp cloth of mild detergent and air dry Do not spray pesticide on device ...

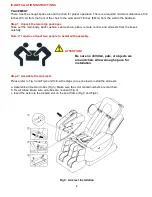
Page 8: ...rol and armrests from the boxes carefully Note i7 requires at least two people to assist with assembly ATTENTION Step 2 Assemble the Armrests Please refer to Fig 3 and Fig 4 and follow the steps a to e below to install the armrests a Assemble armrest air tubes Fig 3 Make sure the color marks numbers are matched b Fix air tubes Make sure air tubes are not bent Fig 3 c Insert the axle into the locat...

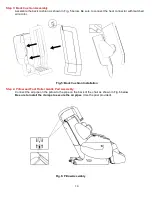
Page 9: ...epeat steps a to e for the armrest assembly on other side ATTENTION Be sure no object is behind chair before reclining For a higher intensity foot massage you can remove the gentle pads located on top of the foot rollers Fig 7 For a higher intensity neck and shoulder massage you can flip the pillow to the back of the chair ...

Page 10: ... connector with matched wire color Fig 5 Back Cushion Installation Step 4 Pillow and Foot Roller Gentle Pad Assembly Connect the air pipe on the pillow to the pipe on the back of the chair as shown in Fig 6 below Be sure to install the clamps to secure the air pipes Use the plier provided Fig 6 Pillow Assembly ...
Page 11: ...t Roller Gentle Pads Step 5 Install Remote Control and other Electrical Accessory Devices a Please refer to Fig 8 below for remote control and other accessory devices connection Note This panel is located on the right side of the chair slightly below the armrest Remote Control Port Reserved For Service Tech Blood Pressure Monitor Port Remote Control Error Indicator Power Indicator Audio Out Connec...

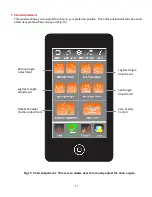
Page 12: ...usic files to the bottom of the remote Fig 9 A sample SD card is included f If you use earplugs please insert the earplugs to the audio out port as indicated on the side panel of chair Fig 8 IV UNDERSTANDING REMOTE CONTROL FEATURES MP3 SD Card Start Stop Auto Modes Manual Modes Chair Se7ng Health Info Music Player User Massage Profile Save Open Massage Intensity Control Chair PosiBon Adjustment Hea...

Page 13: ...er for each massage session is 20 minutes When timer is up the chair maintains its position to avoid sleep disruption Pressing this button a second time will put the chair back to its initial position automatically 3 Automatic Massage Modes Health Massage Mode This massage mode is specifically designed for health enhancement It mainly focuses on health aspects like releasing muscle strain improvin...

Page 14: ...puts the chair to a comfortable position for watching TV 4 Manual Massage Modes The i7 Series allows users to easily customize the massage profile and save them under 5 different user profiles Touch a button on the body diagram screen to add or remove the massage to or from the specific parts of the body The selected massage profiles will be highlighted in green color on the buttons Fig 10 Spot Ba...

Page 15: ...code protection Fig 11 Note The default passcode to unlock the remote is 1111 Voice Response Language Op0ons Massage Time Se5ng Passcode Setup Default 1111 System Info For Manufacturer Use Only End of Cycle Chair Posi0on Se5ng Screen Brightness Control Fig 11 System Setting Description ...

Page 16: ... an integrated MP3 player with flash SD card reader and built in speakers or headset option The MP3 control functions are shown in Fig 12 below Music File Display Window Play Pause Control Backward Forward Volume Control Fig 12 MP3 Music Player Control ...

Page 17: ...sition will also be saved under user profile when you save it Fig 13 Leg Rest Angle Adjustment Seat Angle Adjustment Zero Gravity Control Recline Angle Adjustment Neck Shoulder Posi on Adjustment Leg Rest Length Adjustment Fig 13 Chair Adjustment This screen allows user to manually adjust the chair angles ...

Page 18: ... from pain due to musculature injuries and other causes is cited as a major benefit of massage In one study cancer patients self reported symptomatic relief of pain Acupressure or pressure point massage could be beneficial in relieving back pain State and trait anxiety Massage has been shown to reduce state and trait anxiety Depression Massage has been shown to reduce sub clinical depression Blood...

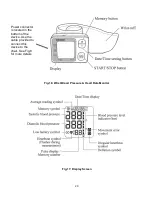
Page 19: ...he device iRobotics 7 Series has the capability to operate an optional health monitoring device made by OMRON The device can measure blood pressure and heart rate of the user Connect the blood pressure monitor to blood pressure port on the side panel of the chair before operating Refer to Fig 8 ...

Page 20: ...g 16 Wrist Blood Pressure Heart Rate Monitor Fig 17 Display Screen Power connector is located in the bottom of the device Use the cable provided to connect this device to the chair See Fig 8 for more details ...

Page 21: ... comfortably on the chair in the upright position with your legs uncrossed and your feet flat on the footrest and place your elbow on the armrest in order to relax before starting blood pressure measurement c Hold your arm with the device at heart level Hold your elbow firmly to avoid body movement Sit still and do not talk or move during the measurement Fig 19 d Press the START STOP button Fig 19...

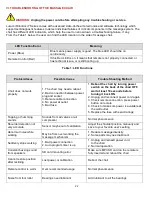
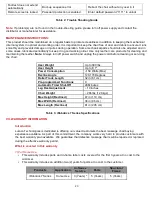
Page 22: ...let 5 Bad fuse 1 Reboot the chair by turning power switch on the back of the chair OFF wait at least 10 seconds before turning it back ON 2 Unplug and reconnect power cord again 3 Check remote connection press power button on remote 4 Check to make sure power is available at the wall outlet 5 Replace the fuse with exact ratings Tapping or humming sounds Sounds from air valves or air compressor Nor...

Page 23: ...9 Automatic Timer Shut Off 20 Minutes Leg Rest Adjustment 10 inches Chair Weight 265 lbs 120 kgs Max Height Reclined 47 in 119 cm Max Width Reclined 38 in 96 cm Max Length Reclined 81 in 205 cm Table 3 iRobotics 7 Series Specifications VII WARRANTY INFORMATION Introduction Luraco Technologies is dedicated to offering our valued customers the best massage chair buying experience available As part o...

Page 24: ... may be charged for service calls labor and travel costs Display models that have been on floor for more than twelve 12 months are not covered under this limited warranty This warranty is non transferable and applies only to the original purchaser of this product Implied Warranty Any implied warranties shall be limited to the duration of the 3 year portion of this warranty for home use and 6 month...

Page 25: ...ologies be liable for any indirect incidental punitive special or consequential damages including without limitation lost profits lost savings business interruption costs related to the removal or replacement of any products or rework charges whether or not such damages are based on tort including negligence warranty breach of contract or any other legal theory Notwithstanding any damages that cus...

Page 26: ...1 800 483 9930 You may also fill out the warranty registration card with payment and a copy of your receipt Mail to Luraco Technologies Warranty Dept 1132 107th Street Arlington Texas 76011 USA If you have already purchased your 2 Year Extended Warranty please register your extended warranty purchase by mailing in the warranty registration card or at www luraco com warranty Note All fields are man...

Reviews: