background image

Application Note #734

2

www.lutron.com/support

®

Glossary

Change Feature Mode

  Allows the user to modify the selected feature .

Default Setting


The way the feature operates when the control is first used .

Factory Default


The way all the features operate when the control is first used .

FASS


Tab at the bottom of the control, required to be pulled out for light bulb(s) replacement and 

changing advanced features; also known as 

Air Gap

 .

Flashing Quickly


Light bar on the dimmer is flashing ~8 times per second . This indicates the user is ready to 

change the selected feature .

Flashing Slowly


Light bar on the dimmer is flashing ~4 times per second . This indicates the user is ready to select 

the feature they would like to change .

High-End Trim


The highest achievable light level to which the control can be adjusted

Light Bar


The bar on the right side of the Sunnata dimmer paddle . See the diagram below .

Light Level Indicator


The light bar is illuminated to display the current load level when the load is on and the control 

has not been touched for about 2 seconds .

Load


The light bulb(s) that the control is controlling .

Locator Light


The entire light bar is faintly illuminated when the load is OFF .

Locked Preset


A programmable light level setting to which the control will turn on after tapping the ON button once .

Low-End Trim


The lowest achievable light level to which the control can be adjusted .

Normal Operation


Standard use of control (ON / OFF, touch); indicator lights will not be flashing .

Phase Select Mode


Allows for selection of forward- or reverse-phase dimming . The Phase Selectable dimmer default 

powers up in reverse-phase (PRO-N only) .

Press and Hold


Sustained activation of the ON / OFF button for a specified period of time .

Slide


Lightly make contact with the control and move finger up or down without depressing any buttons .

Tap


Momentary activation of the ON / OFF button . Less than 1 second .

Touch


Lightly make contact with the control but do not depress any buttons .

Unlocked Preset


A light level setting that allows the control to turn ON to the last dimmed setting when tapping the 

ON button once . The control stores the light level setting after remaining there for one second . 

When in the load is off, a single LED will glow brighter than the rest to indicate the saved level .
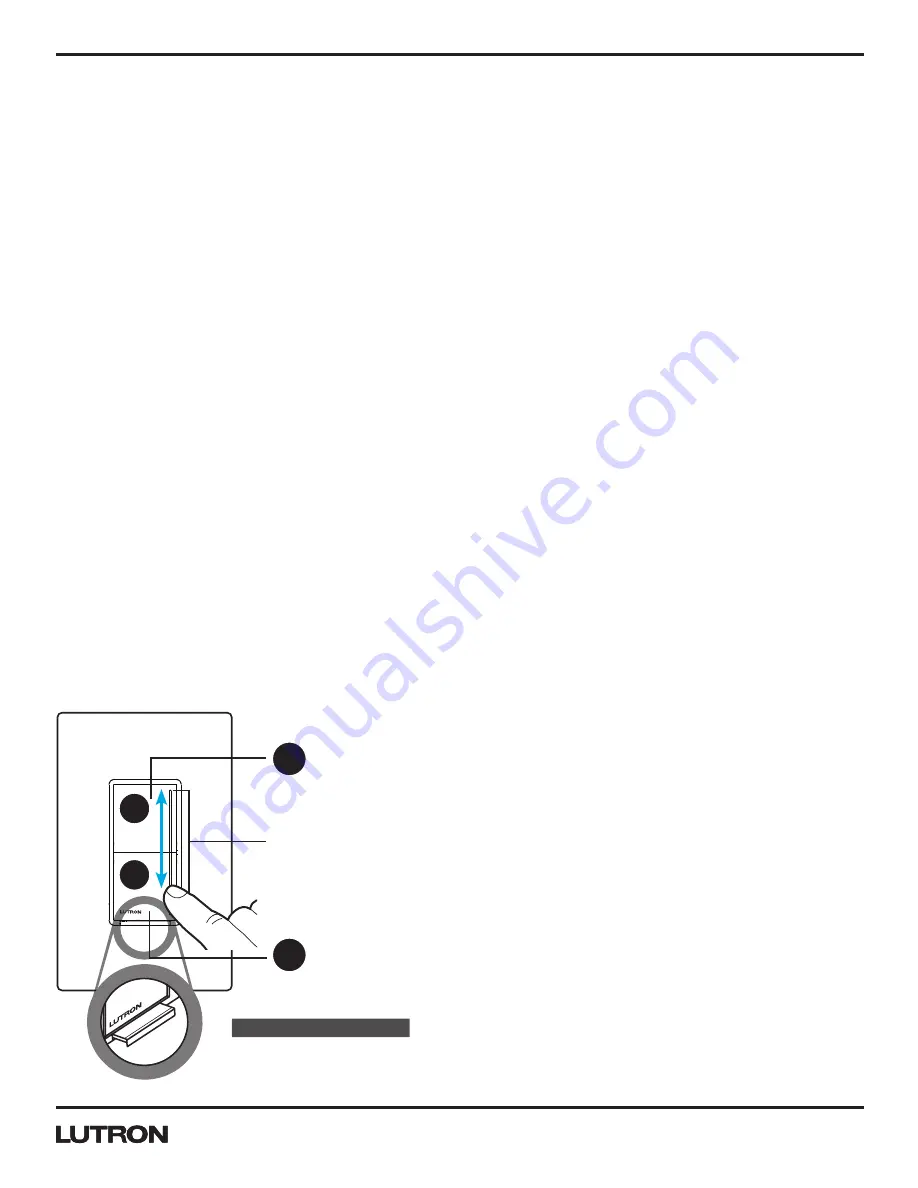
FA

SS

FA

S

S

FAS

S•

FA

SS

FA

S

S

FAS

S •

On

Off

(Front Accesible Service Switch) 

Pull tab out to change the room’s 

light bulb.

FASS*

Adjust: 

(Light Bar)

•  Touch the light bar to set the lamps to desired level
• Slide to adjust the light level
• Will not turn lights off

•  Default - Lights go to full brightness or programmed preset level
• Anytime - Double tap to full brightness

• Default - Lights go off
•  Press and Hold for more than 1 second -  

Delayed long fade to off (30 second delay)

On

Off

Summary of Contents for Sunnata HRST-PRO-N

Page 1: ...S S FASS On Off Front Accesible Service Switch FASS Adjust Light Bar Touch light bar to set lamps to desired level Slide to adjust light level LED 9 LED 8 LED 7 LED 6 LED 5 LED 4 LED 3 LED 2 LED 1 en español en français Overview MyLevel personalization gives you the ability to customize your Sunnata touch dimmer From the main dimmer you can adjust the brightness of the light bar as well as set a f...

Page 2: ...fter tapping the ON button once Low End Trim The lowest achievable light level to which the control can be adjusted Normal Operation Standard use of control ON OFF touch indicator lights will not be flashing Phase Select Mode Allows for selection of forward or reverse phase dimming The Phase Selectable dimmer default powers up in reverse phase PRO N only Press and Hold Sustained activation of the ...

Page 3: ...cally exit high end trim mode after 1 minute of inactivity 3 Slide your finger up or down the light bar to set the maximum light level high end The trim setting follows your finger as it is adjusted 4 Once the maximum light level is acceptable Tap the Off button to confirm your setting and exit into Normal Operation Note If at any time you are not happy with the settings you have achieved you may ...

Page 4: ...minute of inactivity 3 Slide your finger up or down the light bar to set the minimum light level low end The trim setting follows your finger as it is adjusted 4 Once the minimum light level is acceptable Tap the Off button to confirm your setting and exit into Normal Operation Note If at any time you are not happy with the settings you have achieved you may Restore Factory Default Settings See pa...

Page 5: ...ess and hold the On button Press the left side of the button to not mistakenly affect the light bar 3 While continuing to hold the On button push the Front Accessible Service Switch FASS in to the closed position Continue to hold the On button for approximately 6 seconds until LED 1 and LED 9 start flashing PRESS AND HOLD PULL MIN SEC continued on next page PUSH ...

Page 6: ...dicate current phase mode LED 9 Forward phase LED 1 Reverse phase default Touch the light bar to select the desired phase Note The control will automatically exit low end trim mode after 1 minute of inactivity Exit Phase Select Mode 5 Press and hold the On button for approximately 6 seconds to save and exit RELEASE LED 9 Forward phase LED 1 Reverse phase default On Off MIN SEC ...

Page 7: ...This level is indicated by an LED that glows brighter in the locator light state Locked Preset indicates that the device will come On to a user specified level Default Setting Tapping the On button always sets the lights to full Locked Preset at High end 1 Pull the Front Accessible Service Switch FASS out to the open position 2 Press and hold the Off button Press the left side of the button to not...

Page 8: ...elease the Off button and LED 1 will continue to flash slowly 4 times second Note The control will automatically exit this menu after 1 minute of inactivity 5 While LED 1 is flashing slowly 4 times second tap the Off button Some LEDs will be flashing quickly to indicate the current Preset setting MIN SEC PUSH HOLD RELEASE continued on next page Preset Light Level continued LED 9 Light Level Indica...

Page 9: ...e level they were at the last time they were turned off Touch and hold the middle of the light bar for 6 seconds until the LEDs begin scrolling b Locked Preset Lights turn on to this specified level no matter what level they were at the last time they were turned off Touch any part of the light bar to select a preset to lock The light bar will be flashing quickly 8 times second to indicate the pro...

Page 10: ...n 2 Press and hold the Off button Press the left side of the button to not mistakenly affect the light bar 3 While continuing to hold the Off button push the Front Accessible Service Switch FASS in to the closed position Continue to hold the Off button for approximately 6 seconds The light bar will begin to flash slowly 4 times second 4 Release the Off button and LED 1 will continue to flash slowl...

Page 11: ... setting 6 Touch the light bar in the area of the LED corresponding to your selection 7 Tap the Off button to confirm and save your settings 8 Press and hold the Off button for approximately 6 seconds to go back into Normal Operation LED 9 Light Level Indicator Locator Light LED 5 Light Bar Brightness LED 1 Preset Light Level FASS TOUCH On Off LED 9 Maximum Brightness LED 5 Medium Brightness LED 1...

Page 12: ...FASS out to the open position 2 Press and hold the Off button Press the left side of the button to not mistakenly affect the light bar 3 While continuing to hold the Off button push the Front Accessible Service Switch FASS in to the closed position Continue to hold the Off button for approximately 6 seconds The light bar will begin to flash slowly 4 times second 4 Release the Off button and LED 1 ...

Page 13: ...a of the LED corresponding to your selection 7 Tap the Off button to confirm and save your settings 8 Press and hold the Off button for approximately 6 seconds go back into Normal Operation LED 9 Light Level Indicator Locator Light LED 5 Light Bar Brightness LED 1 Preset Light Level FASS TOUCH On Off LED 7 Light Level Indicator ON Locator Light ON LED 5 Light Level Indicator ON Locator Light OFF L...

Page 14: ...light ON ON Light bar brightness Medium brightness Preset light level Tapping the On button always sets the lights to full locked preset at high end 1 TAP 3x in 1 sec HOLD 3 sec UNTIL 2 LOW TO HIGH 3 TAP 3x in 1 sec AND System Features HRST and RRST Models Only Note If setting up as part of a system phase settings and low end trim levels made on the dimmer will be over written by the system softwa...

Page 15: ... 1 844 LUTRON1 1 844 588 7661 Mexico 1 888 235 2910 Central South America 1 610 282 6701 UK AND EUROPE Lutron EA Limited 125 Finsbury Pavement 4th floor London EC2A 1NQ United Kingdom TEL 44 0 20 7702 0657 FAX 44 0 20 7480 6899 FREEPHONE UK 0800 282 107 Technical Support 44 0 20 7680 4481 lutronlondon lutron com ASIA Lutron GL Ltd 390 Havelock Road 07 04 King s Centre Singapore 169662 TEL 65 6220 ...

Reviews: