background image

INSTRUCTION | P9

INSTRUCTION | P8

Operating

Operating

!

PLEASE NOTE:


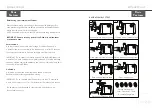
Please note: The head can be fixed into the grinder body prior to the 

accessories being attached if desired and as shown on page 6.


damage the appliance.

IMPORTANT: 

The flat side of the cutting blade should be facing the cutting plate

!

CAUTION: 


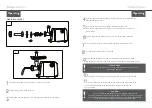
Do not use anything else apart from the food pusher supplied 

with this meat grinder to push meat through the head. NEVER use your 

hands or fingers to push meat through the head. (Fig.2)

1

2

S T E P 

1

S T E P 

2

S T E P 

3

S T E P 

4

S T E P 

5

S T E P 

6

S T E P 

7

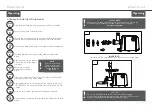
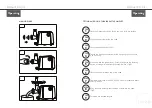
FITTING AND USING THE CUTTING BLADES

Place the Meat Grinder body, facing you on a level, dry surface.

Fit the grinding screw inside the head.

Fit the blade over the grinding screw ensuring that the flat side of 

the blade faces the cutting plate, away from the grinding screw.

Fit the cutting plate (depending on the type of mince you require).

The fixing ring then fits over the cutting plate and screws into 

place. 

Align the head into the grinder 

body.Screw the fasten button 

into place.

Before use, ensure all 

elements are securely in 

place. 

Place a bowl underneath the fixing ring for mince collection and 

the hopper plate on top of the head.

Place prepared meat into the hopper plate. Plug the power cord 

into a 230-240V AC power outlet and turn control dial to the ON 

position.

Using the food pusher, gently push meat through the head.

When grinding is complete, turn the dial to the off position to stop 

grinder.

S T E P 

10

S T E P 

8

S T E P 

9

S T E P 

11

!

NOTE:


Do not use excessive 

force to push meat 

through the head as it 

could damage the 

appliance.

Summary of Contents for ECLIPSE MEAT GRINDER

Page 1: ...LUVELE ECLIPSE MEAT GRINDER Instruction Booklet LEMG1200WUK co uk...

Page 2: ...the Grinder in a dishwasher or microwave oven Do not immerse the body of the Meat Grinder in water or other liquids Never operate damaged appliance incl Mains cable Operate appliance only through a pr...

Page 3: ...be made by children unless they are older than 8 years old and supervised Keep the appliance and its cord out of reach of children less than 8 years Check the power supply cord for damage from time t...

Page 4: ...while the Meat Grinder is in operation The motor must have completely stopped Once the blockage has been cleared unplug the appliance and clean out remaining food from the head of the Meat Grinder Hal...

Page 5: ...it the blade over the grinding screw ensuring that the flat side of the blade faces the cutting plate away from the grinding screw Fit the cutting plate depending on the type of mince you require The...

Page 6: ...press the ON button 1 2 1Place the meat grinder body facing you on a level dry surface 2Fit the grinding screw inside the head 3Fit the blade over the grinding screw ensuring that the flat side of th...

Page 7: ...ding screw inside the head Fit the kebbe attachment Fig 1 Secure the kibbe attachments with the fixing ring Loosely secure with fixing ring Align head into the grinder body Screw and tighten the faste...

Page 8: ...ind the meat Freshly made sausages are better when allowed to sit in the refrigerator for a minimum of 12 hours and for up to 24 hours Fresh sausages are highly perishable products as they do not cont...

Page 9: ...e requested if and where appropriate and if it will ensure a faster resolution Generally if you have an issue with your item within 30 days of receiving it we will email you a prepaid return label tha...

Reviews: