background image

Safety Instructions

P/3

Please be sure to read all of the following instructions before using the 

Luvele Biltong Maker. Keep the instructions for future reference.


Remove all packaging material from Biltong Maker before first use.

Do not place the Biltong Maker near the edge of a bench or table during 

operation. Ensure the surface is level and free of liquids or other substances.

Do not place the Biltong Maker near or on a hot stove or oven. Do not place 

any parts of the Biltong Maker in a dishwasher or microwave oven.

Never operate damaged appliance, including damaged main cable.

Always use your appliance from a power outlet of the voltage (A.C. only) 

marked on the appliance.

Do not use the appliance for any purpose other than its intended use.

Do not immerse the appliance in water or any other liquid unless recommended.

Never remove main cable with wet hands, or lay cable on hot surfaces, 

or let cable come into contact with hot surfaces.

Unplug the appliance after each use, when the appliance in not in use and before

changing accessories or cleaning the appliance.

Do not try and perform any maintenance, other than cleaning. For any 

maintenance issues please contact Luvele at 

support@luvele.com.

Use well away from walls and curtains.

Do not use near sink.

Summary of Contents for LBTM400W

Page 1: ...Luvele Biltong Maker LBTM400W Instructions...

Page 2: ...Congratulations on the purchase of your new Luvele Biltong Maker...

Page 3: ...erate damaged appliance including damaged main cable Always use your appliance from a power outlet of the voltage A C only marked on the appliance Do not use the appliance for any purpose other than i...

Page 4: ...nsible for their safety Children 8 years and above can use this appliance however they should be supervised to ensure that they do not play with the appliance Children should not play with the applian...

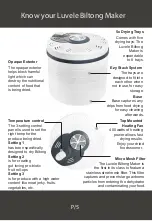
Page 5: ...Temperature control The 3 setting control panel is used to set the right temp for the produce being dried Setting 1 has been specifically designed to dry Biltong Setting 2 is for creating gut loving...

Page 6: ...ll 5 trays onto the base to create a hollow structure then place the grey biltong rack onto the top tray Hang your biltong Place top fan cover onto the grey biltong rack then begin drying To setup the...

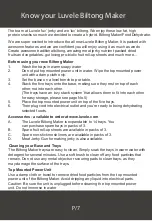
Page 7: ...ge No 5 5 Place the top mounted power unit on top of the five trays 6 Then plug cord into electrical outlet and you re ready to being dehydrating selected foods Accessories available to order at www l...

Page 8: ...rator will produce Setting 1 approx 30 degrees C Setting one is the Biltong setting It has been specifically designed to dry Biltong at the optimal temperature of between 30 and 35 degrees C Setting 2...

Page 9: ...more chewy than fresh or frozen fruit and vegetable Dried food used in cooking will absorb additional liquid so adjust the recipe accordingly by adding more water Packaging Dried foods should be pack...

Page 10: ...ver it is important the biltong strips do not touch the base or sides of the Biltong Maker Basting seasoning recipe for approximately 2kg of meat 250ml vinegar for basting 1 2 cup ground coriander 2 T...

Page 11: ...When making biltong setting two can be using if faster drying it desired Please note the higher temperature and air flow of setting two will dry the outside of the meat fast than the inside creating...

Page 12: ...minimize liquid or juice from dripping down from one tray onto another The mesh liners are non stick easy to clean heat resisting reusable They are available in packs of three Fruit Roll up Sheet The...

Page 13: ...drying racks Blanching Some fruits with natural protective wax coatings e g figs grapes and prunes need to be blanched to speed the drying process To blanch place whole fruits in boiling water for 1...

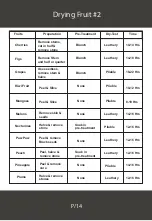
Page 14: ...rter Blanch Blanch Use seedless remove stem halve None None None Remove skin seeds Halve remove stone Peel remove Black seeds Peel halve remove stone Peel remove core Halve remove stones Soak in pre t...

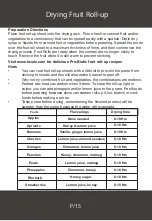
Page 15: ...ets and this will also make it easier to peel off Why not try combined fruit and vegetables the combinations are endless Pureed raw food can darken when it dries To keep the roll up light in colour yo...

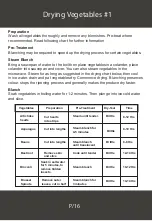
Page 16: ...y Commence drying Blanching preserves colour stops the ripening process and generally makes the produce dry faster Blanch Soak vegetables in boiling water for 1 2 minutes Then plunge into ice cold wat...

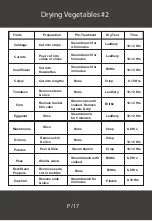
Page 17: ...Slice None None 10 12 Hrs 10 12 Hrs 10 12 Hrs 10 12 Hrs 10 12 Hrs 10 12 Hrs 6 8 Hrs 12 16 Hrs 6 8 Hrs 6 8 Hrs 8 10 Hrs Cabbage Carrots Cauliflower Celery Corn Eggplant Mushrooms Onions Peas Red Green...

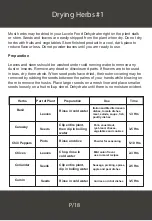
Page 18: ...alms of your hands while blowing on them to remove the husks Place larger seeds on a mesh liner and place smaller seeds loosely on a fruit roll up sheet Dehydrate until there is no moisture evident 1...

Page 19: ...ter Rinse in cold water Rinse in cold water Rinse in cold water Mustard Seeds Corned beef sauerkraut salad dressings cabbage Oregano Leaves Italian Greek Mexican tomato dishes Rosemary Leaves Barbecue...

Page 20: ...2 3 weeks Drying Flowers You can dry your own flowers blossoms and petals using your new Luvele express Food Dehydrator Preparation Directions Cut flowers when they are dry and cool Choose flowers th...

Page 21: ...will ensure a faster resolution Generally if you have an issue with your item within 30 days of receiving it we will email you a prepaid return label that can be printed out and used to send the item...

Page 22: ......

Reviews: