background image

INSTRUCTION | P15

INSTRUCTION | P14

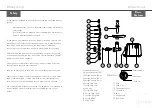
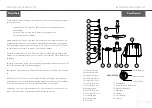
Hints & Tips

• Remove all large pieces of fat from meat before grinding.
• For fatty cuts of meat we recommend that you cut meat into 5cm cubes.
  We also recommend using the 8mm cutting plate for fatty cuts of meat. 
  If the 4mm cutting plate is used and there is excess fat in the meat it can 
  cause the fat to block the grinder head. This should be avoided.
  For lean cuts of meat; cut into strips approximately 15cm long and 5cm 
  thick or into cubes.
• Remove any bones from meat as this may damage the grinder.
• To make sure that all meat has come through mincing, place a 20cm sheet 
  of crushed baking paper into the grinder after the last piece of meat. 
  This will push through any remaining meat and will not damage the grinder.
• If changing cutting plates or changing to another attachment, always ensure 
  that any meat that is around the fixing ring or blade is removed. This will 

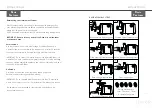
• Unused fresh casings must be drained, covered with salt and frozen.
• Sausages should be stored in an airtight container or sealed with cling 
  film in the refrigerator.
• A good way to make sure that all the sausage mince has come through the 
  mincer is to break up 1-2 slices of bread and push though mincer, this will 
  force any remaining mixture into the casing.
• Gentle cooking over medium heat prevents interior from boiling which in turn 
  bursts the skin, leaking out moisture and flavour. This then produces a hard 
  textured product.

HITS FOR GRINDING MEAT

HINTS FOR SAUSAGE MAKING CONT.

• Salt is an important component of sausage making. It is responsible for the control 
of growth of micro-organisms. It also aids in dissolving the myosin (protein) out of the 
muscle fibres which then acts as a glue to bind the meat. 
• Freshly made sausages are better when allowed to sit in the refrigerator for a 
minimum of 12 hours and for up to 24 hours.
• Fresh sausages are highly perishable products as they do not contain the 
  preservatives that are present in most store-bought sausages. They should be
cooked within 2-3 days of being made or frozen.
• Ideally, sausages should contain up to 30% fat content to provide a tender and 
moist product.
• Sausages should be thoroughly cooked to kill all microbes. Internal temperatures 

must reach 70-75°c.

• Intentional piercing of sausage skin releases much needed moisture but 
  prevents the sausage from possibly splitting and being disfigured.
• Things to look for when making sausages:
  Choose good quality ingredients - Fat to meat ratio (30:70) - Spices and 
  seasoning should be combined in amounts that compliment the meat type.
• Casings (skin) can be purchased from butchers that supply your fresh meat. 
  If preserved in salt, it should be soaked in lukewarm 

HINTS FOR SAUSAGE MAKING

Hints & Tips

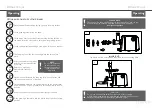
Cleaning

When you have completed grinding, unplug the meat grinder from the power outlet.

Ensure that all accessories and attachments are washed thoroughly with hot, soapy
water.

IMPORTANT:

 Do not place any parts of the Grinder in a dishwasher.

To remove meat that is stuck in the fine and medium cutting plates, use hot, soapy 
water and a scrubbing brush, clean thoroughly.

Ensure that all attachments are thoroughly cleaned and free of 
meat to prevent contamination. Then dry thoroughly before storing.

NOTE:

 Always unplug the grinder to clean. Do not wash/immerse the 

grinder body in water – clean this part only by wiping using a damp cloth.

!

WARNING: 


Take care in washing all attachment components to ensure that there are no 
food particles left in/around the cutting plates, sausage/kebbe making attach-
ments, blade and grinding screw. We do not recommend dishwashing any 

of the mincing attachments.

Summary of Contents for LEMG1200WEU

Page 1: ...LUVELE ECLIPSE MEAT GRINDER Instruction Booklet LEMG1200WEU eu...

Page 2: ...the Grinder in a dishwasher or microwave oven Do not immerse the body of the Meat Grinder in water or other liquids Never operate damaged appliance incl Mains cable Operate appliance only through a pr...

Page 3: ...t be made by children unless they are older than 8 years old and supervised Keep the appliance and its cord out of reach of children less than 8 years Check the power supply cord for damage from time...

Page 4: ...while the Meat Grinder is in operation The motor must have completely stopped Once the blockage has been cleared unplug the appliance and clean out remaining food from the head of the Meat Grinder Hal...

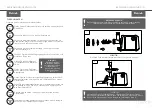
Page 5: ...ction and the hopper plate on top of the head Place prepared meat into the hopper plate Plug the power cord into a 230 240V AC power outlet and turn control dial to the ON position Using the food push...

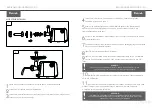
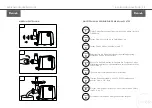
Page 6: ...der body 6Align the head into the grinder body Screw the fasten button into place 7Once the grinder body is in place tighten the fixing ring and ensure all 8Place the hopper plate on top of the head 9...

Page 7: ...ding screw inside the head Fit the kebbe attachment Fig 1 Secure the kibbe attachments with the fixing ring Loosely secure with fixing ring Align head into the grinder body Screw and tighten the faste...

Page 8: ...ind the meat Freshly made sausages are better when allowed to sit in the refrigerator for a minimum of 12 hours and for up to 24 hours Fresh sausages are highly perishable products as they do not cont...

Page 9: ...riate and if it will ensure a faster resolution Generally if you have an issue with your item within 30 days of receiving it we will email you a prepaid return label that can be printed out and used t...

Page 10: ...des Fleischwolfs in eine Sp lmaschine oder Mikrowelle Tauchen Sie den K rper des Fleischwolfs nicht in Wasser oder andere Fl ssigkeiten Verwenden Sie niemals besch digte Ger te inkl Netzkabel Betreibe...

Page 11: ...sie nicht ber 8 Jahre alt sind und beaufsichtigt werden Bewahren Sie das Ger t und sein Kabel au er Reichweite von Kindern unter 8 Jahren auf Pr fen Sie von Zeit zu Zeit ob das Netzkabel besch digt is...

Page 12: ...lf in Betrieb ist Der Motor muss vollst ndig gestoppt sein Sobald die Verstopfung entfernt ist trennen Sie das Ger t vom Stromnetz und entfernen Sie Speisereste aus dem Einf llstutzen des Fleischwolfs...

Page 13: ...ie flache Seite der Klinge auf der Lochscheibe liegt und von der Schnecke weg zeigt Setzen Sie die Lochscheibe abh ngig von der gew nschten Hackfleischsorte ein Schieben Sie jetzt den Befestigungsring...

Page 14: ...erplatte auf den Einf llstutzen 9Legen Sie die vorbereitete Wurstmasse oder unverarbeitetes Fleisch auf die Trichterplatte Stecken Sie das Netzkabel in eine 230 240V Steckdose ein und dr cken Sie die...

Page 15: ...in Setzen Sie den Kibbeh Aufsatz ein Abb 1 Befestigen Sie die Kibbeh Aufs tze mit dem Befestigungsring Schrauben Sie den Ring locker fest Richten Sie den Einf llstutzen im Geh use aus Schrauben Sie de...

Page 16: ...ps Tricks Salz ist ein wichtiger Bestandteil der Wurstherstellung da es das Wachstum von Mikroorganismen kontrolliert Es hilft auch das Myosin ein Protein aus den Muskelfasern zu l sen die dann wie ei...

Page 17: ...en nach Erhalt Ihres Ger ts ein Problem auftritt senden wir Ihnen im Allgemeinen ein frankiertes R cksendeetikett per E Mail das ausgedruckt und zur R cksendung des Ger ts verwendet werden kann In der...

Page 18: ...BEDIENUNGSANLEITUNG S18 Notes LUVELE ECLIPSE FLEISCHWOLF Bedienungsanleitung LEMG1200WEU HACHOIR VIANDE LUVELE ECLIPSE Instructions LEMG1200WEU eu...

Page 19: ...e plongez pas le corps du hachoir viande dans l eau ni dans un autre liquide N utilisez jamais un appareil endommag y compris au niveau du c ble d alimentation N utilisez l appareil qu avec une prise...

Page 20: ...oivent pas tre effectu s par des enfants moins qu ils ne soient g s de 8 ans au moins et surveill s Maintenez l appareil et son c ble hors de port e d enfants de moins de 8 ans V rifiez r guli rement...

Page 21: ...endant que le hachoir viande est en marche Le moteur doit tre compl tement arr t Une fois le blocage d gag d branchez l appareil et enlevez les restes d aliments de la t te du hachoir viande Mode puis...

Page 22: ...plate de la lame soit en face de la grille de coupe l oppos de la vis de broyage Fixez la grille de coupe selon le type de viande que vous voulez hacher L anneau de fixation vient alors se fixer sur...

Page 23: ...la viande pr par e sur le plateau de chargement Branchez le c ble d alimentation sur une prise 230 240V AC et mettez le cadran de commandes sur ON 1 2 10A l aide du poussoir poussez doucement le m la...

Page 24: ...l accessoire pour kibbe Fig 1 Fixez l accessoire pour kibbe avec l anneau de fixation en ne serrant pas trop Ins rez la t te dans le corps du hachoir Vissez et serrez le bou ton de verrouillage apr s...

Page 25: ...urs apr s la fabrication ou bien surgel es Id alement les saucisses devraient contenir jusqu 30 de mati res grasses pour donner un produit tendre et pas sec Les saucisses doivent tre cuites parfaiteme...

Page 26: ...ans retourner l article Des photos du probl me peuvent tre demand es si n cessaire et assurera une solution plus rapide En g n ral si vous rencontrez un probl me dans les 30 jours de r ception nous vo...

Page 27: ...INSTRUCTIONS P18 Notes HACHOIR VIANDE LUVELE ECLIPSE Instructions LEMG1200WEU TRITACARNE LUVELE ECLIPSE Istruzioni LEMG1200WEU eu...

Page 28: ...un forno a microonde Non immergere il corpo del tritacarne in acqua o altri liquidi Non utilizzare mai un dispositivo danneggiato incluso il cavo d alimentazione Utilizza il dispositivo solo tramite u...

Page 29: ...eni l apparecchio ed il cavo d alimentazione fuori dalla portata dei bambini d et inferiore agli 8 anni Controlla regolarmente il cavo d alimentazione per la presenza d eventuali danni Se il cavo dann...

Page 30: ...mentre il tritacarne in fun zione Il motore deve essere completamente fermo Una volta che il blocco stato rimosso scollega il dispositivo ed elimina il resto del cibo dalla testa del tritacarne Media...

Page 31: ...coclea all interno della testa Monta la lama sulla coclea assicurandoti che il lato piano della lama sia rivolto verso il disco di macinazione e opposto alla coclea Monta il disco di macinazione seco...

Page 32: ...la testa 9Piazza la miscela per la salsiccia preparata o la carne non lavorata sulla tramoggia collega il cavo d alimentazione ad una presa da 230 240V e premi il pulsante ON 1 2 10Usando lo spintore...

Page 33: ...e Fig 1 Fissa l accessorio per il kebbe con l anello di fissaggio Non stringe re troppo l anello di fissaggio Allinea la testa nel corpo del tritacarne Avvita e stringi con cura assicurandoti che tutt...

Page 34: ...rodotto tenero e non secco Le salsicce dovrebbero essere ben cotte per eliminare tutti i microbi Le tempera ture interne devono raggiungere i 70 75 c Sebbene la foratura intenzionale della pelle della...

Page 35: ...e senza un reso Potremmo anche richiedere delle immagini del guasto se sar appropriato e garantir una risoluzione pi rapida In generale se riscontri un problema con il tuo articolo entro 30 giorni dal...

Page 36: ...ISTRUZIONI P18 Notes TRITACARNE LUVELE ECLIPSE ISTRUZIONI LEMG1200WEU PICADORA DE CARNE LUVELE ECLIPSE Instrucciones LEMG1200WEU eu...

Page 37: ...cadora es apta para microondas ni lavavajillas No sumerja el cuerpo de la picadora en agua u otros l quidos Nunca ponga en funcionamiento artefactos da ados incl el cable Conecte los artefactos nicame...

Page 38: ...Mantenga el aparato y su cable fuera del alcance de ni os menores de 8 a os Compruebe peri dicamente que el cable de alimentaci n no est da ado Si es tuviera da ado debe ser reemplazado por el fabrica...

Page 39: ...ra quitar la obstrucci n IMPORTANTE No seleccione la funci n inversa mientras la picadora est funcionando El motor debe estar completamente detenido Una vez eliminada la obstrucci n des enchufe el apa...

Page 40: ...tornillo sinf n asegur ndose de que su cara plana quede orientada hacia la placa de corte y opuesta al tornillo Coloque la placa de corte seg n el tipo de picado deseado Coloque la anilla de ajuste so...

Page 41: ...a bandeja de la tolva Enchufe el cable a una toma de corriente de 230 240V AC y seleccione ON 1 2 10Presione suavemente el alimento con el empujador por el cabezal 11Mientras la mezcla pasa por el cab...

Page 42: ...cabezal Coloque el accesorio para kibbe Fig 1 Asegure los accesorios con la anilla de ajuste Sujete holgada mente con la anilla de ajuste Alinee el cabezal en el cuerpo de la picadora Enrosque y ajust...

Page 43: ...ci n de salchichas ya que controla el crecimiento de microorganismos Tambi n ayuda a disolver la miosina prote na de las fibras musculares que luego act a como un pegamento para unir la carne Las salc...

Page 44: ...si fuera apropiado y nos garantizara una resoluci n m s r pida En general si tiene un problema con su art culo dentro de los 30 d as de haberlo recibido le enviaremos por correo electr nico una etique...

Page 45: ...PICADORA DE CARNE LUVELE ECLIPSE Instrucciones LEMG1200WEU...

Reviews: