background image

12

12.  ‘Terugspreek’-indicator


 Verschijnt wanneer de terugspreekfunctie wordt ingedrukt, zolang u de 

knop ingedrukt houdt kunt u met uw kind praten via de microfoon.

Let op:

a) De “Talk Back” knop verschijnt alleen in live view mode in één camera live view modus.
b) Wanneer de camera slaapliedjes afspeelt zullen deze worden gepauzeerd tijdens het terugspreken.
c) Het camera volumeniveau voor de talk back is hetzelfde als voor de slaapliedjes(select

>

>

 ).

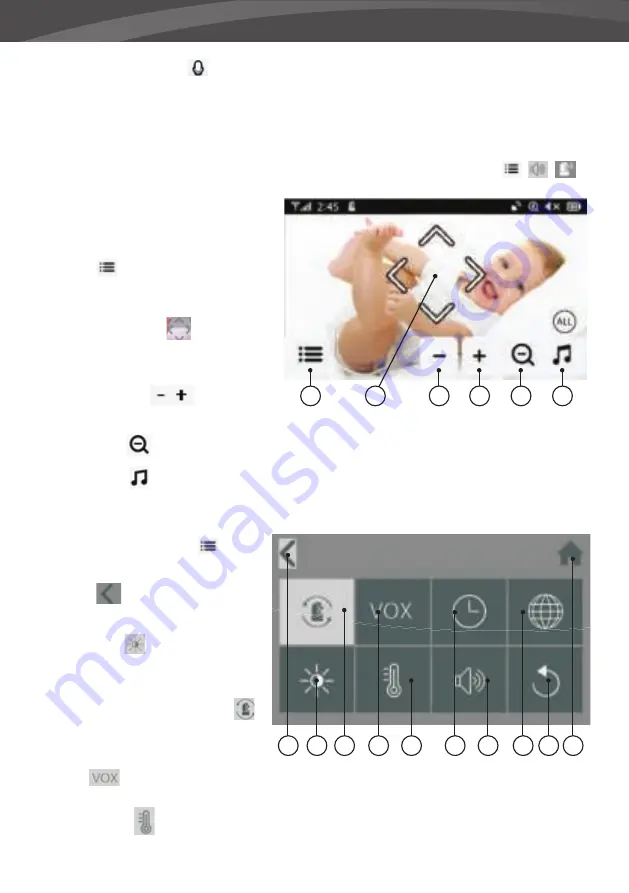
Bij aanraking van het touch screen zal 
het scherm zoals hier aan de rechterzijde 
worden weergegeven.

13.  Menu


 Hier kunnen verschillende 

monitor en camera instellingen worden 
aangepast.

14.  Navigatie Knoppen 

Gebruik de pijl 

icoontjes in het midden van het scherm 
om de camera te bewegen.

15.  Monitor Volume


 Gebruik deze 

knoppen om het volume omhoog  ‘+’ & omlaag ‘-’ aan te passen.
  

16.  Zoom knop


Geeft de mogelijkheid in te zoomen tot x1, x1.5 & x2 digitale zoom ratio.

17.  Slaapliedjes


 Druk op het slaapliedjes icoon om de slaapliedjes aan en uit te zetten. Speelt 3 

voorgeprogrameerde liedjes af. Kies 1 liedje naar keuze om deze af te spelen of kies “All” om alle 4 de 
liedjes om beurten af te laten spelen (van 1 naar 2 naar 3 en weer terug naar 1).

Wanneer het menu opent  

 opent 

het scherm dat je hier rechts ziet.

18.  Terug 

 De instellingen opslaan en 

terug gaan naar de vorige pagina. 

19.  Helderheid 

  Hier kun je de 

helderheidsinstellingen voor elke 
camera individueel aanpassen.

20.  Camera koppelen / ontkoppelen


Op het systeem kunnen tot 4 camera’s 
worden aangesloten.

21.  VOX 


 Stel hier de geluidsgevoeligheid van de VOX functie in om het geluidsniveau waarbij de 

monitor inschakelt aan te passen.

22.  Temperatuur 

 Zet de waarde op Celsius of Fahrenheit en stel hier de boven en onder limieten in 

voor het temperatuur alarm.

13

18

19

20

21

22

23

24

25

26 27

14

15

15

16

17

Summary of Contents for SUPREME CONNECT 2

Page 1: ...1 LUVION Premium Baby products SUPREME CONNECT 2 HANDLEIDING INSTRUCTION MANUAL MANUAL D INSTRUCTIONS ИНСТРУКЦИЯ ПО ЭКСПЛУАТАЦИИ ...

Page 2: ......

Page 3: ...3 LUVION Premium Baby products SUPREME CONNECT 2 ...

Page 4: ...e informatie om veilig en met plezier gebruik te kunnen maken van deze Luvion Supreme Connect 2 babyfoon Voordat u de babyfoon gebruikt adviseren wij u deze handleiding aandachtig door te lezen Wij vragen uw extra aandacht voor de veiligheidsinstructies LUVION Delft The Netherlands www luvion com VEILIGHEIDSINSTRUCTIES WAARSCHUWING VERSTIKKINGSGEVAAR Houd de adapterkabels buiten het bereik van kin...

Page 5: ... hiervoor contact op met de verkoper of locale distributeur Accu Vervang de accu alleen door een originele Luvion accu van hetzelfde type Gebruik van een verkeerde accu kan een explosie veroorzaken Zorg ervoor dat bij het eerste gebruik de Supreme Connect 2 volledig is opgeladen Dit garandeert een optimale levensduur van de accu De accu is volledig opgeladen wanneer het indicatielampje aan de zijk...

Page 6: ...6 OVERZICHT OUDER UNIT MONITOR 20 2 3 6 4 5 7 8 1 9 ACHTERAANZICHT VOORAANZICHT ...

Page 7: ...en worden door dit compartiment te openen Gebruik hiervoor alleen een geschikte originele Luvion accu 8 Voet Standaard De monitor ouder unit kan met de voet rechtop gezet worden 9 Luidspreker Produceert het geluid van de camera baby unit OVERZICHT BABY UNIT CAMERA ACHTERAANZICHT VOORAANZICHT 2 3 6 4 5 7 1 Lichtsensor Corrigeert het beeld wanneer het licht van de omgeving verandert 2 IR LED s Geeft...

Page 8: ... bij het toevoegen van een extra camera of wanneer de ouderunit de babyunit niet kan vinden Buiten Bereik Zie het Pairing hoofdstuk voor meer informatie 11 Montageframe connectoren Verbindt de baby unit met het bijgeleverde montageframe welke bevestigd kan worden aan muur of plafond 12 Reset knop Druk op deze knop om de camera te resetten of de comera modus te wijzigen 10 ...

Page 9: ...nit plaatst voordat u de unit gaat gebruiken Probeer rekening te houden met de lengte van de adapter snoeren en een beschikbaar stopcontact om zo de camera van stroom te voorzien 1 Haal de baby unit voorzichtig uit de verpakking 2 Plaats of bevestig de baby unit U kunt de baby unit plaatsen op een tafel of kastje of hem bevestigen aan een muur of plafond met de bijgeleverde montageframe plugs en s...

Page 10: ...it zal de video weergeven van de babyunit indien beide aan staan en binnen bereik van elkaar staan Het bericht Buiten Bereik wordt weergeven op het scherm van de ouderunit wanneer de babyunit buiten bereik staat uit staat of wanneer de units elkaar niet herkennen Zie pairing hoofdstuk Wall mounted Ceiling mounted ...

Page 11: ...chijnen 7 Batterij indicator Geeft aan hoe vol de batterij nog is De batterij indicator geeft het laadniveau in vijf niveaus aan Batterij bijna leeg knipperend rood Batterij Rood Batterij Wit 1 streepje Battery Wit 2 streepjes Full Battery Wit 4 streepjes de adapter is niet aangesloten Wanneer de adapter is aangesloten zal een bliksem icoontje worden weergegeven 8 Temperatuur indicator Geeft de te...

Page 12: ...aag aan te passen 16 Zoom knop Geeft de mogelijkheid in te zoomen tot x1 x1 5 x2 digitale zoom ratio 17 Slaapliedjes Druk op het slaapliedjes icoon om de slaapliedjes aan en uit te zetten Speelt 3 voorgeprogrameerde liedjes af Kies 1 liedje naar keuze om deze af te spelen of kies All om alle 4 de liedjes om beurten af te laten spelen van 1 naar 2 naar 3 en weer terug naar 1 Wanneer het menu opent ...

Page 13: ...e van de baby monitor eventueel omhoog worden uitgeklapt LET OP Als de ouder unit in alle gevallen buiten bereik blijft aangeven controleer dan of de camera aan staat en probeer opnieuw te pairen zie Pairing OUT OF RANGE 23 Datum Tijd Voedingstimer Stel hier de datum tijd en of voedingstimer in 24 Camera Alarm Volume Pas hier het camera en of alarm volume niveau aan 25 Taalinstellingen Stel hier d...

Page 14: ...voeligheid worden aangepast De VOX functie kan voor iedere camera individueel worden aangepast druk op de camera symbolen bovenin het beeld om de gewenste camera te selecteren Kies na het selecteren van de juiste camera of de VOX functie Aan of Uit moet staan Bij uitgeschakelde VOX modus zal de monitor continue actief blijven Wanneer de VOX modus actief is zal de monitor na 120 seconden in slaap m...

Page 15: ...ovenin op het camerasymbool met het cameranummer waarvan je de helderheid wenst aan te passen MENU TEMPERATUUR The baby unit camera is uitgerust met een temperatuur sensor Hierdoor kun je een alarm instellen waardoor je gewaarschuwd wordt als de temperatuur te hoog laag is Deze functie is niet bedoeld als vervanging van ouderlijk toezicht Druk op Aan of Uit op het touch scherm om de alarmfunctie a...

Page 16: ...symbool om het volumeniveau van de monitor alarm functies aan te passen Gebruik de symbolen om het volume omlaag omhoog aan te passen MENU FABRIEKSINSTELLINGEN Gebruik dit alleen wanneer je de monitor naar de fabrieksinstellingen wilt terugzetten Gebruik het touch scherm om je keuze te bevestigen Ja Hierna worden de monitor instellingen teruggezet naar de fabrieksinstellingen LET OP Het herstellen...

Page 17: ...d worden op de verschillende kanalen Zet de baby unit camera aan door de aanknop om te zetten naar de On positie Gebruik de Aan Uit Knop om de ouderunit aan te zetten Wacht totdat het Luvion logo verdwenen is Druk op het touch scherm om het bedienings scherm te activeren Druk vervolgens op de menu knop Druk op het pairing menu icoon om het CAMERA PAIRING menu te openen 1 2 3 4 LUVION ...

Page 18: ...aan de onderkant van de baby unit camera om deze te verbinden met de ouder unit Het beeld van de camera zou nu op het scherm moeten verschijnen P A I R Druk op één van de vrije camera kanalen om de camera hieraan te koppelen 6 5 PLEASE PRESS PAIR KEY ON CAMERA SIDE 12 RESET ...

Page 19: ...t aan te raden de babyfoon monitor uit te schakelen IOS EN ANDROID INSTALLATIE Download en installeer de SmartBabyCam app voor iOS of Android Schakel de camera in druk op de reset knop en houd deze ingedrukt totdat het lampje onderop de camera 3 keer knip pert Druk na ongeveer 5 seconden opnieuw kort 1 2 seconden op de reset knop Het camera nachtlampje zal nu snel gaan knipperen Druk na ongeveer 3...

Page 20: ...m _ Druk na het aanpassen van het wachtwoord op het Instellingen aanpassen icoon selecteer WiFi Setting en voer het netwerk SSID in je kunt hier alleen 2 4GHz netwerken kiezen van jouw eigen thuisnetwerk en voer het wachtwoord hiervan in en druk op send Het nachtlampje zal nu stoppen met knip peren en continue aan blijven staan totdat de installatie is voltooid waarna het nachtlampje 3 keer knippe...

Page 21: ...etter één cijfer en één speciaal teken choose from _ Druk na het aanpassen van het wachtwoord op het Instellingen aanpassen icoon se lecteer WiFi Setting en selecteer het netwerk SSID je kunt hier alleen 2 4GHz netwerken kiezen van jouw eigen thuisnetwerk en voer het wachtwoord hiervan in en druk op send Het nachtlampje zal nu stoppen met knip peren en continue aan blijven staan totdat de installa...

Page 22: ...aar is Zorg ervoor dat u de camera verbonden houdt met internet tijdens het instal latieproces van de firmware Wanneer de nieuwe firmware is geïnstalleerd wordt het bericht OTA update is over please check if the de vice is functioning normally weerge geven Druk op OK Controleer of alles naar behoren functioneert uw babyfoon is nu weer klaar voor gebruik FIRMWARE UPDATE IOS KIJK VOOR ANDROID OP DE ...

Page 23: ... beschikbaar is Om de firmware bij te werken ga naar de liveweergavepa gina de camera moet online zijn en raak het menu icoon in de rech terhoek aan en selecteer Firmware Update Druk op OK om te beginnen met het updaten van de firmware als er nieuwe firmware beschikbaar is Zorg ervoor dat u de camera verbonden houdt met internet tijdens het instal latieproces van de firmware Wanneer de nieuwe firm...

Page 24: ... beelden in het volledige scherm van de telefoon door de telefoon 90 graden te draaien van portret naar landschap modus Naast de live view bediening kunnen somige functies nog via het menu worden aangepast om het menu in gaan druk je op het icoon Hier kun je de onderstaande instellingen aapassen NAME Hier kun je de cameranaam aanpassen CONNECTION STATUS Hier zie je de huidige connectie status staa...

Page 25: ...p de volume knop aan de bovenkant van de ouderunit 2 Controleer of er wel geluid is in de omgeving van de baby unit 3 Indien er een harde piep aanwezig is breng de ouder unit verder weg van de baby unit Het beeld hapert de resolutie is slecht 1 Probeer de units dichter bij elkaar te brengen 2 Probeer de units uit de buurt van grote objecten of muren te plaatsen om het bereik te verbeteren 3 Klap d...

Page 26: ...pparaten die op 2 4Ghz werken zijn van invloed op het bereik Baby unit camera Beeld Sensor Type 1 4 Color CMOS Image Sensor Effectieve Pixels H 1280 px V 1024 px Beeld Resolutie Hoog 1280 720 MAX 1 7Mbps Laag 854 480 MAX 0 7 Mbps Wit Balans Auto Lens 3 95 mm F 2 2 Field of View 55 IR On Off 15 25 Lux Off 5 15 Lux On IR LED Type Nacht Visie 940 nm 5 m Speaker Output 0 5 W Max Voedingsspanning 5 Vdc 10...

Page 27: ...temperatuur Bereik 10 40 Luchtvochtigheid Omgeving Bereik 0 85 LET OP Buitenshuis gebruik in Frankrijk Italië en de Oekraïne niet toegestaan Dit product is in overeenstemming met de essentiële eisen zoals omschreven in de Europese richtlijnen De verklaring van conformiteit is beschikbaar op https www luvion nl site wp content uploads 2019 11 Conformiteitsverklaring Supreme Connect 2 pdf ...

Page 28: ...r website www luvion com This user manual provides you with all information necessary for a safe pleasant and easy use of the Luvion Supreme Connect 2 Before use we ask you to thoroughly read this user manual We ask for your special attention for the safety instructions below LUVION Delft The Netherlands www luvion com SAFETY INSTRUCTIONS WARNING STRANGULATION HAZARD Keep the power cord out of chi...

Page 29: ...ler or distributor Batteries Don t replace the battery by a incorrect type Only use original Luvion Supreme Connect 2 batteries us ing incompatible batteries may cause risk of explosion Fully charge the monitor before first use to ensure an optimal battery capacity The battery is fully charged when the charging light on the side of the monitor turns green Dispose of used batteries according to the...

Page 30: ...30 OVERVIEW OF PARENT UNIT MONITOR 20 2 3 6 4 5 7 8 1 9 BACK VIEW FRONT VIEW ...

Page 31: ...ables you to position the parent unit on a flat surface 9 Speaker Produces the sound from the baby unit OVERVIEW OF BABY UNIT CAMERA BACK VIEW FRONT VIEW 2 3 6 4 5 7 1 Light Sensor Allows the baby unit to correct itself under changing light conditions 2 IR LED s Allows for 5m distance of night vision automatically activates within low lights conditions 3 Camera lens Detects the visual environment ...

Page 32: ...hen installing an additional camera or when the monitor does not recognize the baby unit Consult page xx for more information on the pairing process 11 Mounting frame connectors Connects the baby unit to the included mounting frame which can be attached to a wall or ceiling 12 Reset button Press this button to reset the camera or change camera mode 10 ...

Page 33: ...ake in account the length of the power cable and the position of the power socket because the baby unit camera always needs to be connected to the power grid 1 Carefully unpack the baby unit camera 2 Place the baby unit in the preferred position You can place the baby unit on a table cabinet or you can mount it on a wall or ceiling You can use the mounting frame to mount the camera on a wall or ce...

Page 34: ...nt unit will display the video of the baby unit when both are switched on and within range of each other The message Out of range will be displayed on the screen of the parent unit when the baby unit is outside the range of the parent unit or when the baby unit is not switched on or recognized Wall mounted Ceiling mounted ...

Page 35: ...nitor Speaker Mute Indicates the monitor s speaker is muted 7 Battery indicator Indicates the battery level of the parent unit The battery level indicator within will show the level of charge in five states Low battery Flashing Red Battery Red Battery White 1 bar Battery White 2 bars Full Battery White 4 bars the power supply is not connected When the power supply is connected the lightning bolt i...

Page 36: ...zoom ratio 17 Lullaby Press the Lullaby icon to turn lullabies ON OFF Plays 3 pre programmed songs Choose 1 specific song or All above the 1 2 3 or all will be displayed You can choose one specific lullaby you want to play or have all 3 lullabies play subsequently from 1 to 2 to 3 and back to 1 again Inside the monitor s menu you ll see the screen on the right 18 Back Save the settings and return ...

Page 37: ...een of the parent unit will be black and display the warning message Out of Range To improve the range of the baby monitor move the antenna of the baby monitor upwards NOTE If moving the baby and parent unit closer together does not help try re pairing the baby and parent unit see Pairing chapter OUT OF RANGE 25 Language Setting language for the monitor six options English German French Italian Ne...

Page 38: ... the sensitivity for the vox function for each separate camera The VOX can be set differently for each camera press the camera symbols on the top of the screen to switch between cameras After selecting the right camera choose whether you want VOX On or Off If VOX is turned off the monitor screen will always stay on When VOX mode is active the monitor will go into VOX sleep mode after xx seconds Choos...

Page 39: ...ightness The brightness can be set differently for each camera press the camera symbols on the top of the screen to switch between cameras MENU TEMPERATURE The baby unit camera is equipped with a temperature sensor You can set a temperature alert to get notified when the temperature is either too cold hot This feature should only be used as an indication and is not intended as a substitute for adul...

Page 40: ...mbol to adjust the volume level for the monitor s alarm functions Use the symbols to de increase the volume level MENU DEFAULT SETTINGS Use this menu to restore the Default Settings factory settings Use the touch screen to confirm your choice After a reset the monitor settings are reset to the original factory settings NOTE Restoring the Default Settings will not affect the pairing settings The bab...

Page 41: ... need to be paired on a different channel Switch the baby unit camera on by sliding the on off button to the ON position Hold and press the On Off button to switch the parent unit monitor on Tap the touch screen once to activate the operation screen on the right and then press the menu button on the screen Press the pairing menu icon to open the CAMERA PAIRING menu 1 2 3 4 LUVION ...

Page 42: ...a PAIR button on the bottom of the camera to pair the baby unit camera to the parent unit monitor The video from the camera should now be displayed on screen P A I R Choose one of the available camera channels to pair the new camera 6 5 PLEASE PRESS PAIR KEY ON CAMERA SIDE 12 RESET ...

Page 43: ...t possible connection to the router during the setup process please turn off the monitor IOS AND ANDROID INSTALLATION Download and install the SmartBabyCam app for iOS or Android Turn on the camera press and hold reset button until the camera flashes 3 times After around 5 seconds short press the reset button the camera night light will change to fast flash After about 30 seconds short push the res...

Page 44: ...ers with at least one up percase letter one lowercase letter one digit and one special character choose from _ After changing the password press the Edit Device icon find the WiFi Setting Enter your WiFi network SSID you can only connect the camera to 2 4GHz WiFi networks and enter it s password and press send The night light will now change to solid on once you see the night light flash 3 times a...

Page 45: ... 6 characters with at least one up percase letter one lowercase letter one digit and one special character choose from _ After changing the password press the Edit Device icon find the WiFi Setting Select your WiFi network SSID you can only connect the camera to 2 4GHz WiFi networks and input it s password and press send The night light will now change to solid on once you see the night light flas...

Page 46: ...avail able Make sure you keep the camera connected to the internet during the firmware installation process When the new firmware is installed the message OTA update is over please check if the device is function ing normally will be displayed Press Ok Please check if everything is functioning properly your baby monitor is now ready to use FIRMWARE UPDATE IOS FOR ANDROID SEE NEXT PAGE Below the in...

Page 47: ...the camera should be on line and touch the menu icon at the right corner and select Firmware Update Press OK to start updating the firm ware If there is new firmware avail able Make sure you keep the camera connected to the internet during the firmware installation process When the new firmware is installed the message OTA update is over please check if the device is function ing normally will be ...

Page 48: ...trait into landscape mode Beside the live view controls there are also some settings you can change through the menu to enter the menu press the icon Here you can change the following settings NAME Here you can change the name you gave your camera CONNECTION STATUS Here you can check the current connection status Click here to try re establishing a connection ADVANCED SETTING Press to move onto th...

Page 49: ...is not muted Press the volume button on the parent unit to increase the volume 2 Make sure that there is sound within range of the baby unit microphone 3 If the unit emits a loud screeching noise move the baby and parent unit further apart The video is or has become choppy 1 Try moving the baby unit closer to the parent unit 2 Remove obstructions between the baby and parent unit 3 Place the antenn...

Page 50: ... as other devices operating at 2 4Ghz can limit the maximum transmission range Baby unit camera Image Sensor Type 1 4 Color CMOS Image Sensor Effective Pixels H 1280 px V 1024 px Image Resolution High 1280 720 MAX 1 7Mbps Low 854 480 MAX 0 7 Mbps White Balance Auto Lens 3 95 mm F 2 2 Field of View 55 IR On Off 15 25 Lux Off 5 15 Lux On IR LED Type Nightvision 940 nm 5 m Speaker Output 0 5 W Max Power...

Page 51: ...X Operating Temperature Range 10 40 Operating Humidity Range 0 85 NOTE Outdoor use in France Italy Russia and Ukraine is not allowed This item is in compliance with the essential requirements and other relevant provisions of European Directives The declaration of conformity is available through https www luvion nl site wp content uploads 2019 11 Conformiteitsverklaring Supreme Connect 2 pdf ...

Page 52: ... pouvez contacter votre revendeur Luvion ou votre distributeur Luvion local Plus d informations peuvent être trouvées sur notre site Web www luvion com Ce manuel d utilisation vous fournit toutes les informations nécessaires pour une utilisation sûre agréable et facile du Luvion Supreme Connect 2 Avant utilisation nous vous demandons de lire attentivement ce manuel d utilisation Nous vous demandon...

Page 53: ... et 35 C à l abri de la lumière directe du soleil et d autres sources de chaleur telles que radiateurs et garder le produit bien ventilé pendant l utilisation N essayez pas d ouvrir le produit vous même ou vous pourriez annuler votre garantie veuillez contacter votre revendeur ou distributeur Batterie Ne remplacez pas la batterie par un type incorrect Utilisez uniquement les batteries d origine Lu...

Page 54: ... L UNITÉ PARENTS MONITEUR 20 2 3 6 4 5 1 VUE DE FACE Le Luvion Supreme Connect 2 prend jusqu à quatre caméras en charge Vous pouvez désormais surveiller plusieurs enfants ou chambres en même temps CAMÉRAS SUPPLÉMENTAIRES ...

Page 55: ...indiquent le niveau de son détecté par l unité bébé La quantité de LED qui sont allumées indique l intensité du son détecté 5 DC in Connecte l adaptateur DC 5V inclus pour alimenter et ou charger l unité parents 6 Écran Écran LCD tactile 5 7 Compartiment batteries Ce compartiment permet de remplacer la batterie Utilisez uniquement les batteries d origine Luvion 8 Support Vous permet de positionner...

Page 56: ...ts 8 Entrée d alimentation Entrée pour l adaptateur d alimentation Luvion 5V 2A 9 Bouton marche arrêt Appuyez sur marche ou arrêt pour allumer éteindre l unité bébé 10 Bouton de couplage Établit une nouvelle connexion entre l unité bébé et l unité parents pendant le processus de couplage Le couplage doit être utilisé lors de l installation d une caméra supplémentaire ou lorsque le moniteur ne reco...

Page 57: ... Assurez vous de prendre en compte la longueur du câble d alimentation et la position de la prise de courant car l unité bébé caméra doit toujours être branchée sur secteur 1 Déballez soigneusement l unité bébé caméra 2 Placez l unité bébé dans la position souhaitée Vous pouvez placer l unité bébé sur une table armoire ou vous pouvez la monter sur un mur ou un plafond Vous pouvez utiliser le suppo...

Page 58: ...er la caméra L unité parents affichera la vidéo de l unité bébé lorsque les deux sont allumées et à portée l une de l autre Le message hors de portée s affiche sur l écran de l unité parents lorsque l unité bébé est hors de portée de l unité parents ou lorsque l unité bébé n est pas allumée ou reconnue monté au mur monté au plafond ...

Page 59: ...eux Indique que le son du haut parleur du moniteur est coupé 7 Indicateur de batterie Indique le niveau de batterie de l unité parents L indicateur de niveau de batterie affichera le niveau de charge selon cinq états Batterie faible rouge clignotant Batterie pleine rouge Batterie pleine blanc 1 bar Batterie pleine blanc 2 barres Batterie pleine blanc 4 barres l alimentation n est pas connectée Lorsq...

Page 60: ...moniteur Ajustez le volume du moniteur vers le haut et vers le bas 16 Zoom avant arrière Prend en charge le zoom numérique x1 x1 5 x2 17 Berceuse Appuyez sur l icône de berceuse pour activer désactiver les berceuses Joue 3 chansons préprogrammées Choisissez 1 morceau spécifique ou Tout au dessus de 1 2 3 ou tout sera affiché Vous pouvez choisir une berceuse spécifique que vous souhaitez jouer ou fai...

Page 61: ...enne du moniteur vers le haut REMARQUE Si rapprocher l unité bébé et l unité parents n aide pas essayez de coupler à nouveau l unité bébé et l unité parents Voir le chapitre couplage OUT OF RANGE température haute et basse 23 Date et heure et minuterie Configurez la date et l heure du système et la minuterie pour l heure du repas de bébé 24 Volume de la caméra et de l alarme Vous pouvez régler le ...

Page 62: ...fier la sensibilité de la fonction vox pour chaque caméra séparement VOX peut être réglé différemment pour chaque caméra appuyez sur les symboles de caméra en haut de l écran pour basculer entre les caméras Après avoir sélectionné la bonne caméra choisissez si vous souhaitez VOX activé ou désactivé Si VOX est désactivé l écran restera toujours allumé Lorsque le mode VOX est activé le moniteur passe...

Page 63: ...minosité minimale est de zéro barre et la luminosité maximale est de 5 barres Appuyez sur ou sur l écran tactile pour diminuer ou augmenter la luminosité La luminosité peut être réglée différemment pour chaque caméra appuyez sur les symboles de la caméra en haut de l écran pour basculer entre les caméras MENU TEMPÉRATURE L unité bébé caméra est équipée d un capteur de température Vous pouvez défini...

Page 64: ... berceuses Utilisez les symboles et pour diminuer augmenter le volume Sélectionnez le symbole de la cloche d alarme pour régler le niveau de volume des fonctions d alarme du moniteur Utilisez les symboles et pour diminuer augmenter le volume MENU PARAMÈTRES PAR DÉFAUT Utilisez ce menu pour restaurer les paramètres par défaut réglages d usine Utilisez l écran tactile pour confirmer votre choix Aprè...

Page 65: ...s sur un canal différent Allumer l unité bébé caméra en faisant glisser le bouton marche arrêt vers la position on Maintenez enfoncé et appuyez sur le bouton marche arrêt pour allumer l unité parents moniteur Appuyez une fois sur l écran tactile pour activer l écran de réglage à droite puis appuyez sur le bouton de menu à l écran Appuyez sur l icône du menu de couplage pour ouvrir le menu de COUPLA...

Page 66: ...ébé caméra en bas de la caméra pour coupler l unité bébé caméra à l unité parents moniteur La vidéo de la caméra devrait maintenant être affichée à l écran P A I R Choisissez l un des canaux de caméra disponibles pour coupler la nouvelle caméra 6 5 PLEASE PRESS PAIR KEY ON CAMERA SIDE 12 RESET ...

Page 67: ...exion possible au routeur pendant le processus de configuration veuillez éteindre le moniteur INSTALLATION IOS ET ANDROID Téléchargez et installez l application SmartBabyCam pour iOS ou Android Allumez la caméra maintenez enfoncé le bouton reset jusqu à ce que la caméra clignote 3 fois Après environ 5 secondes appuyez brièvement sur le bouton reset la veilleuse de la caméra va clignoter rapidement...

Page 68: ...uscule une lettre minuscule un chiffre et un caractère spécial choisissez parmi _ Après avoir changé le mot de passe appuyez sur l icône Modifier l appareil recherchez le Réglage WiFi entrez le SSID de votre réseau WiFi vous ne pouvez connecter la caméra qu aux réseaux WiFi 2 4 GHz et saisis sez son mot de passe et appuyez sur envoyer La veilleuse va maintenant s allumer continuellement une fois qu...

Page 69: ...scule une lettre minuscule un chiffre et un caractère spécial choisissez parmi _ Après avoir changé le mot de passe appuyez sur l icône Modifier l appareil recherchez le Réglage WiFi Sélectionnez votre réseau WiFi SSID vous ne pouvez connecter la caméra qu aux réseaux WiFi 2 4 GHz et saisis sez son mot de passe et appuyez sur envoyer La veilleuse va maintenant s allumer continuellement une fois que...

Page 70: ... un nouveau firmware est disponible Assurez vous de garder la caméra connectée à Internet pendant le pro cessus d installation du firmware Lorsque le nouveau firmware est in stallé le message La mise à jour OTA est terminée vérifiez que l appareil fonctionne normalement s affiche Veuillez vérifier si tout fonctionne correctement votre babymonitor est maintenant prêt à l emploi MISE À JOUR DU FIRMWAR...

Page 71: ...version est disponible Pour mettre à jour le firmware allez sur la page d affichage en direct la caméra doit être en ligne et appuyez sur l icône de menu dans le coin droit et sélectionnez Mise à niveau du firmware Appuyez sur OK pour démarrer la mise à jour du firmware si un nouveau firmware est disponible Assurez vous de garder la caméra connectée à Internet pendant le pro cessus d installation du...

Page 72: ...CRAN affichez le flux de la caméra en plein écran en tournant votre téléphone à 90 du mode por trait au mode paysage Outre les commandes de la vue en direct il existe également certains paramètres que vous pouvez modifier dans le menu Pour accéder au menu appuyez sur l icône Ici vous pouvez modifier les paramètres suiv ants NOM Ici vous pouvez changer le nom que vous avez donné à votre caméra ÉTAT D...

Page 73: ...u son à portée du microphone de l unité bébé 3 Si l unité émet un bruit strident et puissant éloignez davantage l unité bébé de l unité parents La vidéo est ou est devenue saccadée 1 Essayez de rapprocher l unité bébé de l unité parents 2 Retirez les obstructions entre le bébé et l unité parents 3 Placez l antenne de l unité parents en position verticale La batterie de l unité parents s épuise trè...

Page 74: ...ent limiter la portée de transmission maximale Unité bébé caméra Type de capteur d image Capteur d image CMOS couleur 1 4 Pixels efficaces H 1280 px V 1024 px Résolution de l image Élevé 1280 720 MAX 1 7 Mbps Faible 854 480 MAX 0 7 Mbps Balance des blancs Automatique Lentille 3 95 mm F 2 2 Champ de vision 55 IR On Off 15 25 Lux Off 5 15 Lux On Type de LED IR vision nocturne 940 nm 5 m Sortie haut parl...

Page 75: ...re de fonctionnement 10 40 Plage d humidité de fonctionnement 0 85 NOTE L utilisation en extérieur en France en Italie en Russie et en Ukraine n est pas autorisée Cet article est conforme aux exigences essentielles et aux autres dispositions pertinentes des directives européennes La déclaration de conformité est disponible via https www luvion nl site wp content uploads 2019 11 Conformiteitsverkla...

Page 76: ...пки По всем вопросам гарантии вы можете обратиться к вашему дилеру Luvion или местному дистрибьютору Luvion Более подробную информацию можно найти на нашем сайте www luvion com Это руководство пользователя предоставляет вам подробную информацию необходимую для безопасного приятного и простого использования видеоняни Luvion Supreme Connect 2 Перед использованием мы просим вас внимательно прочитать ...

Page 77: ...ускайте попадания прямых солнечных лучей и других опасных источников тепла таких как радиаторы и обеспечьте хорошую вентиляцию устройства во время использования Не пытайтесь вскрывать изделие самостоятельно иначе вы можете лишиться гарантии Обратитесь к местному дилеру или представителю Батареи Не пытайтесь заменить батарею на аналог Используйте только оригинальные батареи Luvion Su preme Connect ...

Page 78: ...А МОНИТОР 20 2 3 6 4 5 7 8 1 9 ВИД СЗАДИ ВИД СПЕРЕДИ ДОПОЛНИТЕЛЬНЫЕ КАМЕРЫ Видеоняня Luvion Supreme Connect 2 поддерживает использование до четырех камер Теперь вы можете наблюдать за несколькими детьми или комнатами одновременно ...

Page 79: ...который фиксирует детский блок камера ОБЗОР ДЕТСКОГО БЛОКА КАМЕРА ВИД СЗАДИ ВИД СПЕРЕДИ 2 3 6 4 5 7 1 Датчик света Данный датчик включает инфракрасную подсветку в условиях слабого освещения 2 ИК светодиоды Данные светодиоды обеспечивают ночное видение камеры на расстоянии до 5 метров и автоматически активируются в условиях слабого освещения 3 Объектив камеры Данный объектив передает изображение на...

Page 80: ...еподключть детский блок камеру к родительскому блоку монитору За дополнительной информацией обратитесь в соответствующему разделу данной инструкции 11 Ответные отверстия для монтажной рамки 12 Кнопка Reset сброс Нажмите эту кнопку чтобы сбросить настройки камеры или изменить режим камеры 10 ...

Page 81: ... адаптера питания и расположение розетки так как детский блок камера в процессе работы всегда должен быть подключен к питанию 1 Аккуратно распакуйте детский блок камеру 2 Разместите детский блок камеру в подходящее место например на стол или шкаф Так же вы можете разместить детский блок камеру на стене или на потолке используя для крепления камеры крепежную рамку и винты поставляемые в комплекте с...

Page 82: ...удет отображаться видеоизображение с детского блока когда эти оба блока включены и находятся в пределах досягаемости друг друга Когда детский блок находится за пределами диапазона родительского блока или когда детский блок не включен или не распознан на экране родительского блока будет отображаться сообщение Out of range Настенное крепление камеры Потолочное крепление камеры ...

Page 83: ...дикатор показывает с какой кратностью увеличения отображается видеоизображение с камеры на экране монитора 1х 1 5х или 2х 6 Отключение звука динамика монитора Этот индикатор показывает активен ли динамик монитора или отключен 7 Индикатор заряда батареи Этот индикатор показывает уровень заряда батареи родительского блока У этого индикатора существует пять разных состояний Низкий заряд батареи индик...

Page 84: ...атная связь c Настройка громкости динамика камеры так же относится и к громкости колыбельных мелодий выберите Если вы коснетесь центра сенсорного экрана то на экране появится следующее 13 Меню Здесь вы можете изменять некоторые настройки монитора и камеры 14 Управление поворотом камеры Используйте значки со стрелками для поворота и наклона камеры 15 Громкость динамика монитора Отрегулируйте громко...

Page 85: ...ся следующее 18 Назад Сохранить настройки и вернуться на предыдущую страницу 19 Регулировка яркости Вы можете регулировать яркость изображения с каждой отдельной камеры 20 Сопряжение отключение камер К родительскому блоку монитору вы можете подключить до 4 камер 21 VOX Функция активации по звуку Отрегулируйте чувствительность VOX для оптимального состояния 22 Температура Вы можете установить граду...

Page 86: ...ункции VOX можно настраивать отдельно для каждой камеры В верхней левой части экрана выберите камеру для которой хотите произвести настройку чувствительности функции VOX После выбора нужной камеры выберите хотите ли вы активировать функцию VOX On или отключить Off Если функция VOX не активна экран монитора всегда будет включен Когда функция VOX активна то через некоторое время монитор перейдет в сп...

Page 87: ...те в верхнем левом углу экрана монитора камеру и настройте яркость изображения с этой камеры МЕНЮ ТЕМПЕРАТУРА Детский блок камера оснащен датчиком температуры Вы можете выставить температурный диапазон чтобы получать уведомления когда температура слишком низкая или высокая Обращаем ваше внимание что эта функция не должна использоваться взамен наблюдения за температурным диапазоном взрослыми Нажмит...

Page 88: ...ости для функций оповещения на мониторе Используйте иконки или для уменьшения или увеличения уровня громкости МЕНЮ ЗАВОДСКИЕ УСТАНОВКИ Используйте это меню для возврата к заводским установкам Используйте сенсорный экран чтобы подтвердить возврат к заводским установкам После подтверждения этого действия настройки монитора сбрасываются до заводских ПРИМЕЧАНИЕ Возврат к заводским установкам не удаляе...

Page 89: ... камер Они должны быть присоединены каждая на своем канале Включите детский блок камеру сдвинув кнопку включения выключения в положение ON Нажмите и удерживайте кнопку On Off чтобы включить родительский блок монитор Нажмите на сенсорный экран один раз чтобы активировать панель управления а затем нажмите на иконку МЕНЮ в левом нижнем углу экрана Нажмите иконку камера чтобы открыть меню сопряжение 1 ...

Page 90: ...тского блока камеры чтобы соединить детский блок камеру с родительским блоком монитором Видеоизображение с камеры после успешного соединения будет отображаться на экране P A I R Для сопряжения с новой камерой выберите один свободный из четырех доступных каналов 6 5 PLEASE PRESS PAIR KEY ON CAMERA SIDE 12 RESET ...

Page 91: ...го блока камеры к WIFI роутеру пожалуйста выключите материнский блок монитор ПРОЦЕСС УСТАНОВКИ ДЛЯ IOS И ANDROID Скачайте и установите на смартфон планшет приложение SmartBabyCam для iOS или Android Включите камеру затем нажмите и удерживайте кнопку RESET пока ночная подсветка камеры не мигнет 3 раза Примерно через 5 секунд однократно нажмите эту же кнопку RESET Ночная подсветка камеры начнет быст...

Page 92: ...как вы изменили пароль нажмите значок Edit Device далее перейдите в WiFi Setting Введите SSID домашней сети WiFi роутер Примечание вы можете подключить камеру только к сетям WiFi 2 4 ГГц введите пароль для подключения к вашему роутеру и нажмите Send После этого ночная подсветка камеры загорится непрерывным светом После того как вы увидели что ночная подсветка камеры мигнет 3 раза а затем выключитс...

Page 93: ...о как вы изменили пароль нажмите значок Edit Device далее перейдите в WiFi Setting далее из появившегося списка доступных WIFI сетей выберите вашу домашнюю точку доступа роутер Примечание вы можете подключить камеру только к сетям WiFi 2 4 ГГц введите пароль для подключения к вашему роутеру и нажмите Send После этого ночная подсветка камеры загорится непрерывным светом После того как вы увидели чт...

Page 94: ...а оставалась присоединенной к сети интернет После успешного окончания обновления программного обеспечения камеры вы увидите сообщение OTA update is over pls check if the device is functioning normally Обновление ПО успешно завершено пожалуйста проверьте работоспособность камеры Пожалуйста убедитесь что все нормально функционирует После этого видеоняня полностью готова к использованию ОБНОВЛЕНИЕ ПР...

Page 95: ...ы произвести обновление программного обеспечения зайдите в приложение SmartBabyCam камера должна быть присоединена и изображение с камеры должно быть активным и нажмите на иконку в верхнем правом углу В открывшемся меню выберите пункт Firmware Upgrade Нажмите OK для запуска процесса обновления если обновление доступно Убедитесь чтобы до конца процесса обновления камера оставалась присоединенной к ...

Page 96: ... режиме реального времени есть также некоторые настройки которые вы можете изменить через меню приложения Чтобы войти в меню нажмите значок можете изменить через меню приложения Чтобы войти в меню нажмите значок который расположен в правом верхнем углу над видеоизображением Здесь вы можете изменить следующие настройки NAME Здесь вы можете изменить имя которое вы дали своей камере CONNECTION STATUS...

Page 97: ...еличения громкости на родительском блоке чтобы увеличить громкость динамика 2 Проверьте работоспособность микрофона камеры создав какой либо звук около детского блока 3 Если динамик монитора издает громкий визгливый шум отодвиньте детский и родительский блоки дальше друг от друга В случае если видеоизображение прерывистое или зависает 1 Попробуйте переместить детский блок ближе к родительскому 2 П...

Page 98: ... например WIFI роутеры могут значительно ограничивать максимальную дальность связи а так же стабильность соединения Детский блок камера Тип объектива 1 4 Color CMOS Image Sensor Пиксели по вертикали и горизонтали H 1280 px V 1024 px Разрешение изображения High 1280 720 MAX 1 7Mbps Low 854 480 MAX 0 7 Mbps Баланс белого Auto Размер линзы 3 95 mm F 2 2 Угол обзора 55 Чувствительность датчика света 1...

Page 99: ...кружающей среды 10 40 Рабочий диапазон относительной влажности 0 85 ПРИМЕЧАНИЕ Использование вне помещения в таких странах как Франция Италия и Украина не допускается Этот пункт соответствует основным требованиям и другим соответствующим положениям европейских директив Декларация о соответствии доступна для ознакомления по ссылке https www luvion nl site wp content uploads 2019 11 Conformiteitsver...

Page 100: ......

Page 101: ......

Page 102: ...Luvion Premium Babyproducts Visit us at www Luvion com ...

Reviews: