10
• Remember that when using a tool with
multiple blades, moving one blade may
lead to the other blades rotating.
• When adjusting the machine, make sure
that no fingers are trapped between the
moving blades and fixed parts of the
machine.
• Allow the motor to cool down before you
put the machine away.
• When maintaining the blades, remember
that even if the machine is switched off,
the blades can still be moved.
• For safety reasons, replace worn or dam-
aged parts. Only use original spare parts
and accessories.
The variant of the product sold in Switzerland
may only be used in Switzerland, as it is
equipped with a Swiss plug.
You can identify the variant by means of the
item number on the product (the instructions
always contain
all
item numbers):
• Item number Switzerland: 115 330
• Item number in other EU countries:
115 324
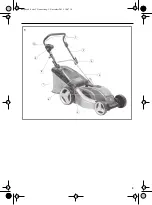
Your device at a glance
1. Switch-on lever
2. Handlebar
3. Clamp lever for handle
4. Handlebar, bottom part
5. Lever for adjusting the cutting height
6. Safety flap
7. Collection box
8. Strain relief mechanism for extension
cable
9. Switch-lock
10. Mains plug
Scope of delivery
• Operating manual
• Lawn-mower
• Handle
• Collection box
• Mulch wedge
• Bag containing small parts
Assembly
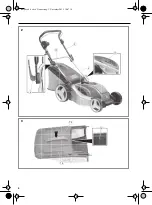
Mounting the handle
– Position the bottom part of the handle
bar (4) into the locators on the product
and tighten with screws (11).
– Screw the handle (2) using the nuts and
tensioning lever screws (3) onto the han-
dle under section.
– Press the clamping lever towards the
handlebar.
– If the clamping lever does not safely
clamp: open the clamping lever again in a
clockwise direction and tighten it to the
limit stop.
– If the clamping lever cannot be tightened
to the limit stop: open the clamping lever,
make a counter-clockwise revolution,
and tighten it to the limit stop.
– Clip the cable into the cable clamps (12).
Mounting the collection box
– Insert the carry handle (13) into the col-
lection basket upper (14) until it engages.
– Tighten the handle with screws (15).
– Attach the collection bag (16) to the col-
lection basket upper (14).
– Press the rubber lip as far as possible into
the guide!
Operation
Check before starting the device!
Check to make sure the device is in safe
operating condition:
– Check to make sure there are no visible
defects.
– Check to make sure all device compo-
nents are correctly mounted.
Preparation
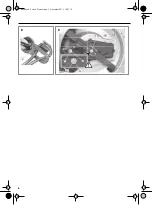
Set the cutting height
The cutting height can be set to several dif-
ferent heights (Cutting heights:
DANGER! Risk of death through
electric shock!
The use of this vari-
ant outside Switzerland is not per-
missible for safety reasons, as this
poses a risk of electric shock or fire.
Note:
The actual appearance of your
product may differ from the illustra-
tions.
DANGER! Risk of injury!
The
device may only be put into opera-
tion if there are no defects. If a part is
defective it must be replaced before
the device is used again.
GB
temp.book Seite 10 Donnerstag, 5. November 2015 10:07 10
Summary of Contents for 115 324
Page 2: ...2 GB Original instructions 7 GR 14 temp book Seite 2 Donnerstag 5 November 2015 10 07 10...
Page 3: ...3 1 3 4 7 8 5 6 10 9 2 1 temp book Seite 3 Donnerstag 5 November 2015 10 07 10...
Page 4: ...4 11 3 4 2 12 2 13 15 14 3 temp book Seite 4 Donnerstag 5 November 2015 10 07 10...
Page 5: ...5 14 16 4 5 5 7 6 17 6 6 18 7 temp book Seite 5 Donnerstag 5 November 2015 10 07 10...
Page 6: ...6 8 8 20 19 21 22 20 9 temp book Seite 6 Donnerstag 5 November 2015 10 07 10...
Page 14: ...14 14 14 18 18 18 19 20 20 21 21 22 GR temp book Seite 14 Donnerstag 5 November 2015 10 07 10...
Page 15: ...15 FI 30 mA GR temp book Seite 15 Donnerstag 5 November 2015 10 07 10...
Page 16: ...16 GR temp book Seite 16 Donnerstag 5 November 2015 10 07 10...
Page 17: ...17 115330 115324 GR temp book Seite 17 Donnerstag 5 November 2015 10 07 10...
Page 19: ...19 6 P 6 8 8 P 3 1 9 1 2 P 5 6 17 18 GR temp book Seite 19 Donnerstag 5 November 2015 10 07 10...
Page 20: ...20 P 6 9 20 19 19 22 20 20 Nm 21 2 GR temp book Seite 20 Donnerstag 5 November 2015 10 07 10...
Page 23: ...23 temp book Seite 23 Donnerstag 5 November 2015 10 07 10...


