11
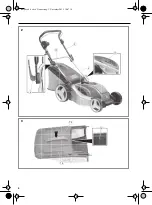
– Pull the lever (5) to the side.
– Set the cutting height to the value you
require, and let the lever slot back into
place.
Attaching the cuttings bag
– Lift the protective flap (6) and hold.
– Slot the cuttings bag (7) into place.
– Ensure that the bag has slotted into place
securely.
Mounting the mulch wedge
– Remove the collecting sack.
– Push the mulch wedge (18) into the open-
ing of the machine until it engages.
– Lower the safety flap (6).
Connecting the product
– Insert the extension cable coupling into
the mains.
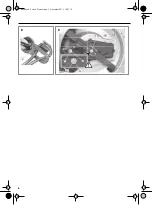
– Feed the extension cable through the
strain relief mechanism (8) as shown.
Turning on the tool
– Press and hold down the switch lock (9).
– Pull the switch on lever (1) and hold.
– Release the switch lock.
The unit will switch itself on with approxi-
mately 2 seconds delay.
Switching-off the device
– Release the switch on lever.
Mowing
– Guide the unit at an even, slow pace
(walking speed) and with as straight a
path as possible.
Important notes
• Always work at right angles to the slope.
• Try not to cut grass when wet.
• Use overlapping paths to produce an
even cutting pattern.
• Cut longer grass with a greater cutting
height initially, then cut crosswise using
the desired cutting height.
• If the air flap (17) closes, the collection
container is full and must be emptied.
Information on mulching
Mounting the mulch wedge – p. 11
• Do not mulch moist grass.
• Regularly clean the mulch wedge, ejec-
tion channel and cutting blade.
Cleaning and maintenance
Cleaning and maintenance overview
Before each use
Cleaning the device
Clean unit immediately after every use. Dried
grass remains are very hard, and are very dif-
ficult to remove.
– Remove grass remains with a brush, and
a plastic scraper if required (do not use
sharp implements).
– Remove deposits on the wheels.
– Wipe the tool with a damp cloth.
– Never clean the unit with water or high-
pressure jet.
WARNING! Risk of injury!
Before
starting work, check the area and
remove all objects which may be
kicked up by the unit.
Note:
Mulching is the use of cut
grass as a natural compost. When
mulch-mowing, the grass is cut,
finely chopped and spread across
the grass in one operation.
DANGER! Risk of injury!
Carry out
the maintenance work described
here in person.
Improper maintenance work can
damage the device and lead to inju-
ries.
DANGER! Risk of injury!
Before
carrying out any maintenance or
cleaning work, the machine must be
disconnected from the power and
secured to prevent accidental switch
on.
What?
How?
General function check.
Visual check.
Check all screw connec-
tions and tighten if neces-
sary.
GB
temp.book Seite 11 Donnerstag, 5. November 2015 10:07 10
Summary of Contents for 115 324
Page 2: ...2 GB Original instructions 7 GR 14 temp book Seite 2 Donnerstag 5 November 2015 10 07 10...
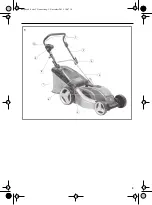
Page 3: ...3 1 3 4 7 8 5 6 10 9 2 1 temp book Seite 3 Donnerstag 5 November 2015 10 07 10...
Page 4: ...4 11 3 4 2 12 2 13 15 14 3 temp book Seite 4 Donnerstag 5 November 2015 10 07 10...
Page 5: ...5 14 16 4 5 5 7 6 17 6 6 18 7 temp book Seite 5 Donnerstag 5 November 2015 10 07 10...
Page 6: ...6 8 8 20 19 21 22 20 9 temp book Seite 6 Donnerstag 5 November 2015 10 07 10...
Page 14: ...14 14 14 18 18 18 19 20 20 21 21 22 GR temp book Seite 14 Donnerstag 5 November 2015 10 07 10...
Page 15: ...15 FI 30 mA GR temp book Seite 15 Donnerstag 5 November 2015 10 07 10...
Page 16: ...16 GR temp book Seite 16 Donnerstag 5 November 2015 10 07 10...
Page 17: ...17 115330 115324 GR temp book Seite 17 Donnerstag 5 November 2015 10 07 10...
Page 19: ...19 6 P 6 8 8 P 3 1 9 1 2 P 5 6 17 18 GR temp book Seite 19 Donnerstag 5 November 2015 10 07 10...
Page 20: ...20 P 6 9 20 19 19 22 20 20 Nm 21 2 GR temp book Seite 20 Donnerstag 5 November 2015 10 07 10...
Page 23: ...23 temp book Seite 23 Donnerstag 5 November 2015 10 07 10...


