9
9.
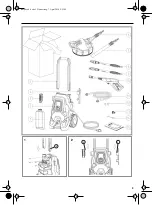
Jet tube with high-pressure jet nozzle
10. Hand-held spray gun
11. High-pressure hose
12. Screws 4×
13. Plug-in coupling for water connection
14. Cleaning needle for high-pressure nozzle
15. Instructions for use
Installation
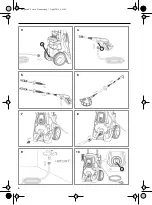
– Insert the handle (5) into the high-pressure
cleaner and fasten using screws (12).
– Attach the holder for the spray gun (3) to the
cable holder (4).
– Screw the high-pressure hose onto the high-
pressure connection (16) of the product and
tighten.
– Screw the high-pressure hose to the cou-
pling (17) of the spray gun (10).
– Insert the jet pipe for low pressure (8) or the jet
pipe with high-pressure nozzle (9) into the spray
gun (10) and rotate by approx. 90° until the two
parts are securely connected.
– Insert the terrace cleaner (6) into connecting
pipe (7) and rotate approx. by 90° until the two
parts are securely connected.
– Insert the connecting pipe (7) into the spray
gun (10) and rotate by approx. 90° until the two
parts are securely connected.
– Screw the supplied plug-in coupling (13) onto
the water connection of the product by hand.
Commissioning
Water supply
The following accessories are required for connect-
ing the machine (not included):
• a fabric-reinforced hose with a minimum diame-
ter of 13 mm (½")
– Insert the water hose into the plug-in coupling
and connect to the water supply.
Mains supply
– Ensure that the on/off switch (18) is at [0].
– Open the water inlet.
– Insert the mains plug into the socket.
Operation
Check before switching on!
Check the safe condition of the machine:
– Check it for visual defects.
– Check that all parts of the machine have been
securely fitted.
– Check if the water connector and the high-pres-
sure pipes are tight.
Water inlet
– Open the water inlet.
– Retract the switch-on safety lock (19).
– Actuate the lever (20) of the spray gun until a
water jet escapes continually.
Switching on/off
– To switch the machine on, set the On/Off
switch (18) to [1].
– To switch the machine off, set the On/Off
switch (18) to [0].
Switching on the water jet
– Hold the hand-held spray gun and the jet tube
firmly with both hands. Be aware of the recoil
when switching on the high-pressure jet.
– Retract the switch-on safety lock (19).
– Actuate lever (20) of the spray gun
The high-pressure pump starts running as soon as
you operate the hand-held spray gun.
The high-pressure pump stops running as soon as
you release the lever on the hand-held spray gun.
Switch the machine off when interrupting your work
for extended periods of time.
Adjusting the high-pressure water jet
– Rotate the nozzle (21) clockwise: spot-type jet;
– Rotate the nozzle (21) anticlockwise: fan-shaped
jet;
Use in combination with cleaning agents
– Switch the machine off.
NOTICE! Risk of environmental dam-
age!
In accordance with EN 61770, the
product must not be directly connected to
the public drinking water supply.
Always use a system separator in accord-
ance with EN 12729 type BA.
Note:
Observe the regulations of your
water supply company.
NOTICE! Risk of machine damage!
Never operate the machine without water
inlet as dry running may damage the pump.
Use a water filter if the inlet water is con-
taminated.
DANGER! Risk of fatal injury!
Use special
care when cleaning tyres. Vehicle tyres/tyre
valves may become damaged or burst
when handled improperly. First signs of
damage included discolourations on the
tyre. Damaged vehicle tyres/tyre valves
pose a life-threatening risk. Keep the jet at
a distance of at least 30 cm!
DANGER! Risk of fatal injury!
The high-
pressure jet may be dangerous when han-
dled improperly. The jet may not be
directed towards living beings (persons,
animals), live equipment or the machine
itself.
Note:
add cleaning agents only in low-
pressure mode.
GB
temp.book Seite 9 Donnerstag, 7. April 2016 9:55 09
Summary of Contents for 389842
Page 2: ...2 GB Original instructions 7 GR 12 temp book Seite 2 Donnerstag 7 April 2016 9 55 09...
Page 3: ...3 5 1 3 4 2 temp book Seite 3 Donnerstag 7 April 2016 9 55 09...
Page 4: ...4 16 3 17 4 5 6 7 8 9 18 10 temp book Seite 4 Donnerstag 7 April 2016 9 55 09...
Page 5: ...5 11 12 18 13 19 20 14 15 21 22 8 16 1 17 temp book Seite 5 Donnerstag 7 April 2016 9 55 09...
Page 6: ...6 18 19 temp book Seite 6 Donnerstag 7 April 2016 9 55 09...
Page 12: ...12 12 12 14 14 14 14 15 16 16 16 17 18 GR temp book Seite 12 Donnerstag 7 April 2016 9 55 09...
Page 13: ...13 FI 30 mA 18 GR temp book Seite 13 Donnerstag 7 April 2016 9 55 09...
Page 16: ...16 ON OFF 0 15 15 GR temp book Seite 16 Donnerstag 7 April 2016 9 55 09...
Page 19: ...19 temp book Seite 19 Donnerstag 7 April 2016 9 55 09...


