background image

5

FTF01 Rev.3.1 01/2021

Luxier

Installation

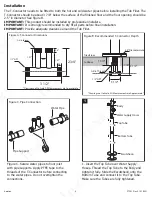
3. Make sure the floor is level in both directions. 

Determine the distance from the finished wall to 

the center of the floor water supply hose. Make 

sure there is enough clearance around the Tub 

Filler. Mark the center line. Drill a 2.5” diameter 

hole for the water supply hoses. Insert the 

water supply hoses through the hole and place 

tub filler assembly on the floor and check for 

alignment.

Level

Finished Wall Line

2.5” Hole

Base Board

Top View

3

4. With the Tub Filler Assembly aligned in the 

desired position, mark each of the 4 mounting 

holes from the base on the floor. Use a drill with 

3/8” drill bit, drill the holes 2” deep and insert 

the included anchors. Make sure the anchors are 

flush with the finished floor.

5. Place the Tub Filler over the T-Connector 

and connect both water supply hoses to the 

T-Connector. Do not overtighten the connections.

4

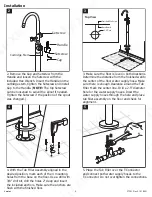
2. Remove the Cap and Setscrew from the 

Handle and loosen the Setscrew with the 

included Hex Wrench. Insert the Handle on the 

cartridge stem, tighten the Setscrew and install 

Cap to the Handle. (

NOTE: 

The top Setscrew 

can be loosened to swivel the spout if needed. 

Tighten the Setscrew if the position of the spout 

was changed.)

Setscrew

Handle

Setscrew

Cap

Cartridge Stem

2

5

Summary of Contents for FTF01-TB

Page 1: ...truction Single Hole Installation Drip Free 40 mm Ceramic Cartridge Hand shower flow rate 1 8 gpm at 80 psi Tub spout flow rate 3 7 gpm at 20 psi Rough in kit included Complies with IAPMO UPC cUPC ADA...

Page 2: ...gence improper installation product abuse product misuse or use of cleaners containing abrasives alcohol or other organic solvents whether performed by a contractor service company or yourself are exc...

Page 3: ...tighten the compression nuts as it will reduce the integrity of the sealed connection You may also need the following tools 1 Safety Glasses 5 Adjustable Pipe Wrench 2 Teflon PTFE Tape 6 Screwdriver 3...

Page 4: ...RTANT This product should be installed by professional installers IMPORTANT It is strongly recommended to dry fit all parts before final installation IMPORTANT Provide adequate clearance around the Tu...

Page 5: ...the desired position mark each of the 4 mounting holes from the base on the floor Use a drill with 3 8 drill bit drill the holes 2 deep and insert the included anchors Make sure the anchors are flush...

Page 6: ...end to the Tub Filler NOTE Make sure the rubber washers 1 are installed on both end of the hose Hand tighten the Hand Shower Wand 6 to the Hand Shower Hose 5 The Hand Shower Wand should be placed in t...

Page 7: ...rench 16 Handle 17 Setscrews 18 Spout OFF Front View Diverter Knob Side View ON HOT COLD To operate the tub filler simply move the handle to the ON position to turn on the water Adjust the temperature...

Reviews: