background image

SP25-CEC 

Rev. A 102019

9

Luxier

Operation

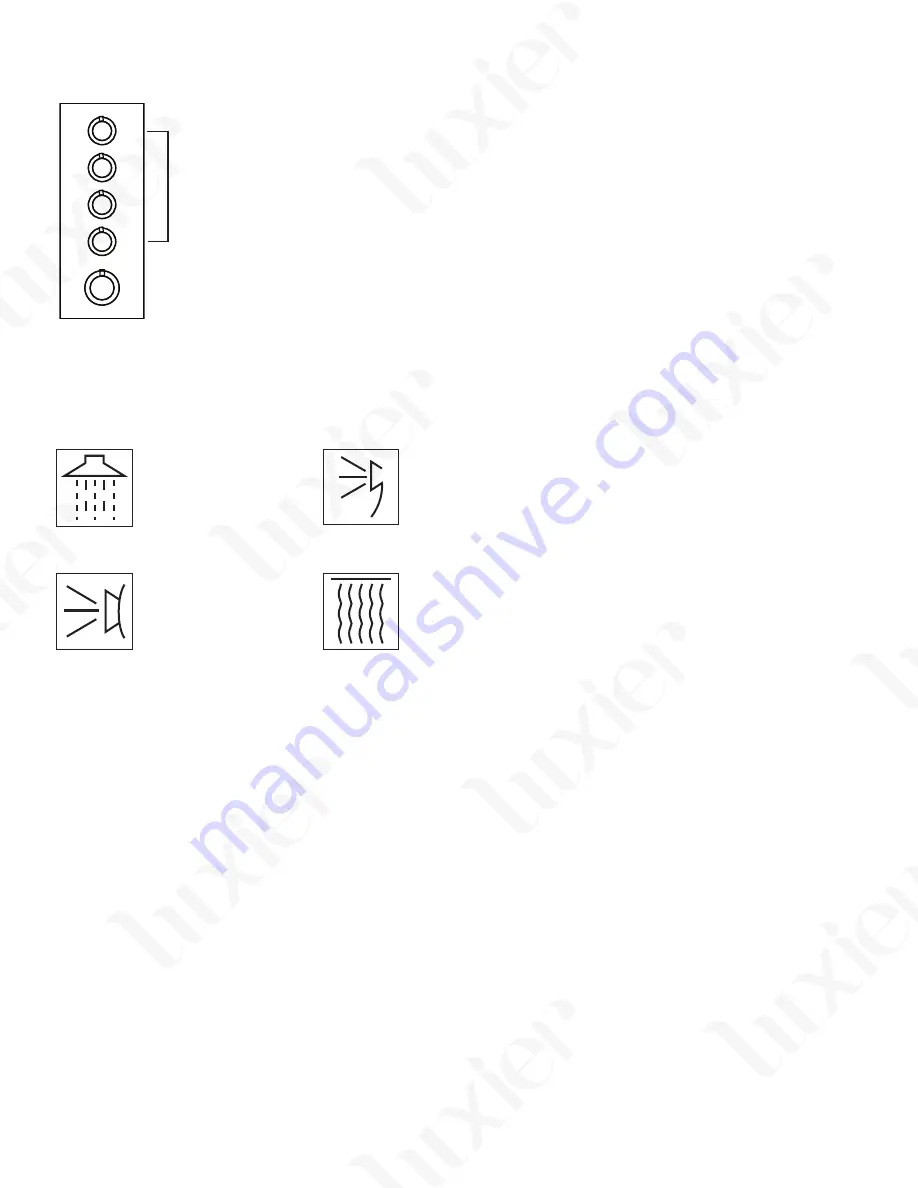
Water Functions

Overhead Jets

Overhead Waterfall

Horizontal Body Jets

Handheld Shower

1.  Turn the temperature control knob counter-clockwise to 

set the desired water temperature. The control starts with 

cold temperature and goes to warm and hot as the knob 

is turned counter-clockwise (

Important: Scalding may 

occur if the control is set at high temperature, use this 

control with caution

)

2.  Select the desired water function by turning the selector to 

the corresponding marking. Multiple functions can be used 

simultaneously only if there is adequate water pressure 

supplied to the shower panel.

Temperature Control

Function Selectors

Maintenance Guide

Please follow the cleaning material manufacturer’s instructions. In addition, pay attention to the 

following points:

1.  Regular cleaning can prevent mineral build up on shower head and handheld shower.

2.  Use a mild detergent such as liquid dishwashing soap and warm water for cleaning.

3. 

Do not use abrasive / harsh chemical when cleaning the fi xture as they will damage and dull the 

fi nish.

4.  Carefully read the cleaner product label to ensure the cleaner is safe for use on the material.

5.  Test the cleaner on a small area before using on the entire surface.

6. 

Do not leave the cleaner on the fi xture longer than necessary.

7. 

When using spray cleaners, spray fi rst onto a soft cloth or sponge. Never spray directly onto the 

faucet as droplets can enter openings and gaps and cause damage.

8.  After cleaning, rinse thoroughly with clean water to remove any cleaner residue.

9.  Wipe dry with soft cloth to keep shower panel surface spot free.

Summary of Contents for SP25-CEC

Page 1: ...atures Stunning stylish European inspired design Elegant Durable stainless steel frame construction Pressure balanced valve minimize the chance of scalding 4 stage shower functions Rainfall Waterfall Massage Spray Hand Shower SP25 CEC ...

Page 2: ...igence improper installation product abuse product misuse or use of cleaners containing abrasives alcohol or other organic solvents whether performed by a contractor service company or yourself are excluded from this warranty Our responsibility under this limited warranty is limited to only to replacement parts and no other costs Luxier USA will not be responsible for labor charges and or damage i...

Page 3: ...he package for shipping damage and make sure all parts are included with the shower panel Keep the product in its package until you are ready to install Read and understand this installation guide completely Make sure the installation site is clean and free of dust and debris Please make sure the water supply is shut off to the installation area If necessary shut off the water to the entire house ...

Page 4: ...ual product may vary depends on model Fig A This is the distance from the bottom edge of the shower panel to the shower panel inlet valve NOTE This distance vary by models always take the actual measurement from the shower panel A B The installation height of the outlet box is approximately the total distance of measurement A and measurement B It is recommened to aim the top hori zontal body jets ...

Page 5: ...ed with a water saving device with restricted flow rate as required by the state of California To learn more about this water saving feature please contact our customer service department 495 mm 19 49 200 mm 7 87 1500 mm 59 06 72 5m 2 85 570 mm 22 44 770 mm 30 31 260 mm 10 24 365 mm 14 37 Drawings not to scale All measurements are approximate ...

Page 6: ...uxier Parts List 01 Shower Panel Body 02 Hand Shower 03 Hand Shower Cradle 04 O rings 05 Hand Shower Hose 06 Gasket 07 Hand Shower Water Connector 08 Screws X 4 09 Mounting Brackets X 2 10 Wall Anchors X 4 8 9 10 2 1 3 4 5 6 7 ...

Page 7: ...le 1 to the shower panel by installing the rubber washer 2 and the locking nut 3 and attach white plastic hose tube connector 5 with PVC tubing to complete the connection NOTE Make sure the silicon gasket 4 is seated properly inside the connector 1 3 Using a drill with a tile bit drill the hole slowly into the tile Do not drill into any piping or wiring in the wall Insert the anchors into the wall...

Page 8: ... range of the control knob is limited in both clockwise and counter clockwise directions DO NOT force to turn the knob pass its limit Overturning the control will damage the thermostatic valve making it fail to regulate temperature 6 Once the shower panel has been tested for functions and leaks Hang the unit on the wall to complete the installation Due to the limited space behind the shower panel ...

Page 9: ...he cleaning material manufacturer s instructions In addition pay attention to the following points 1 Regular cleaning can prevent mineral build up on shower head and handheld shower 2 Use a mild detergent such as liquid dishwashing soap and warm water for cleaning 3 Do not use abrasive harsh chemical when cleaning the fixture as they will damage and dull the finish 4 Carefully read the cleaner produ...

Page 10: ...general installation process NOTE Luxier is not affiliated with the owner of the video The purpose of this video is meant to provide a visual concept of the shower outlet box to speed up the installation process All images are copyright to their respective owners https youtu be 51Z1Xb5n6F0 Sioux Chief OxBoxTM 696 2 1 2 Copper Pipe 1 4 Turn Angle Valve 1 2 Nom Comp Inlet 7 16 1 2 Slip Joint Outlet 5 ...

Reviews: