50V
+
-
+
1
5
6
4
2
3
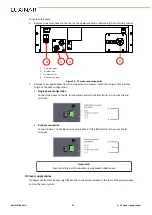
1
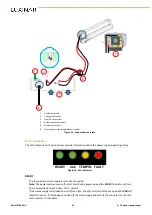
Auxiliary interface
2
Voltage sense cable
3
Laser DC connections
4
Buffer capacitor assembly
5
Coolant connections
6
Three-phase mains supply without neutral
Figure 41 - Connection overview
D.3.4. Operation
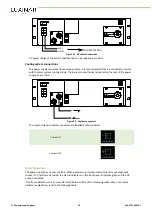
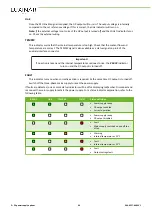
The LED indicators on the front panel provide information about the power supply operating status.
READY Uok TEMPW. FAULT
Figure 42 - LED indicators
READY
The three-phase mains supply is correctly connected.
Note: The power supply uses a soft-start circuit during power up and the
FAULT
indicator will turn
on momentarily during this time. This is normal.
If the mains supply is switched on and off too often, the soft-start resistors heat up and the
FAULT
indicator tuns on. If this happens, switch off the mains supply and wait for five minutes for the soft-
start resistors to cool down.
906-0227-00 REV 1
65
D. DC power supply options
Summary of Contents for SR 10 AOM
Page 1: ...USER MANUAL SR AOM series Sealed CO2 laser sources with integrated AOM...
Page 8: ...Preface iv 906 0227 00 REV 1...
Page 40: ...6 Installation 32 906 0227 00 REV 1...
Page 42: ...7 Transport and recommissioning 34 906 0227 00 REV 1...
Page 52: ...8 Interfacing 44 906 0227 00 REV 1...

