background image

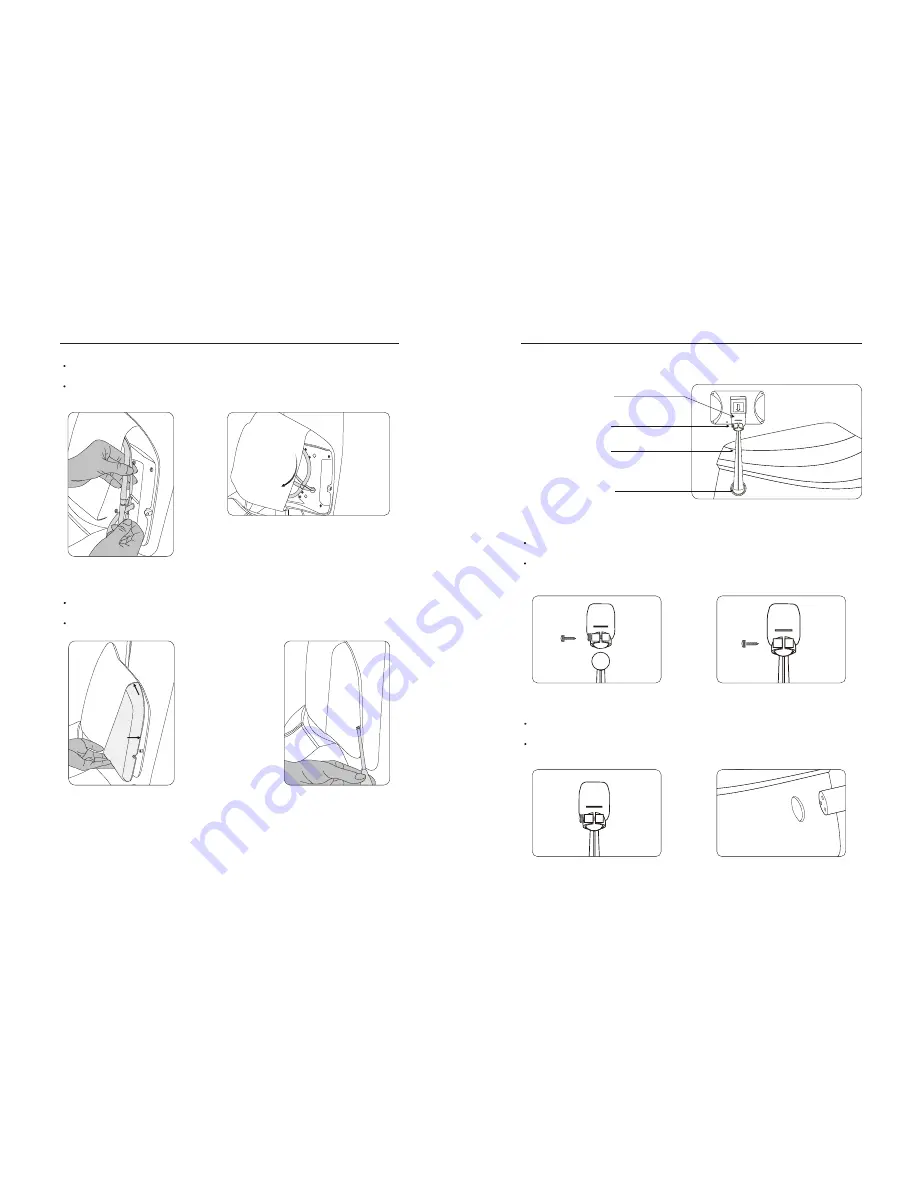
8.Handle controller frame installation

Handle controller tray

Screw

Frame

Handle controller 
frame assembly

Method Of Usage

Method Of Usage

Ready for the handle controller tray, steel pole, take out the fixed screws on the 

handle controller tray. (Figure 1)

Insert the ball joint of the steel pole to the concave spherical of the handle controller 
tray.(figure 2) 

( Figure 1)

( Figure 2) 

Screw the screws in to the hole which got in step 1 and tighten it, take care the 

direction, should be screw it from right to left. (Figure 3)

Prepare the cylindrical fixed pipe.(Figure 4)

( Figure 3)

( Figure 4) 

17

16

( Figure 3)

( Figure 4)

( Figure 5)

( Figure 6

Joint the upper armrest, trumpet line in backrest and the air pipe. Make sure the 

   connection is well and without air leak(Figure 3).

After the connected air pipe and trumpet line, please surround the cable within 

   upper armrest. Do not fold any pipe or cable(Figure 4).

Surround 
Air Pipe

Installation of decoration bar. Insert it into upper armrest cover slot. Lightly press 

    inward rim make it fit. Be careful of damage rim during installation(Figure 5).

Tighten decoration bar with supplied cross recessed pan head screws(Figure 6)

Insert

Lightly 

press inward

Summary of Contents for 2G series

Page 1: ...Operation Instructions SAVE THESE INSTRUCTIONS www LuxorHealth com Luxor Health 2G series Massage chair ...

Page 2: ...to some important safety warning and keep this manual book properly for future use Note Our Company reserves the right to revise the design and description of this product without any further notice Please refer to the actual color of this product CONTENTS Important Safety Instruction Name and function of components Function Method of usage Product specification 02 06 07 08 21 ...

Page 3: ...y SAFETY AND MAINTENANCE 14 C 15 Keep children away from extended foot support or other similar parts 16 Do not use massager in close proximity to loose clothing or jewelry 17 Keep long hair away from massager while in use onnect this appliance to a properly grounded outlet only see grounding instructions GROUNDING INSTRUCTIONS This product must be grounded if it should malfunction or breakdown gr...

Page 4: ...05 04 ...

Page 5: ...d shiatsu massage status the width of the massage hand can be adjusted in five levels Arm air massage function built in 26 airbags upper arm air massage function built in 4 airbags with 3 intensity adjustments Lower body air pressure massage function back air pressure massage function built in 4 airbags buttock air pressure massage built in 5 airbags legs air pressure massage function built in 40 ...

Page 6: ...position and massage points please wait till detection finished It sounds di di di after detection finished Now please adjust the shoulder position by pressing up or down button It will run automatic massage if there is no adjustment on shoulder position within 10 seconds Move the massage balls upward to a suitable position Move the massage balls downward to a suitable position Shoulder position a...

Page 7: ... with 5 levels available Width 5 levels available in taping and kneading massage mode Buttons description display BACK STRETCH BACK STRETCH BACK STRETCH LOWER ADJUST UPPER ADJUST Fixed position fixed point massage Small area partial massage back and forth Upper body overall back and forth Massage position adjust can adjust the massage position in fixed position partial mode Mechanical hands move d...

Page 8: ... display Auto lay down mode with 3 auto lay down modes when press the button turn into one mode Calf rest lifting button press this button calf rest lifting slowly stop when release it Calf rest decline button press this button calf rest decline slowly stop when release it Back rest lifting button press this button back rest lifting slowly stop when release it Back rest decline button press this b...

Page 9: ... the whole arm rest covered on the fixed steel board figure 6 Figure 5 Figure 6 Note the connect wire must be insert in the right place avoid to get stuck Arm rest covered on the fixed steel board then press the armrest make sure the pin into the box on the fixed steel board and pull it with your hand to check it is fasten tightly figure 7 Find out the install hole on the front part of the fixed s...

Page 10: ... it from right to left Figure 3 Prepare the cylindrical fixed pipe Figure 4 Figure 3 Figure 4 17 16 Figure 3 Figure 4 Figure 5 Figure 6 Joint the upper armrest trumpet line in backrest and the air pipe Make sure the connection is well and without air leak Figure 3 After the connected air pipe and trumpet line please surround the cable within upper armrest Do not fold any pipe or cable Figure 4 Sur...

Page 11: ...rig ht freely Figure 2 and the handle controller can swing freely in horizontal direction Figure 1 Figure 2 Figure 3 ENLARGE FIGURE Put the cylindrical fixed pipe in to the hole on the right armrest take care that the sthere hole on the fixed pipe should be one to one corresponded with the hole on the arm rest of the flange plate figure 5 Screw three screws to tighten it figure 6 Figure 5 Figure 6...

Page 12: ...e with the gravity center resting on the wheels push the chair forward or backward with your hands and finally resume the chair to the normal position in a slow and gentle manner Method Of Usage Material introduction PVC PA steel parts and electric ele ctron parts MATERIAL PU LEATHER CLOTH WOOD Model Luxor Health Description Full Body Air Massage Chair G Series Rated Voltage 110 120V 60Hz 220 240V...

Reviews: