LVO Manufacturing, Inc.
LVO Manufacturing, Inc.
LVO Manufacturing, Inc.
LVO Manufacturing, Inc.
808 N. 2
nd
Avenue E., P.O. Box 188
Rock Rapids, IA 51246
www.lvomfg.com
(712) 472-3734
1-800-346-5749 Fax (712) 472-2203
__________________________________________________________________________________________________________________________________________________________________
11
Startup Procedures
Warning:
These instructions must be followed or damage to the machine will result.
Step 1:
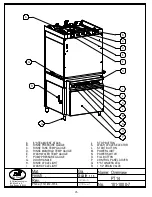
Close drain valve. See drawings for location.
Step 2:
With the circuit breakers in the control panel of the machine in the “OFF” position and the
main power supply to the machine connected, the
ON-OFF switch
on the button panel can
be turned to the “ON” position. Then wait approximately 5 seconds for the machine
controller to power up.
Note:
The amber power light will not turn on until there is sufficient water in the machine.
Step 3:
Fill the machine by pressing the
Auto Fill
button. The machine will continue to fill for 90
seconds past the point where the low water protection device is energized, turning on the
power light and temperature controllers.
The machine is equipped with a low water
protection device and will not run without sufficient water in
the wash tank.
Note:
The machine has a door switch and will not operate with the door partially open.
Step 4:
With the machine full of water and with the door closed, press the start button and let the
machine go through a complete cycle. The timers in the control panel will go through their
sequence, lighting the wash and rinse lights on the front of the machine. The cycle is
complete when the red light goes off and the amber light stays on. The pump will not run at
this time because the pump circuit breaker in the control panel is in the “OFF” position.
Step 5:
Repeat
Step 4
at least two times or until water can be heard spraying out of the rinse nozzles.
This ensures that the rinse tank is full of water before the heating element is energized.
Step 6:
All circuit breakers in the control panel can now be switched to the “ON” position. This will
energize the heating system in the wash and rinse tanks.
Step 7:
Check the pump for proper rotation by pressing the start button and observing the wash
pressure gauge on the front of the machine for 5 to 10 seconds. Then press the stop button.
The wash pressure should be 45-60 psi. If the pressure is erratic and only rises to about 20
psi, the pump is running backwards. The pump will also have a noticeable growl when
running backwards. Disconnect power to the machine and reverse the outside two wires that
feed the power block in the control panel. Reconnect power and run the pump again to
confirm that it is operating correctly.


