Under Flight Recording, you will find options for
Recording Interval and Pilot/Airplane properties, under
Advanced you can find Connection settings, Radio
settings, device ID for radio communication and ICAO
24-bit address in case you have transponder.
When appropriate settings have been made, click Save
to generate the config file. Save the file to the root of
USB flash drive, insert it into LX FLARM Eagle and turn
it on. The configuration will start automatically. Wait 5
minutes and restart it. The LX FLARM Eagle is configured.
3. Flights/logbook download
The most convenient way to download flights is via USB
flash drive, as it is an automatic procedure. FLARM will
store all finished flights from internal memory to USB
flash drive (if it is inserted). Stored flights can be viewed
on PC (.igc format).
4. Updating LX FLARM Eagle
To update device, download the latest FW version at
www.lxnavigation.com/support/software and copy it to
the root of USB flash drive. Insert the USB into the device
and power it on. Wait 5 minutes and restart it. The LX
FLARM Eagle is updated.
5. Completing the installation
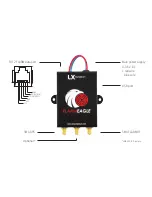
Connect any compatible FLARM display to your LX FLARM
Eagle via RJ11 FLARM cable to get the full potential of
the system. LX FLARM Eagle will provide the necessary
power (12 V and 3,3 V) and data via single cable.
We recommend using LX FLARM Eagle with LX navigation
FLARM accessories - LX Traffic monitor, LX FLARM Colour
display and LX FLARM LED display. Discover more at
www.lxnavigation.com.
Some settings in FLARM Firmware will not work correctly or will be limited if you do not use the latest FLARM
Firmware version. Ensure that LX FLARM Eagle is updated at least once per year.


