background image


                                                                     LX Zeus v 3.4.3


10.9.2014 


- 47 - 

4  Navigation modes 

LX Zeus offers three modes for navigation. These modes are: 


APT

:  navigation to Airports which are stored in APT memory 


TP

:  navigation to turn points (TP)  


TSK

: task navigation after a task has been entered 

Any of the three modes are selectable after sequenced pressing on 

A-P-T

 push button. 


4.1 

APT mode (navigation to airports) 

LX Zeus is capable to store more airport data files in 

.af

 format (LX Navigation airport format). At the same 

time  only  one  file  can  be  active.  Selection  of  the  file  of  interest  should  be  carried  out  in  Setup/Transfer 
section Airfields. 
 
APT mode consists of three navigation pages (1

st

 is map navigation page, 2

nd

 is subpage with information 

about selected airport and glide path, 3

rd

 is a map and a 3D view (if not selected then a vertical profile). Any 

of them is directly selectable by 

SUBP

 button. 

 
Note:

 the third subpage (3D terrain) can be disabled (see Setup User interface). 

 
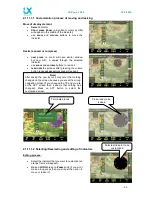
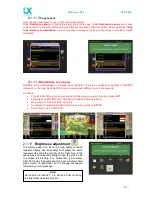
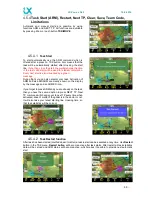
Airports are marked with a symbol (filled black line means airport with asphalt, a line 
without fill is a grass runway): 
 
 
The RWY orientation matches the real situation. Extended Airport data are available in the lower section of 
the  second  navigation  page.  After  pressing 

1-4

  button  the  supplemental  information  page  in  form  of  a 

vertical profile will open.  


4.2 

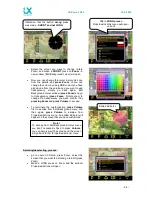
How to select an airport? 

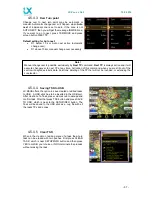
Airport selection is active from any mode of operation and 
also from any subpage. Use press on 

Select

 button (short 

press) and select menu will open. Use screen button 

APT


by  short  press  at 

TSK/MOVE

  and  selection  dialogue  will 

start. 


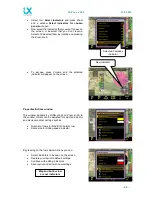
Now  scroll  with  a 

Zoom

  knob  to  select  a  filter  such  as: 

Country,  Name,  Distance  Track  or  Arrival  altitude

  to 

reduce number of offered Airports. If you use filter 

sort by 

distance, 

then it is not possible to use a name filter; only 

country filter is then possible. After the airport of interest is 
found  confirm  the  choice  with short  press  on  Zoom. The 
APT screen will open with track to destination. 


Summary of Contents for LX Zeus 2.8

Page 1: ...LX Zeus LX Zeus Mobile 2 8 4 3 5 5 7 0 and 8 0 User s manual Version 3 4 3 Tkalska 10 SI 3000 Celje Tel 00 386 3 490 46 70 Fax 00 386 3 490 46 71 www lxnavigation si ...

Page 2: ...13 1 5 2 1 APT button Airport Turn point Task 13 1 5 2 2 SUBP button Subpage 13 1 5 2 3 1 4 button 15 1 6 Rotary Switches 16 1 6 1 Zoom Rotary switch 16 1 6 1 1 Additional functions of Zoom 16 1 6 2 Audio volume rotary switch 16 1 6 2 1 Additional functions 17 1 7 Automatic jump out of edit 17 1 8 Display organisation and management 17 1 8 1 Display organization 17 1 8 1 1 Indicators 17 1 8 1 2 Bo...

Page 3: ...election 38 2 2 2 1 Speed indicator settings 38 2 2 2 2 Flaps position settings 38 2 2 2 3 TE level and TE filter 39 2 2 3 Checklist 40 2 2 4 Notepad 41 2 2 5 Transfer 41 2 2 5 1 Transfer of Airport data 42 2 2 5 2 Transfer of Turn Point data 42 2 2 5 3 Transfer of Airspace files 43 2 2 5 4 Transfer of Flarm net files 43 2 2 5 5 Transfer Charts 43 2 2 5 6 Transfer Checklist 43 2 2 5 7 Logbook tran...

Page 4: ...mitations 56 4 5 4 1 Task Start 56 4 5 4 2 Task Restart function 56 4 5 4 3 Over Turn point 57 4 5 4 4 Saving TSK to USB 57 4 5 4 5 Clear TSK 57 4 5 4 6 Team Code 58 4 5 4 7 Limitations 58 4 5 5 MOVE Function during flight 58 4 5 6 Task Zoom 59 4 5 7 Use of Remote Stick 59 5 AIRSPACE MANAGEMENT 60 5 1 Basic airspace settings 60 5 1 1 Hide airspaces above 60 5 1 2 Other setups 60 5 1 3 Define appea...

Page 5: ...Zeus LX Zeus Second seat 71 12 2 1 TSK TP APT exchange 72 12 2 2 Downloading flights from Second seat 72 13 FLYING WITH LX ZEUS 73 13 1 Flight preparation on ground 73 13 1 1 Before take off 73 13 1 1 1 Setting of the take off elevation 73 13 1 1 2 QNH setting 73 13 1 1 3 73 13 1 1 4 Task declaration process 74 13 2 During flight 74 13 2 1 Set MacCready Ballast Bugs and QNH 74 13 2 2 Statistics 75...

Page 6: ...nloading of flights recorded by Zeus 85 13 3 1 3 Downloading flights stored in Flarm 85 13 3 1 4 Colibri II Zeus interaction after landing 85 13 3 2 Recommendations for safe operation 86 13 4 ICAO charts 86 14 INSTALLATION 87 14 1 Mechanical installation 87 14 1 1 Installation of Vario unit 87 14 2 Screen rotation 87 14 3 Electrical installation 88 14 3 1 Installation of USB D 60 Vario unit 88 14 ...

Page 7: ...where as 5 5 7 0 and 8 0 have a 5x3 push button organization Every unit except the 2 8 option is delivered with a suitable steel template which makes it possible to prepare a new cut out by hand There are two orientations possible landscape or portrait orientation This can be specified during ordering The user can also change the orientation in the system settings Zeus 2 8 is only available in lan...

Page 8: ...ons of system configurations so the pilot is able to provide some kind of custom design At the back side of the unit there are plenty of connectors which make it possible to connect plug and play a various palette of GPS signal sources as the unit does not have integral an GPS receiver Units as Colibri LX 20 VL and any other GPS source which is capable of delivering NMEA data at nearly any baud ra...

Page 9: ... one side there are five push buttons which all have a double push function short and long press and on the other side there are three push buttons with one push function Buttons are labelled and this makes unit manipulation very easy Zeus 2 8 has a 4x4 push button organization Both rotary switches are multifunctional as follows Default functions audio volume adjustment function zoom selector In e...

Page 10: ...n philosophy but some new approaches have been involved The SW is continuously developed and upgrades are regularly published Upgrades of SW can easily be done by user without requiring any passwords Contact your dealer to get notified of future updates 1 4 Technical data Computer module 4 3 5 5 7 0 8 0 4 3 5 5 7 0 or 8 0 inch sunshine readable anti glare display Landscape or portrait orientation ...

Page 11: ...lled function and long press approximately 2 seconds activates secondary function which is labelled below the top one Next three push buttons are used during navigation to switch between navigation modes These buttons do not support long press functions 1 5 1 System push buttons 5 Vario Flarm TSK Move Stat Event Select Near Setup Info 1 5 1 1 VARIO FLARM button VARIO short press input of MC Ballas...

Page 12: ...E executing of move function by AAT 1 5 1 3 STAT EVENT button STATISTICS flight and task statistics EVENT activation of Event function in Colibri II 1 5 1 4 SELECT NEAR button SELECT selection of APT TP TSK Airspace and activation of Pan mode see flying NEAR activation of near function Landable points Markers Turnpoints Airspaces ...

Page 13: ...2 Navigation push buttons 3 Three buttons are used to leaf through the navigation menus of LX Zeus APT SUBP 1 4 1 5 2 1 APT button Airport Turn point Task After each press the next mode will be selected This will only change the main page 1 5 2 2 SUBP button Subpage SUBP subpage after every push subpage of APT TP or TSK screen will open The procedure is circular 1st subpage is divided into two par...

Page 14: ...tching between lower info can be done after press on 1 4 button Vertical terrain profile shows glider position regarding to the terrain and the airspace Final glide profile for MC 0 and actual MC is also visualized as a cone The terrain is shown in all 3 pages TP APT TSK The profile of the terrain is chosen according to the terrain from current position to selected TP APT and through all TPs on th...

Page 15: ... 3 1 Custom creation of bottom rows NAV BOX row Any NAV BOX position can be custom designed The procedure starts after a long press on Zoom button A yellow marked window shows ready status Rotate Zoom to find position for your NAV BOX and press Zoom A list of possible NAV BOX information will open Rotate Zoom to find NAV BOX of interest and confirm it with press on Zeus 1 5 2 3 2 Bottom row layout...

Page 16: ...ns of Zoom After press has been activated the function of Zoom rotary switch will change and the switch will become the most common used switch for LX Zeus operation during editing and selection processes Any input and also scrolling can be done after using of Zoom switch Example 1 update of MC press Vario button select item MC Bal by Zoom knob rotate press on Zoom knob adjust new value rotating Z...

Page 17: ...nactivity time out 1 8 Display organization and management Additionally to geographic map there are also several extra indicators which make the display information much more effective than a fixed predetermined solution How to create custom design is explained in Setup Layout Customization of the display doesn t require any special tools or a computer all this can be done in the Zeus by using the...

Page 18: ...rrect frame position is reached pressing zoom again will open a list of available NAV BOXes Available NAV BOXES are Indicated air speed True air speed Ground speed Vario Average vario Netto vario Average netto vario Relative vario Altitude QFE Altitude QNH Altitude QNH in ft Maximal altitude QNH Altitude IGC Altitude GPS Above ground level Circling radius Flight level Thermal gain Thermal last 30 ...

Page 19: ...speed TP APT Task GPS position Battery GPS signal To terminate the process press the volume button There is an infinite number of bottom rows available selectable with 1 4 push button To create a new row simply press 1 4 and a new row will open The display configuration may consist of one two or three bottom rows See Setup Layout for details 1 8 1 3 Header customization Customization of the header...

Page 20: ... can be used as a default pilot Furthermore plenty of empty positions are offered and this can be used for pilot names input Additionally to the name some additional parameters can be entered such as pilot s weight default ballast and reserve altitude all that will be calculate into final glide 2 1 1 1 TDT calculation task delta time This information can only be visualized as navbox and present on...

Page 21: ...ot should use leg restart function and when he is ready again he should press next TP again Limiting altitude means setting of altitude limit that will turn on the altitude warning alert You can also save user pilot settings to the USB stick and import user by pressing the buttons Import user VARIO FLARM and Save user TSK MOVE There is also an option to put a password to each pilot profile to prev...

Page 22: ...nable or disable warnings Flarm Enable or disable information about Flarm and warnings 2 1 4 Vario settings Settings in this menu define vario characteristics and some other important inputs connected to vario and speed command Vario vario filter defines dynamic of vario needle Lower number means faster reaction and vice versa smart vario Integration time display on vario unit vario scale three op...

Page 23: ...condary indicators can be addressed from 1 up to four In general every indicator consists of mechanical needle SC dot needle status indicator upper lower digital indicator battery indicator and GPS signal indicator It is important to point out that the settings should be done separately for vario and SC mode of operation A radial moving dot serves as a continuous speed to fly indicator this cannot...

Page 24: ...larm This menu is mainly used to adapt flarm objects visualization on Zeus display The only executive command which can be send to flarm unit is privacy mode Activation of privacy mode will send flarm unit into so called stealth mode which means that the data which are transmitted to and from flarm unit are limited Others commands show objects till zoom command defines zoom till flarm object will ...

Page 25: ...rm or any other Loggers In a double seat configuration the second seat pilot is also able to change logger settings The process is equal as on first seat 2 1 8 Airspace management All settings connected to AS management are available in this menu Example of Hide airspace above You can set maximal vertical and horizontal distance to which airspaces in Airspace info box on map are displayed If there...

Page 26: ... more is required as some time is needed to detect circling status It is important to keep constant speed during circling Position drift calculates wind regarding to position offset during circling Such a method needs more circles from 4 up to 8 Number of circles should be set in Drift circles option If both methods straight model and position drift are selected Zeus indicates a combined result 2 ...

Page 27: ... task mode the final glide indication is based on remaining distance over all TP until finish not over already flown turn points Wind influence for individual legs is based on actual wind data Using of component method will define wind direction on actual track and this value will be taken into final glide calculation 2 1 10 Graphics User Interface In User interface the pilot can adjust most of gr...

Page 28: ...ght 2 1 10 1 4 Distance circles In this section it is possible to select number size and colour of distance circles on the map 2 1 10 1 5 Range graphic glide reach Activation of this feature shows glide range curve from actual position to all direction This curve is not necessary a circle due to the in calculated elevation Show range from zoom defines appearance of feature regarding of zoom settin...

Page 29: ...djust appearance and length of labels of TP and APT on the map at different zooms Show TP till zoom adjust visibility of TP at wanted size ratio Show TP labels till zoom adjust visibility of TP labels at wanted size ratio TP labels length adjust number of label characters shown on the map TP label color select Label color Show APT till zoom adjust visibility of APT at wanted size ratio Show APT la...

Page 30: ...n Transparency can be set at all colours 2 1 10 5 Airspaces User can define colours and width of airspace sections that will meet personal preferences Default colours are Selected active airspace Blue Controlled area Red Prohibited area Red All other Blue 2 1 10 6 Tail settings Track of last flown minutes and colours of positive zero and neutral vario can be defined in this setting Draw tail for l...

Page 31: ...10 Auto close inactivity time out LX Zeus is monitoring push buttons and rotary switches during editing process If no action will be detected the program will change back to the last used navigation page in a predefined time slot The time is flexible and can be adjusted from 6 up to 60 seconds and also be disabled off If the time is set to off than the page will disappear only by pressing the Volu...

Page 32: ...he rest two options bottom row and header row is that indicators can also be disabled and moved or resized 2 1 11 1 Layout edit procedure go to setup Layout press Zoom knob on Layout check one two or all three panels to edit TP APT TSK rotate zoom button to select Edit and press Zoom now a screen will open with an orange frame orange frame means what is selected map row or indicator select indicat...

Page 33: ...the volume button a layout saved message will appear 2 1 11 1 2 Selecting Deselecting and editing of indicators Editing process Select the indicator that you want to customize an orange frame will appear Make a LONG press on Zoom knob if you won t make a long press than you will get the option to move or resize it Cross ready to be resized Terminate proces Selected indicator to be customized Note ...

Page 34: ...again Edit Background colour window press Zoom and go to transparency press Zoom Rotate zoom to change the transparency you want confirm it by pressing Zoom and press Volume to escape To terminate the customization press Volume first to escape from Edit Background menu and then again press Volume to escape from Properties Actions menu An edited indicator will appear on the screen that you have cus...

Page 35: ...olume and the selected indicator will appear on the screen Properties Actions window This window appears by LONG press on Zoom knob In this window colours can be adjusted for selected indicator and also some other settings such as Number of rows for NAV BOX bottom row Scale size for Sliding speed indicator By pressing on the rows below Actions you can Select indicators to be seen on the screen Res...

Page 36: ... Airspace info Limitations start conditions Map scale AHRS Flap position Flarm indicator Map NAV BOX transparency Map can be only resized If you want to have your NAV BOXes transparent than the map should be maximum stretched and the bottom row should be set to transparent 2 1 11 2 Copy NAVBOXes Under Layout user can copy NAV BOXes from one screen to another or to have nav box configuration the sa...

Page 37: ...ent Procedure TO add a NAVBOX go to Layout and select the screen you want to adjust press EDIT Long press on ENTER button will open a Properties Actions window Move down to Add NAVBOX indicator To remove it select the NAVBOX and make a long press on ENTER Select Remove xy NAVBOX 2 1 12 Brightness adjustment The display used in LX Zeus is a high quality sunshine readable display and its backlight w...

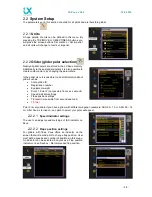
Page 38: ...formation about glider such as Competition ID Registration number Equipment weight Polar 1 Polar 2 not possible from sec seat unit Speed indicator settings Flaps position settings TE level not possible from second seat unit TE filter Polar 2 is very usable if you have a glider with different wingspan example ASG 29 15 m ASG 29 18 m After Zeus is turned on an option to select your polar will appear...

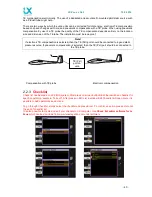
Page 39: ... TE compensation can be fine tuned during flight with the following procedure It is essential that this is only done in smooth air it is not possible to tune the TE accurately when there is a lot of thermal activity Select 100 and default TEF TE filter Accelerate up to approximately 160 km h 75 kts and keep the speed stable for a few seconds Gently reduce the speed to 80 km h 45 kts Observe the va...

Page 40: ...t port should be connected to a good static pressure source If pneumatic compensation is selected then the TE Pst port should be connected to the TE probe Compensation with TE probe Electronic compensation 2 2 3 Checklist Check list can be made on LX ZEUS system After press on screen button NEW there will be a checklist for specific operation example Take off After press on Edit List a window Edit...

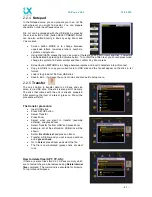
Page 41: ... appear on the stick in txt format Load is to upload txt file from USB stick Save Exit it will save the current notes and also exit to setup menu 2 2 5 Transfer The only solution to transfer data to LX Zeus and vice versa is via USB stick One stick is also part of delivery The stick that comes with the unit is already prepared After selecting the item of interest press on Zoom the procedure will s...

Page 42: ...er a specific task do as follows o Export Insert USB stick Press tsk button and select Save to USB this will save the task in cup format Remove USB stick o Import Insert USB stick Press setup and go to transfer Go to turnpoints Go to transfer file from USB Select the desirable task Go to the TP Task file window and activate the desirable task If you wish to transfer all tasks do as follows o Expor...

Page 43: ...lable on http www flarmnet org 2 2 5 5 Transfer Charts ICAO charts can also be used on the Zeus The ICAO charts should be ordered and purchased from LX Navigation The file for the charts has to be ras format Charts will be activated after importing a license file which you will receive from LX Navigation after payment The license file should be transferred via the USB stick At row view installed c...

Page 44: ...2 Compass calibration Compass module has to be connected to the main unit in case of double seater connect to first seat on 485 bus Install a module horizontally without any pitch after that enter to the compass calibration menu Position your compass to north and press SET after that you will have to position your compass to all magnetic directions seen on the screen When you are sure that your co...

Page 45: ... press on button Make a test flight with your aircraft Aircraft should be as close to the reference mass as possible Fly at the reference airspeed and observe the pitch indicated by Zeus Record this pitch on paper This observed pitch is the error which needs to be corrected Repeat the Zeus level adjustment but now put your airplane in such position lift or lower nose or tail wheel that pitch on Ze...

Page 46: ...e format time format and Position format and language can be adapted to local preferences A restart is needed for applying this settings 3 Update procedure Lx Zeus software is constantly being upgraded Please contact your local dealer for the latest upgrade Upgrade procedure is very simple and can be done by User Do as follows Put upgrade file on USB Insert USB stick into Zeus Turn Zeus off and on...

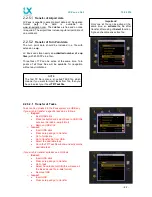
Page 47: ...third subpage 3D terrain can be disabled see Setup User interface Airports are marked with a symbol filled black line means airport with asphalt a line without fill is a grass runway The RWY orientation matches the real situation Extended Airport data are available in the lower section of the second navigation page After pressing 1 4 button the supplemental information page in form of a vertical p...

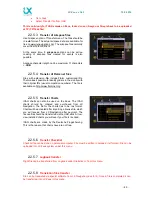
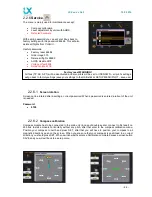
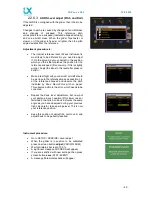
Page 48: ... airports from the Airport database turn points that are declared as landable and Marker 4 3 Navigation in APT TP or TSK mode There are three navigation pages possible APT TP or TASK and also 2 subpages are possible all selectable by SUBP button 4 3 1 Sort by filter Every turn point can be selected by using the following filters Name alphabetical sorted from number A Z Distance closest TP will be ...

Page 49: ... is a MC setting 0 and upper line is your currently set MC If the glider icon is between upper and lower line it means that you are still below glide path for your set MC but you will still reach your destination with a lower MC setting If the glider is below the lower line you are too low and you won t reach your destination even on MC 0 The lower section shows APT TP data such as Grass or asphal...

Page 50: ...ter and press confirmation go down with Plus and select your APT with Check button Change MC Press MC Press Minus Plus button Press X to escape 4 4 Turn point mode The structure of the mode is similar to APT the only important difference is that the navigation is towards turn points that are included in turn point files The turn point files cup should be uploaded by USB stick See Setup Transfer fo...

Page 51: ...e marked with U and a PILOT icon in front of its name 4 4 1 2 1 Auto TP If you select Auto TP a user TP will be created with the current position and the current time as it s name If you wish to edit an Auto created TP use the Edit TP function 4 4 1 2 2 Creation of a Turn point by hand Press on Zoom button and following menu with screen buttons will open Run Add TP after pressing on STAT EVENT pus...

Page 52: ... you should press Zoom select screen button DELETE TP and a new window will open Select the TP by rotating the Zoom knob and confirm it with short press 4 4 1 5 Send TP If you select Send TP you can send the current selected TP to the second seat all info about the TP will be send 4 4 2 Selection of a Turn Point The selection process is similar to APT Use SELECT button to start the process and pre...

Page 53: ...reated by user in LX Zeus by hand and those tasks are called User USR After creating or selecting TSK the TSK is automatically declared 4 5 1 1 Task declaration Declaring the task is an automatic process After a task is constructed and exit is pressed Volume knob a very clear message on the LX ZEUS screen appears TASK DECLARED This means that LX ZEUS will start sending the declaration data to logg...

Page 54: ...will be saved in USER if you edit an IMP task it will automatically change from IMP to USR The procedure Press TSK MOVE button Select screen button NEW TSK MOVE or EDIT Task VARIO FLARM If you have an AAT task then add time by press on Zoom and rotate Zoom Volume terminate by pressing Zoom Rotate zoom to add Task name press Zoom and add name Rotate zoom to TPs press zoom and select insert TP or AP...

Page 55: ...ight MOVE during active TSK is also possible Long press on push button TSK MOVE will open a move window You can move your custom turn point by rotating Zoom and Volume During move you will see the imporant information next to your moved TSK Total distance Required speed final glide at MC 0 and selected MC Note The task can also be seen at full ZOOM OUT you will get the TASK ZOOM function The task ...

Page 56: ...flight you can also disarm your task Activation of ARM and also DISARM are clearly shown on the display by the message and an ARMED icon If you forget to press ARM and you are already on the task then you have the second option to press NEXT TP Next TP command will change over to next TP every time when activated doesn t matter if the glider is in the sector or not It will also take your latest st...

Page 57: ...on of a Task press volume knob to escape and confirm task After that press TSK button and press SAVE TO USB which is near to the SETUP INFO button The Task will be saved to the USB stick as a cup file with all the tasks TPs and zones 4 5 4 5 Clear TSK When in the creation or editing menu of a task the whole task can be erased with two pushes First press CLEAR TASK which is near SETUP INFO button a...

Page 58: ...lled is a reference point When this is chosen LX ZEUS calculates distance and bearing from reference point to pilot s location and codes it into TEAM CODE First two characters mean the angle and the last two the radius from the reference point When this information is given to a partner with the same reference point chosen LX ZEUS can calculate direct bearing and distance to the other partner The ...

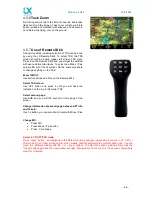
Page 59: ...uttons Minus and Plus on the Remote Stick Select TSK screen Use APT button and press it until you will have the indication on the top in left corner TSK Select second page Use SUB and you will the second or third page of the screen Change information at second page between APT info and Terrain Use 1 4 button you can also Zoom In out with Minus Plus Change MC Press MC Press Minus Plus button Press ...

Page 60: ...lso in this section Zeus will warn a user at predefined distance warning Default settings are 100m vertically and 2 km horizontally Warning timeout at take off lets you choose how long after takeoff there won t be any airspace warnings 5 1 3 Define appearance of airspaces regarding zoom After using of Show on zoom function you can define by which zoom the airspace will become visible on the displa...

Page 61: ...warning will appear as it is on the picture on the right Warning can be easily disabled after a long press on one of the screen buttons User can also disable airspace on the ground after a long press on SELECT NEAR button to engage NEAR function or short press on SELECT and click the screen button AIRSPACES Airspaces are sorted by distance In the upper dialogue a name of the airspace is shown hori...

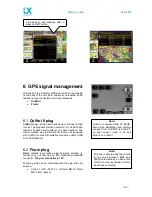
Page 62: ...h suitable connection cable USB mini 6P telephone 6 2 Flarm plug Flarm marked input makes plug and play solution to connect any unit that has an IGC standard compatible connector The port also delivers 12V Following units can be connected with the plug and play solution Colibri LX 20 2000 VL LX Flarm RB LX Flarm MB Flarm Swiss Note LX Zeus is able to adapt baud rate to any value between 4800 and 3...

Page 63: ...d the Colibri II will automatically switch ON without any pilot interaction After landing Colibri II will remain ON as long as Zeus will be powered When Zeus will be switched off Colibri II will remain on for a limited time and will switch off after approximately 5 minutes some beeps from Colibri II will be heard as a signal which means that Colibri II will switch off Colibri II is charged permane...

Page 64: ...ons can of course also be used Original Flarm Swiss can be also used Zeus will show objects from Flarm on its display and will also provide power for Flarm Declaration will be also sent from Zeus to Original Flarm SD card slot cannot be used for Original Flarms 8 1 Flarm external displays LX Zeus HW makes it possible to connect up to two Flarm external displays Both plugs are controlled from Flarm...

Page 65: ... Micro SD card are transferring themselves After the red POWER LED light stops blinking remove the Micro SD card and all the flight are there If the micro SD card has not been used for a while FLARM will automatically transfer all flights that are not already on the Micro SD card from its internal memory to the micro SD card If there are a lot of flights to transfer the process may take up to 20 m...

Page 66: ...ation to flarm will be sent directly from LX Zeus Updating Garrecht units is not possible via LX Zeus Connection schematics are shown bellow 9 1 LX ZEUS and Garrecht TRX 1090 ADSB TRX 2000 9 2 LX ZEUS and Garrrect TRX 1500 A special cable is needed for that connection This cable can be ordered at LX Navigation under following code LX TRX1500 ...

Page 67: ...d vertical profile Use 1 4 button you can also Zoom In out with Minus Plus Change MC Press MC Press Minus Plus button Press X to escape Select TP APT Press X button Use MINUS to go to Country Name or Sort by distance filter Use Check confirmation button to select your filter Example Name filter press Check press Plus to change the character and press confirmation go down with Plus and select your ...

Page 68: ... mm 20 1 mm or 24 3 mm It is important to point out the dimension by ordering For more information about installation hardware read LX Joy manual on lxnavigaton com manuals 11 2 Button description NORMAL MODE LED OFF Joystick button NOTE In order to LX Zeus work with LX Joy software version on LX Zeus should be at least 3 2 2 or higher Short press VARIO Long Press SETUP Short press ESC Long Press ...

Page 69: ...9 ZOOM VOLUME MODE LED GREEN Joystick button Short press PTT Long Press PTT Short press FN Long Press Press ENTER ZOOM OUT VOLUME ZOOM IN VOLUME Short press STAT Long Press Short press FLARM Long Press Short press ESC Long Press ...

Page 70: ...PAN MODE LED RED Joystick button Short press ZOOM IN Long Press Short press PTT Long Press PTT Press GO TO Move right Move up Move left Short press FN Long Press Short press ZOOM OUT Long Press Short press ESC Long Press Move down ...

Page 71: ...ator connected to second seat unit should be defined in Setup of second seat unit Indicators upper and lower indicator on vario second seat can be adjusted from LX Zeus second seat Automatic SC switching and external switch mode cannot be adjusted form second seat unit 12 2 Interaction LX Zeus LX Zeus Second seat LX Zeus in the front seat and LX Zeus situated in second seat are two units with iden...

Page 72: ...press Zoom knob and select screen button SEND TASK SEND TP SEND APT The other Zeus will receive it immediately Zeus will send the whole task with its statistics moved zones limitations etc When a task is sent from second seat to first seat the declaration is also sent to Colibri II 12 2 2 Downloading flights from Second seat Downloading flights is possible only from the First seat unit ...

Page 73: ...ation LX Zeus requires take off elevation input at initial Setup The elevation of the last landing place is offered If this doesn t match the elevation of actual take off place an adaptation is necessary User can also set QNH select pilot profile settings polar if 18m glider then probably 2 polars inside and set ballast On second seat unit is possible to select only a flying pilot other data has t...

Page 74: ... mode is Log Book replacement with statistics page after pressing on STAT button 13 2 1 Set MacCready Ballast Bugs and QNH After short press on VARIO button a new window will appear MacCready The menu will give options to adjust MacCready Ballast Bugs and QNH Setting MacCready Ballast and Bugs will have affect on the glider polar MC speed sink speed cruise speed and also the efficiency will change...

Page 75: ...the flight 13 2 2 1Thermal Analysis There are two pages of thermals statistics which are selectable by pressing the VARIO FLARM push button Thermals 1 Thermals 2 Thermals 2 The page shows all thermals of the flight as a reference the actual MC setting is shown The value corresponds to thermal vario of individual climb This means from entering and leaving the thermal The thermal is shown if you gai...

Page 76: ...bonus There are three NAV BOXes showing how many OLC km were made so far One is OLC and means the kilometres made to current point in flight The other one is OLC HOME and means how many kilometres will be made if the take off point is reached The third NAV BOX is OLC speed which indicates your speed over the whole OLC distance flown 13 2 2 3 Baro trace graph A baro trace from take off until actual...

Page 77: ...s to mark a position of interest for example a suitable outlanding place thermal hot spot this can easily be done by activating of Marker function The process is very fast and doesn t intensively occupy the pilot To mark a position pilot should do as follows Select screen TP press Zoom Select screen button Add marker The marker is visualized as a yellow triangle positioned on the graphic page Only...

Page 78: ...peration should be carried out Press on TSK button and confirm ARM option A very significant message ARMED will appear on the display Armed word will remain on line until first line crossing After crossing line the task will start automatically without any further pilot interaction Task start is accompanied with a very significant message If you then cross the start line multiple times the time of...

Page 79: ... and ground speed Limitation indicator will appear on the screen only at TSK screen 13 2 4 2 Task Restart After a bad start and intention to perform a new start the pilot is able to execute the so called Restart function After a press on TSK MOVE button you will find screen button RESTART After pressing restart the task will be reset doesn t matter on which leg and a new start can be performed Als...

Page 80: ...ect Zone edit R1 10 km and more and A1 180 Move function makes possible to adapt AAT distance and also get informed about important task parameters as for instance remaining distance required speed Move function is also available after long press on TSK MOVE push button Use Zoom and Volume rotary switches Note If sector radius is bigger than 10km the unit will recognize this as an AAT and will set...

Page 81: ...three navigation modes In case of flying a task final glide profile will be displayed until finish through all TPs It is also possible to select final glide with the current MC setting This can also be shown as a display indicator or as NAV BOX 13 2 8 Finish line crossing Modern competition rules use longer finish lines and also finish cylinders Zeus is always calculating the shortest way to reach...

Page 82: ... to display Flarm objects Objects will be seen on MAP as a glider icons and at Flarm radar which can be opened after long press on VARIO FLARM push button Number of shown objects is infinite Objects on the map will appear automatically with data about object s current vario and altitude difference At the Flarm radar page objects can be customized Call signs and colour Three objects can be selected...

Page 83: ...ial horizon as a box is also possible Simply connect it with CAN cable to first seat unit Plug and Play Pressure connection Pst connect static pressure Ptot connect dynamic pressure Important Orientation of AHRS box is very important It has to be installed as it is shown on the label of box unit little black glider icon Red glider is selected zoom can be adjusted Edit dialogue will open after a lo...

Page 84: ...light recorder This means that downloading Colibri II flights is possible directly from LX Zeus The stored flights can be transferred to a USB stick If there is no connection between Zeus and Colibri II the unit Zeus will offer its own flights which are not IGC approved The flight file structure meets IGC standard and therefore such flights can be evaluated by any program that accepts IGC data for...

Page 85: ...irectly download a flight via the SD card slot which is positioned on the front panel of LX Zeus The SD card slot is wired directly to Flarm Red Box SD card reader without any Zeus interaction General rule by Flarm is that flight will be stored to SD card after next power on So power LX Zeus off and on to download the latest flight It is suggested to keep an SD card all the time in Zeus SD slot to...

Page 86: ...itch on automatically as the power from Zeus will be applied 13 4 ICAO charts LX Zeus offers use of ICAO charts from Rogersdata and Deutsche Flugsicherung Charts can be ordered via update service lxnavigation si Please read Data transfer section 2 2 4 for installation process The charts will be shown by rotating Zoom knob to the left There are 3 zoom steps available for ICAO charts Zoom steps from...

Page 87: ...grade 14 1 1 Installation of Vario unit The unit occupies one 57 mm standard cut out The maximal dimensions of the unit are 60x60 mm and don t exceed dimensions of classic pneumatic instruments In case of space problems the unit can be separated into two parts which are connected via a cable 14 2 Screen rotation Software rotation can be easily done in SETUP SERVICE menu when a password 9109 is ent...

Page 88: ...te spring locks The 9P connector should be inserted into any free 485 marked plug on Zeus back The unit also receives its power from Zeus Speaker output is terminated with one chinch female connector a male connector is part of the speaker CAN terminator can be inserted either into the left or right CAN PORT Not important 9P 485 system bus can be connected also to any free 485 connector plug Impor...

Page 89: ...LX Zeus v 3 4 3 10 9 2014 89 14 3 1 1 USB D 60 wiring ...

Page 90: ...AN marked cable in one of two CAN marked plugs The same is valid for first and for second seat Second seat unit comes with two red wires which are terminated with a toggle switch It is recommended to install the switch somewhere in the rear panel as this will make possible to switch off second seat unit during single pilot operation Note Never remove CAN terminator which occupies one CAN plug of t...

Page 91: ...TP APT Distance to TP APT Dist Empty NAV BOX will remain empty No designator ETA average speed ETA based on average sped reached ETA Avg ETA current speed Estimate time of arrival based on actual speed ETA Sp ETA MacCready speed ETA based on MC setting ETA MC Final glide Altitude difference regarding to f g line FG Final glide MC 0 0 Altitude difference regarding to f g line at MC 0 0 FG MC 0 0 Fl...

Page 92: ...k TP APT TSK Ground track to TP APT or TP of task TRK True Air Speed Airspeed corrected with altitude TAS Vario Momentary variometer value Vario Vertical distance from airspace Glider position vertically from the airspace AS ver Wind direction Wind direction calculated by Zeus Wind Dir Wind speed Wind speed calculated by Zeus Wind Sp 16 Zeus Mobile The unit is very similar to Zeus 4 3 Zeus Mobile ...

Page 93: ...d Yes of course For explanation of the procedure check the relevant chapter in this manual 11 CONDOR simulator can you connect Zeus and play with it Not possible by default must be specified when ordered There will be only GPS data no baro data 12 Can I use OAT sensor from LX 7007 LX 7007 C and LX 5000 It is not possible 13 Can I use remote from LX 5000 LX 7007 C The Remote Stick can be used from ...

Reviews: