background image

2 4

Display

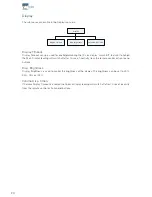
The sub menus accessible in the Display menu are:


Display Timeout

Display Timeout set-up is used for enabling/disabling the 10 sec. display ’switch’off’ feature. If enabled 

the Main Display reading will switch off after 10 sec of inactivity from the remote control or front panel 

buttons. 

Disp. Brightness

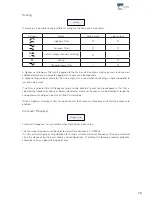
Display Brightness is used to control the brightness of the display. The brightness can be set to 25%, 

50%, 75% or 100%.

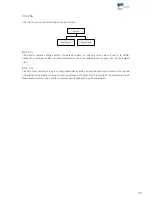
Volume Disp. Timeo.

If Volume Display Timeout is enabled the Volume Display reading will switch off after 10 sec of inactivity 

from the remote control or front panel buttons.

Volume Disp.Timeo.

Display Timeout

Disp. Brightness

Display

Summary of Contents for DPA-1 RoomPerfect

Page 1: ...Owner s manual DPA 1 RoomPerfect MENU ENTER MUTE ANALOG DIGITAL DPA 1 Digital Pre Amplifier...

Page 2: ...2...

Page 3: ...2 RoomKnowledge 23 RoomCorrection 23 Display 24 Display Timeout 24 Disp Brightness 24 Volume Disp Timeo 24 Volume 25 Def Vol 25 Max Vol 25 Input Name 26 Input Sensitivity 26 Advanced Setup 27 Communic...

Page 4: ...rocessor is active ON All circuits are active Unpacking the DPA 1 Carefully remove the unit and accessory kit from the carton visually check for shipping damage Contact both the shipper and your Lyngd...

Page 5: ...othing to chance in the fully automated calibration process However for the advanced user there are plenty of challenges since the DPA is also a complete Control Centre that allows you to build advanc...

Page 6: ...included 1 2 3 4 5 6 7 digital info analog A B random repeat AMP channel ENTER volume RCS CD TUNER menu 8 0 9 Mains cord 8 m 26 25 feet XLR XLR cable Microphone Programming cable Remote control Microp...

Page 7: ...tal input or if already selected cycles to the next Digital input In standby mode press to turn On the DPA 1 with the last selected digital input 5 Display Display with all information on the menu sys...

Page 8: ...0 0 to 99 9 in dB s Mute is indicated by the Volume control setting Standby mode is indicated with the decimal dot from the volume indicator being lit only Rear Panel 6 7 8 10 13 9 11 12 1 5 2 3 4 100...

Page 9: ...input 9 Optical Digital Input 5 Connector for Toslink input 10 Mic In Mic in for connection of RoomPerfect microphone 11 Trigger Out DC Trigger out for remote start of SDA 2175 power amplifiers or ot...

Page 10: ...input or if already selected cycles to the next Digital input To select a specific Digital input press the Digital button fol lowed by numerical button 1 5 within 2 seconds 5 Numerical Button 0 Selec...

Page 11: ...Up Down toggles between bypass and the available Focus and Global filters and the Left Right toggles between neutral and the available voicings In menu mode they are used for navigation in the menu s...

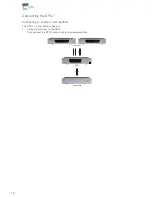
Page 12: ...A 1 Connecting to sources and amplifiers The DPA 1 is very simple to hook up 1 Connect all sources to the DPA 1 Then connect the DPA 1 output signal to a poweramplifier Source s DPA 1 Poweramp DPA 1 D...

Page 13: ...up A poweramp is connected to the Main Out Left and Right and highpass crossover is set at 80Hz The Subwoofer is connected to the Line Output and lowpass crossover is set at 80Hz Remember to set the...

Page 14: ...ressing the Menu button on the front panel or the remote enters the menu or steps back one level in the menu system Using the left right arrows keys the Menu system settings can now be scrolled throug...

Page 15: ...rightness Volume Disp Timeo Def Volume Max Volume RoomPerfect Guided setup Advanced options Measure Room Pos Measure Focus Pos RoomKnowledge RoomCorrection Advanced setup Communication Comm Address Co...

Page 16: ...n the global filter gives the best result Focus Listening The Focus filter improves the sound quality at a listening position by exploiting the 3 dimensional acous tic properties gained through the ro...

Page 17: ...urement volume level Taking one Focus listening position measurement Taking at least three room position measurements Adding more room measurements in the guided set up optional Finally automatic calc...

Page 18: ...the focus position you are ready to set the calibration volume The calibration signal is a combination of the high and low frequency measur ing signals and is only presented in your left loudspeaker...

Page 19: ...ement procedure will start again A measurement has ended successfully when the last measuring signal stops and the display shows a RoomKnowledge rating as RoomKnowledge XX Measurement ok Press Enter t...

Page 20: ...message Add more room meas Yes No is displayed At this point or any time later you can decide whether the acquired room measurements are sufficient or you wish to add further room measurements to lear...

Page 21: ...pected to take anywhere between 5 seconds and a minute de pending on the specific task When RoomPerfect has calculated the room correction filters they are automatically saved The Focus filter is save...

Page 22: ...ng the current measurement Choose between focus listening position 2 8 and press Enter If you wish to overwrite an existing Focus filter 2 to 8 can be overwritten or you are trying to save a new filte...

Page 23: ...perties have been learned The more room measurements you add the higher the RoomKnowledge will become The more that the acoustical properties of the room are learned the greater the accuracy of the ro...

Page 24: ...10 sec of inactivity from the remote control or front panel buttons Disp Brightness Display Brightness is used to control the brightness of the display The brightness can be set to 25 50 75 or 100 Vol...

Page 25: ...recommended as this corresponds to max output with full scale digital input Max Vol The Maximum Volume setting is a safety precaution used for limiting the maximum volume which can be achieved by spin...

Page 26: ...LD MD PC PHONO RADIO RIAA SACD SAT TAPE TUNER TV VCR VDP VIDEO VIDEO 1 VIDEO 2 Input Sensitivity The Input Sensitivity adjustment enables you to match levels from different sources as well as obtainin...

Page 27: ...eed setting is the RS232 Link interface speed The default setting is 57600 baud With different PC s and different lengths of cables the settings can be changed to 9600 or 115200 baud If a multi amplif...

Page 28: ...Level This adjusts the overall output level in steps of 0 1 db it can be attenuated to 40 dB in total Line Out The sub menus accessible in the Line Out menu are Line Out Line Out Control Line Out Leve...

Page 29: ...cted the full frequency range will be directed to your main loudspeakers If a filter is selected the frequencies above or below the selecter crossover frequency will be directed through the analog lin...

Page 30: ...e and order as well as delay is set correctly Therefore creating filters for active speakers is an iterative process that requires several critical listening sessions in order to achieve seamless inte...

Page 31: ...g position in a more symmetrical set up Trigger Setup Trigger setup Trigger setup sets the usage of the trigger output option If e g SDA2175 is connected to drive a sub woofer from the Line out the tr...

Page 32: ...activate Mute Signal clipping 1 The error message Fault Signal clipping is displayed when the incoming signal is classified as too loud resulting in clipping distortion 2 A loud noise from the local e...

Page 33: ...ing The DPA 1 firmware can be upgraded using the Lyngdorf Audio Serial Load software This is in the PC package available from www Lyngdorf com Follow the upgrade steps shown below to bring the product...

Page 34: ...t when the DPA 1 is on e g re motely connected SDA 2175 power amplifiers or active subwoofers AD Converter Board The AD Converter card for the DPA 1 has input connectors for both balanced XLR and unba...

Page 35: ...omPerfect Highpass Filter 3dB at 18Hz THD N A wgt Digital to Analog 103dB Neutral voicing ref 4 4V S N Ratio Digital to Analog 113dB Neutral voicing ref 4 4V Dynamic Range Digital to Analog 113dB Neut...

Page 36: ...lead supplied Mains voltage range 100 240V AC 50 60Hz Power consumption 4 W STANDBY mode Power consumption 35 W OPERATE mode Trigger Parameter Value Note Trigger Out connector 3 5mm 1 8 mono jack Case...

Page 37: ...ions and Answers please check the Support section on the Lyngdorf Audio website If you have any problems with or questions regarding your Lyngdorf Audio product please contact your nearest Lyngdorf Au...

Page 38: ...Hz 100 Hz 1kHz 10kHz 6 4 2 0 2 4 6 Frequency Hz Magnitude dB Magnitude Response Music 2 10 Hz 100 Hz 1kHz 10kHz 6 4 2 0 2 4 6 Frequency Hz Magnitude dB Magnitude Response Open 10 Hz 100 Hz 1kHz 10kHz...

Page 39: ...39...

Page 40: ...40 www lyngdorf com...

Reviews: