background image

4

Operating Voltage

The TDAI 2200 is available in two versions: one for 115V mains voltage and another for 230V mains volt-

age.

Check the label on the TDAI 2200 rear panel and verify you have the version with the proper voltage for 

your area.

The 115V version requires a mains voltage of 110V-120V at 50-60Hz with a current rating of 8A.

The 230V version requires a mains voltage of 220V-240V at 50-60Hz with a current rating of 4A.

The mains voltage setting for your TDAI 2200 can be changed ONLY BY A QUALIFIED ENGINEER.

Connect the power input only to the AC source printed on the label. The warranty 

will not cover any damage caused by connecting to the wrong type of AC mains.

The TDAI 2200 has three power modes:

OFF 

1. 

No circuitry is powered.

STANDBY  

2. 

The mains transformer and amplifi er section are powered off - only the remote control input and the mi-

croprocessor is powered, so the unit can be powered up using the remote control ‘STANDBY’ button.

ON  

3. 

All circuits active.

Unpacking the TDAI 2200

Carefully remove the unit and accessory kit from the carton, visually check for shipping damage.

Contact both the shipper and your Lyngdorf Audio representative immediately if the unit bears any sign 

of damage from mishandeling. All Lyngdorf Audio equipment is carefully inspected before leaving our 

factory.

Keep shipping carton and packing material for future use or in the unlikely event that 

the unit needs servicing. If this unit is shipped without the original packing, damage 

could occur and void the warranty.

Serial Number Registration

Please record the serial number of your amplifi er here for future reference. The serial number is printed 
on the label on the TDAI 2200 rear panel. You will need this serial number, should you ever require 
service for your TDAI 2200 amplifi er.

TDAI 2200 serial number: _____________________

Summary of Contents for Room Perfect TDAI 2200

Page 1: ...Owner s manual TDAI 2200 RoomPerfect...

Page 2: ...2...

Page 3: ...orrection 21 Display 22 Display Timeout 22 Disp Brightness 22 Volume Display Timeout 22 Volume 23 Def Vol 23 Max Vol 23 Input Name 24 Input Sensitivity 24 Advanced setup 25 Communication 25 Comm Addre...

Page 4: ...only the remote control input and the mi croprocessor is powered so the unit can be powered up using the remote control STANDBY button ON 3 All circuits active Unpacking the TDAI 2200 Carefully remov...

Page 5: ...one that s exceptionally pure and natu ral sounding with even the most demanding speaker loads It also happens to be a completely unique Digital Control Centre In fact we believe it to be the most ve...

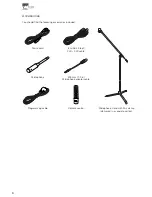
Page 6: ...7 digital info analog A B random repeat AMP channel ENTER volume RCS CD TUNER menu 8 0 9 Mains cord 8 m 26 25 feet XLR XLR cable Microphone Programming cable Remote control 200 mm 7 9 in Microphone a...

Page 7: ...00 in stand by mode 3 Analog Input selector Changes to Analog input or if already selected cycles to the next Analog input Switches the TDAI 2200 on from stand by mode 4 Digital Input selector Changes...

Page 8: ...is selected 3 Digital input 4 XLR Connector for AES input 4 Optical Digital input 5 Connector for Toslink input 5 Analog output DAC output from DSP Section 6 8 Input Single ended Analog input L R pai...

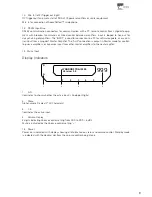
Page 9: ...lifier The AUX connection is output in Master mode for control ling slave amplifiers or bypasses input from other master amplifiers to the next amplifier 14 Mains Input Display Indicators 1 A D Illumi...

Page 10: ...cts Digital input or if already selected cycles to the next Digital input To select a specific Digital input press the Digital button fol lowed by numerical button 1 5 within 2 seconds 5 Numerical but...

Page 11: ...he Menu Tree chapter When the amplifier is powered up the Main screen shows the product name and current software ver sion After showing the initial screen the main screen is shown Here the current In...

Page 12: ...version 3 0 TDAI 2200 Main Menu RoomPerfect Guided setup Advanced options Measure Room Pos Measure Focus Pos RoomKnowledge RoomCorrection Volume Disp Timeo Display Timeout Disp Brightness Input Name V...

Page 13: ...Out Communication Master Slave Comm Address Comm Speed Line Out Control Line Out Level Routing Crossover freq Filter Type Delay Trigger setup Remote Control Software versions Factory Reset TDAI 2200 M...

Page 14: ...t are not sat in any particular listening position the global filter gives the best result Focus Listening The Focus filter improves the sound quality at a listening position by exploiting the 3 dimen...

Page 15: ...ement volume level Taking one Focus listening position measurement Taking at least three room position measurements Adding more room measurements in the guided set up optional Finally automatic calcul...

Page 16: ...the focus position you are ready to set the calibration volume The calibration signal is a combination of the high and low frequency measur ing signals and is only presented in your left loudspeaker...

Page 17: ...ement procedure will start again A measurement has ended successfully when the last measuring signal stops and the display shows a RoomKnowledge rating as RoomKnowledge XX Measurement ok Press Enter t...

Page 18: ...message Add more room meas Yes No is displayed At this point or any time later you can decide whether the acquired room measurements are sufficient or you wish to add further room measurements to lear...

Page 19: ...pected to take anywhere between 5 seconds and a minute de pending on the specific task When RoomPerfect has calculated the room correction filters they are automatically saved The Focus filter is save...

Page 20: ...ng the current measurement Choose between focus listening position 2 8 and press Enter If you wish to overwrite an existing Focus filter 2 to 8 can be overwritten or you are trying to save a new filte...

Page 21: ...perties have been learned The more room measurements you add the higher the RoomKnowledge will become The more that the acoustical properties of the room are learned the greater the accuracy of the ro...

Page 22: ...0 sec of inactivity from the remote control or front panel buttons Disp Brightness Display brightness is used to control the brightness of the display The brightness can be set to 25 50 75 and 100 Vol...

Page 23: ...recommended as this corresponds to max output with full scale digital input Max Vol The Maximum Volume setting is a safety precaution used for limiting the maximum volume which can be achieved by spin...

Page 24: ...DVD 2 FM LD MD PC PHONO RADIO RIAA SACD SAT TAPE TUNER TV VCR VDP VIDEO VIDEO 1 VIDEO 2 Input Sensitivity The Sensitivity adjustment enables you to match levels from different sources as well as obtai...

Page 25: ...s and different lengths of cables the settings can be changed to 9600 or 115200 baud If a multi amplifier set up is installed with Master Slave communication a smaller delay can be observed when usin...

Page 26: ...L Lowpass filter X X R L L R Left and Right channel switching X M Mono X M Mono lowpass filter X A highpass and lowpass filter can be applied to the Main and Line outputs when you want to connect an...

Page 27: ...ight experiment with turning the subwoofer so the driver faces the wall in a distance of 5 to 10 cm This will increase the bandwidth of the subwoofer However due to the limited bandwidth frequency res...

Page 28: ...ch channel 1 centimeter 0 3937 in The fault message Values for delay exceed limits is displayed when the difference between the distance from the speakers closest to and the speakers furthest from the...

Page 29: ...e rest of the TDAI 2200 s over the Lyngdorf RS232 link Software versions The Software version menu is used to check the current software version of your TDAI2200 and the RoomPerfect module as well as...

Page 30: ...nd or de activate Mute Signal clipping 1 The error message Fault Signal clipping is displayed when the incoming signal is classified as too loud resulting in clipping distortion 2 A loud noise from th...

Page 31: ...g The TDAI 2200 firmware can be upgraded using the Lyngdorf Audio Serial Load software This is in the PC package available from www Lyngdorf com Follow the upgrade steps shown below to bring the produ...

Page 32: ...the loudspeaker cable is inserted into the slot in the loudspeaker terminal and the terminal is tightened firmly Always disconnect the TDAI 2200 from the mains before changing any connections to its...

Page 33: ...unbalanced RCA inputs are wired in accordance with normal practice Shell Chassis and ground Pin Hot Cleaning and Maintenance Make sure that no conductive part of the loudspeaker wiring is accessible D...

Page 34: ...1 THD N Output power 4ohms 2 375W 1KHz 0 1 THD N Nominal load impedance 4 Ohms 8 Ohms It is safe to operate the amplifier with no load Frequency response 0 3Hz 33KHz 3dB points 8ohms load Frequency r...

Page 35: ...version Mains voltage range 220 240V AC 50 60Hz 230V version Internal mains fuse 8 Amp 0 25A 115V version Internal mains fuse 4 Amp 0 1A 230V version Power consumption 1 5 W STANDBY mode Power consump...

Page 36: ...Answers please check the Support section on the Lyngdorf Audio website If you have any problems with or questions regarding your Lyngdorf Audio product please contact your nearest Lyngdorf Audio repre...

Page 37: ...cy Hz Magnitude dB Magnitude Response Music 2 10 Hz 100 Hz 1kHz 10kHz 6 4 2 0 2 4 6 Frequency Hz Magnitude dB Magnitude Response Open 10 Hz 100 Hz 1kHz 10kHz 6 4 2 0 2 4 6 Frequency Hz Magnitude dB Ma...

Page 38: ...38...

Page 39: ...39...

Page 40: ...40 www lyngdorf com...

Reviews: