background image


Lyngdorf Audio Discreet series – Installation manual 


SPEAKER INSTALLATION 


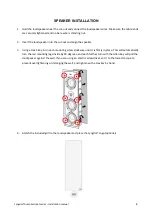
1.


Hold the loudspeakers near the cut-out and connect the loudspeaker wires. Make sure the cable ends 
are securely tightened and no bare wire is standing out. 
 

2.


Insert the loudspeaker into the cut-out and align the speaker. 
 

3.


Using a Hex 3 key, turn each mounting screw clockwise until it is firmly in place. This will automatically 
turn the red mounting legs inside by 90 degrees, and each further turn with the Allen Key will pull the 
loudspeaker against the wall. If you are using an electric screwdriver, set it to the lowest torque to 
prevent overtightening or damaging the wall, and tighten with a Hex key by hand. 


4.


Attach the included grill to the loudspeaker and place the Lyngdorf Logo (optional). 


Summary of Contents for D-5

Page 1: ...LYNGDORF DISCREET SERIES INSTALLATION MANUAL working document D 500 D 500 Center D 5 D 5 IC LYNGDORF DISCREET SERIES D 500 D 500 Center D 5 D 5 IC INSTALLATION MANUAL ...

Page 2: ...E OF CONTENTS Table of Contents COMPLIANCE 3 PRE INSTALLATION 4 SPEAKER INSTALLATION 8 D 500 MOUNTING DIMENSIONS 8 D 500 CENTER MOUNTING DIMENSIONS 10 D 5 MOUNTING DIMENSIONS 11 D 5 IC MOUNTING DIMENSIONS 12 TECHNICAL SPECIFICATIONS 13 SERVICE INFORMATION 15 ...

Page 3: ...nd equipment which must be collected for reuse recycling and other forms of recovery are marked with the icon of the crossed out waste receptacle FCC Steinway Lyngdorf products and accessories comply with parts 15 and 68 of the FCC rules Operation is subject to the following two conditions 1 this device may not cause harmful interference and 2 this device must accept any interference received incl...

Page 4: ... your local Lyngdorf Audio representative immediately if the unit bears any sign of damage from mishandling In some cases it may be necessary to return the equipment to Lyngdorf Audio or an authorized service provider for repair therefore it is recommended that you save your original packing materials If this unit is shipped without the original packing damage could occur and void the warranty D 5...

Page 5: ...e chosen position and that the mounting legs can hold tight D 500 6 7 kg 14 7 lb D 500 Center 11 5 kg 25 4 lb D 5 6 4 kg 14 1 lb D 5 IC 6 9 kg 15 2 lb Cables Recommended minimum up to 16m 50ft AWG 14 2 or 2 lead 2mm2 Recommended minimum from 16m 50ft and up AWG 12 2 or 2 lead 3 5mm2 Recommended maximum Double AWG 10 2 or 2 lead 5mm2 Allow min 50cm longer cable for each speaker for connecting the c...

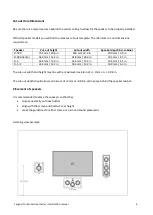
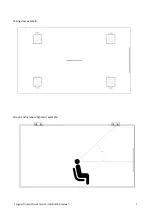
Page 6: ...in 100 mm 3 9 in D 500 Center 360 mm 14 2 in 618 mm 24 3 in 104 mm 4 1 in D 5 334 mm 13 2 in 334 mm 13 2 in 104 mm 4 1 in D 5 IC 334 mm 13 2 in 334 mm 13 2 in 109 mm 4 3 in The cut out width and height must be with a maximum deviation of 2mm or 0 08 in The cut out depth should allow a minimum of 2mm or 0 08 in extra space behind the speaker cabinet Placement of speakers It is recommended to place ...

Page 7: ...Lyngdorf Audio Discreet series Installation manual 7 Ceiling view example Screen and listener alignment example ...

Page 8: ...he speaker 3 Using a Hex 3 key turn each mounting screw clockwise until it is firmly in place This will automatically turn the red mounting legs inside by 90 degrees and each further turn with the Allen Key will pull the loudspeaker against the wall If you are using an electric screwdriver set it to the lowest torque to prevent overtightening or damaging the wall and tighten with a Hex key by hand...

Page 9: ...Lyngdorf Audio Discreet series Installation manual 9 D 500 MOUNTING DIMENSIONS Cut out dimensions back view Cut out dimensions side view Mounting leg position Mounting leg span ...

Page 10: ...Lyngdorf Audio Discreet series Installation manual 10 D 500 CENTER MOUNTING DIMENSIONS Cut out dimensions back view Cut out dimensions side view Mounting leg position Mounting leg span ...

Page 11: ...Lyngdorf Audio Discreet series Installation manual 11 D 5 MOUNTING DIMENSIONS Cut out dimensions back view Cut out dimensions side view Mounting leg position Mounting leg span ...

Page 12: ...Lyngdorf Audio Discreet series Installation manual 12 D 5 IC MOUNTING DIMENSIONS Cut out dimensions back view Cut out dimensions side view Mounting leg position Mounting leg span ...

Page 13: ...x 4 2 inches Cut out dimensions W x H x D 226 x 751 x 100 mm 8 9 x 29 6 x 3 9 inches Weight 6 4 kg 14 1 lb Finish Matte black white grill D 500 Center Description 2 way speaker with 2 passive woofers Tweeter 28 mm 1 soft dome Midrange driver 175 mm 38 mm voice coil aluminum cone vented magnet Passive woofers 2 x 175 mm aluminum cones Enclosure Closed MDF cabinet Frequency range 50 22 000 Hz 3 dB N...

Page 14: ...ut out dimensions W x H x D 334 x 334 x 104 mm 13 2 x 13 2 x 4 1 inches Weight 6 4 kg 14 1 lb Finish Matte black white grill D 5 IC Description 2 way speaker Tweeter 25 mm 1 soft dome Midrange driver 180 mm 35 mm voice coil aluminum cone vented magnet Enclosure Closed MDF cabinet Frequency range 80 20 000 Hz 3 dB Nominal Impedance 4 Ohm Sensitivity 88 dB 2 83V 1m Power handling 100 W IEC Maximum S...

Page 15: ...k In some cases it may be necessary to return the equipment to Steinway Lyngdorf or an authorized service provider for repair therefore it is recommended that you save your original packing materials Steinway Lyngdorf will not be responsible for any damage due to unauthorized packing or shipment in non original packing materials If return is made in authorized packaging risks are borne by Steinway...

Page 16: ...Lyngdorf Audio Discreet series Installation manual 16 SL AUDIO A S ULVEVEJ 28 7800 SKIVE DENMARK WWW STEINWAYLYNGDORF COM ...

Reviews: