LX900 PROGRAMMING AND OPERATION
MDJ, MDJH, MDJB, MDJBH
10
MODES OF OPERATION
This controller has three (3) different modes of operation B2, C2, and TS (Timer Secure). Factory default is B2 mode and
the Timer To Close (TTC) is 0 seconds. Anytime the operator does not detect safety beams, it will automatically change to
C2 mode. If the TTC is larger than 0 seconds, it will automatically change to TS mode. There are 7 fixed delays for TTC –
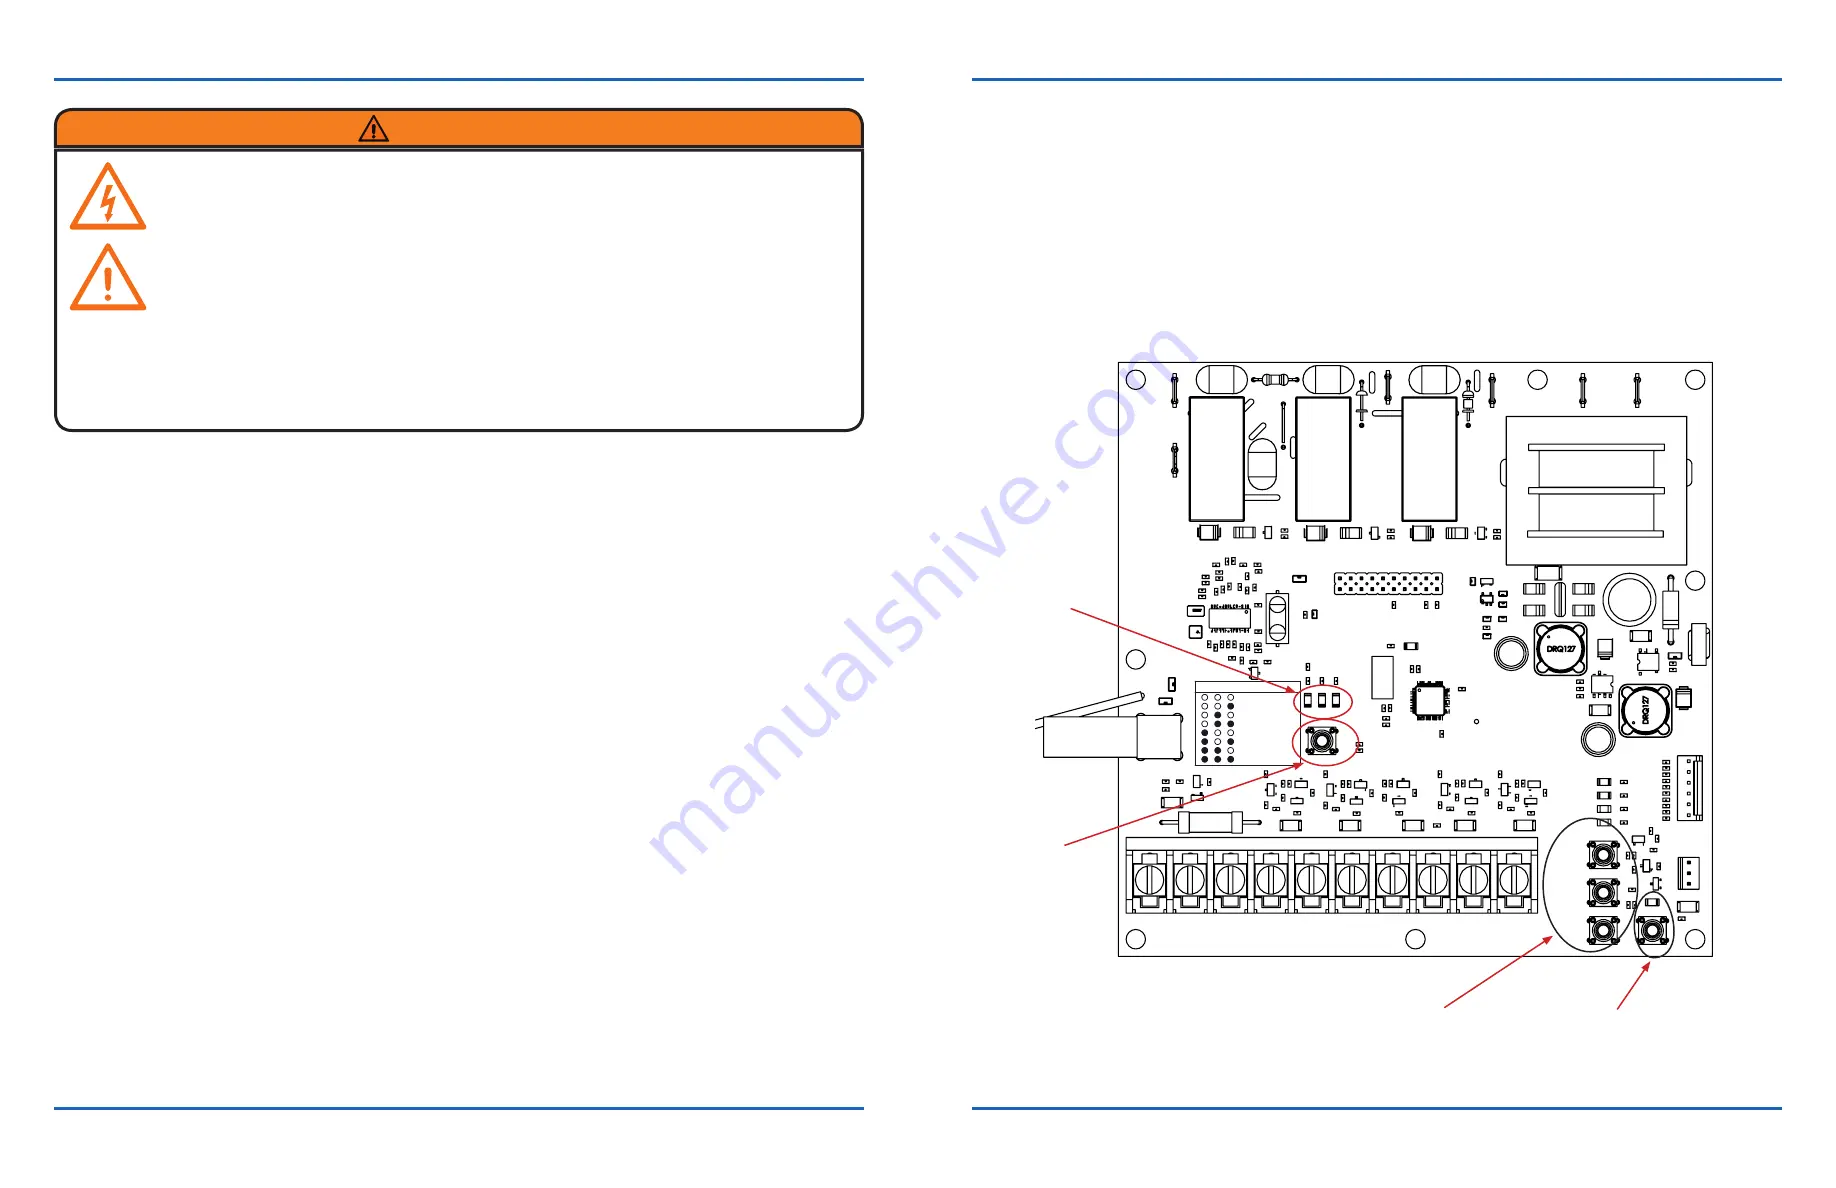
3, 15, 30, 45, 60, 90 and 180 seconds. To adjust the setting, hold in the TTC button (refer to diagram). Three LED's above
the TTC button will indicate the current setting on the adjacent chart. After reaching 180 seconds, it will jump back to 0
seconds (default) and the operator will revert to B2 Mode.
C2 Mode
•
Momentary press of OPEN will open door.
•
Constant pressure required on CLOSE for the door to close.
•
Single or three button transmitter will open or stop the door only.
B2 Mode
•
Momentary press of OPEN or CLOSE will activate door.
•
Single button - reverses a closing door, stops an opening door.
•
Transmitters activate operator same as wall stations.
TS Mode
•
Button function is the same as B2 mode.
•
Includes Timer to Close (TTC) function. The door will automatically close after set time expires. Timer starts when
door reaches the open limit. (When first entering TS mode or after power interruption, momentary press of OPEN will
start timer if door is at OPEN limit.)
General Notes regarding Mode of Operations:
• After power interruption the first move is Open.
•
STOP button works in all modes of operation. If the 3 button wall station is not connected to the Control board or there
is no jumper between COM and STOP, the motor will not run.
•
The Constant Pressure (CP) feature will work only from 3 and 1 button wired Wall Station
•
The controller includes a Run Timer: a maximum amount of time the motor will run after receiving either open or close
command. Factory default: 45 seconds. Not adjustable.
•
Open override means that the door may be reversed while closing by activating an OPEN button without the need to
use the STOP button first (for all 3 Modes).
To reduce the risk of serious injury or death, follow these instructions carefully:
•
Read and follow ALL instructions.
• Keep fingers and other body parts away from all moving parts of the door and gate operator system
while it is being operated.
•
Keep the radio controls away from children. Do not allow children to play with the controls.
•
Keep away from the door when it is in motion. Watch the door while it is moving until completely
closed or opened.
•
Do not cross the path of a moving door.
•
Disable and locks and remove any ropes connected to the garage door to avoid entanglement and
prevent damage to the system.
•
Do not make repairs to cable, springs, or other hardware; call a trained door systems technician. The system is
under extreme tension and can cause serious injury or death.
•
Ensure that the door is properly operating and balanced. If not, call a trained door systems technician to make
repairs.
WARNING
MDJ, MDJH, MDJB, MDJBH
11
LX900 PROGRAMMING AND OPERATION
Programming a transmitter: To program a remote transmitter, press and hold the LEARN button for 3 seconds, the learn
LED will turn ON and the operator will stay at LEARN mode for 15 seconds only. While in LEARN mode, press (any)
button on the transmitter and notice that the LEARN LED will flash four (4) times, indicating that the transmitter has been
programmed to the operator. The controller will learn up to 20 Lynx transmitters.
Erase all transmitters: To erase all remote transmitters, press and hold the LEARN button for at least 15 seconds. During
this time observe that the learn LED will turn ON and, after about 10 seconds the LEARN LED will flash three (3) times
indicating that all the transmitters have been erased from the operator.
LEARN
STOP
CLOSE
OPEN
CLOSE LIMIT
OPEN LIMIT
FAULT
POWER
180 SEC.
90 SEC.
60 SEC.
45 SEC.
15 SEC.
30 SEC.
3 SEC.
0 SEC.
TTC PROGRAM
4 2 1
4 2 1 LED
OPEN
CLOSE
STOP
COM
EDGE
SINGLE
COM
BEAMS
*COAXIAL
ANTENNA
CONNECTION
ANTENNA
EXT. RADIO
LIM IT SWITCHES
Timer To Close (TTC)
LED indicator
Timer To Close (TTC)
Programing button
On board Open Close
Stop (OCS) buttons
FIGURE 10
Learn button and
LED indicator


