background image

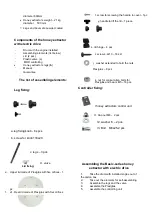
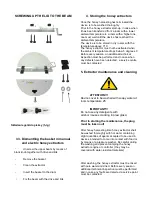
SCREWING UP THE LID TO THE BEAM 


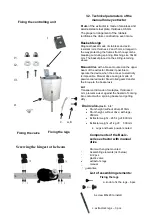
Składanie gałki do pleksy (h,l,g) 


3.3. Dismantling the basket in manual 

and electric honey extractors 


Unscrew the upper beam by means of 

black knob together with drive and lids


Remove the basket


Clean the extractor


Insert the basket to the drum


Fix the beam with the drive and lids


4. Storing the honey extractors 

Once the honey harvesting has terminated the 
device is to be washed thoroughly. 
Prior to the honey extractor start-up, in case when 
it has been transferred from a room with a lower 
ambient temperature to a room with a higher one , 
one must wait until the device has reached the 
ambient temperature. 
The device is to be stored in dry rooms with the 
temperature above 0º C. 
The honey extractor must not be activated when 
the ambient temperature drops below 5 degrees C 
Before every season, an additional technical 
inspection must be performed and n case when 
any defects have been detected , a service centre 
must be contacted 


5. Extractor maintenance and cleaning 


ATTENTION!!! 

Device cover to be washed with soapy water at 
room temperature 25 


IMPORTANT!!! 

Do not use any detergents with 
alcohol (causes cracking in plexi glass) 


Prior to starting the maintenance, the plug 
must be taken out! 


After honey harvesting time honey extractor shall 
be washed thoroughly with hot water containing 
slight quantities of agents accepted to be used in 
devices intended to come into contact with food or 
by means of a pressure washer. Be careful during 
the washing and prevent dumping the honey 
extractor engine or controller ( they may be 
covered with water-resistant materials) 


After washing, the honey extractor must be rinsed 
with pure water and dried. Before every season 
additional technical inspection must be performed 
and in case any faults are detected a service point 
must be contacted. 

Summary of Contents for BASIC LINE Series

Page 1: ...lub elektrycznym Przedsi biorstwo Pszczelarskie Tomasz yso Sp ka z o o Sp ka Komandytowa 34 125 Su kowice ul Rac awicka 162 Polska www lyson com pl email lyson lyson com pl tel 33 875 99 40 33 870 64...

Page 2: ...sady przygotowania do pracy 2 2 Zasady u ytkowania 3 Charakterystyka miodarek minima 3 1 Parametry techniczne miodarki elektrycznej 3 2 Parametry techniczne miodarki r cznej 3 3 Demonta kosza w miodar...

Page 3: ...ta Zabrania si otwierania pokrywy miodarki podczas wirowania 7 Nie nale y przestawia miodarki podczas wirowania 8 W przypadku miodarki ze sterowaniem elektrycznym nale y chroni silnik oraz sterowanie...

Page 4: ...ojemnik w mo na wznowi wirowanie 9 Pod zaw r spustowy nale y podstawi zbiornik przeznaczony na mi d Podczas wirowania zaw r spustowy powinien by otwarty aby odwirowany mi d m g swobodnie sp ywa 3 Char...

Page 5: ...sy z otworami 1 szt e1 tylna pokrywa pleksy z otworami 1 szt f ruba do przykr cenia uchwytu do pleksy 1 szt g uchwyt do podnoszenia pokrywy miodarki M5 1 szt h zawias do pokrywy 4 szt j wkr t 4 2x19 1...

Page 6: ...monta u 3 monta n g oraz zaworu 4 monta pleksy 5 monta sterownika l I1 I2 I3 d Mocowanie zaworu c a b Sk adanie ga ki a b do n g Przykr cenie zawias w do belki Przed monta em zawias w do belki nale y...

Page 7: ...onana z metapleksu o grubo ci 3mm zabezpiecza u ytkownika przed niebezpiecze stwem kontaktu z wiruj cym koszem oraz przed zabrudzeniem Zaw r spustowy plastikowy 6 4 Wysoko i waga wysoko b bna bez nap...

Page 8: ...zamontowan listw z nap dem r cznym wyci gn z kartonu 2 Wyci gn zestaw element w do samodzielnego monta u 3 Monta n g i zaworu 4 Monta r koje ci 5 Monta pleksy Mocowanie r koje ci e2 e1 e d Monta zawo...

Page 9: ...dark przed pierwszym wirowaniem i po zako czonym miodobraniu nale y dok adnie umy Podczas mycia zachowa szczeg ln ostro no aby nie dopu ci do zawilgocenia silnika i sterowania miodarki na czas mycia m...

Page 10: ...r electric drive Przedsi biorstwo Pszczelarskie Tomasz yso Sp ka z o o Sp ka Komandytowa 34 125 Su kowice ul Rac awicka 162 Polska www lyson com pl email lyson lyson com pl tel 33 875 99 40 33 870 64...

Page 11: ...2 2 Operational principles 3 Characteristics of the honey extractors MINIMA series 3 1 Technical parameters for electric honey extractors 3 2 technical parameters for manual honey extractors 3 3 Dism...

Page 12: ...is forbidden to open the lid during spinning 7 While spinning the honey extractor must not be displaced 8 In case of the honey extractor with electric controlling the engine and the controller must b...

Page 13: ...by the honey accumulating inside the drum If that is the case the honey extractor must be stopped in order to avoid any damage Once the honey has drained to the containers spinning may be restarted 9...

Page 14: ...er extended to hold the nuts Plexiglas 8 pcs k nut for conical Allen bolts for Plexiglas and beam M5 16 pcs Controller fixing l honey extractors control unit I1 Cap nut M8 2 pcs I2 washer 8 2 pcs I3 B...

Page 15: ...electricity is impossible Manual drive casing is made of powder coated metal Steel rolled gears transfer the torque to the basket axis d c a b Fixing the valve Fixing the legs Screwing the hinges to t...

Page 16: ...ur orifices 1 piece g bolt to screw up the handle to plexiglas 1 piece h grip to lift the extractor lid 1 piece i lid hinge 4 pcs j screw 4 2x19 16 pcs ASSEMBLING THE HONEY EXTRACTOR WITH MANUAL DRIVE...

Page 17: ...s C Before every season an additional technical inspection must be performed and n case when any defects have been detected a service centre must be contacted 5 Extractor maintenance and cleaning ATTE...

Page 18: ...al equipment distributor network at least free of charge and directly if the device to be returned is of proper type and serves the same purpose as the newly purchased device 7 Guarantee Product purch...

Reviews: