background image


© 2016 Lytx, Inc. – Confidential & Proprietary 


Note

: This equipment has been tested and found to comply with the limits for a Class B digital 

device, pursuant to part 15 of the FCC Rules. These limits are designed to provide reasonable 
protection against harmful interference in a residential installation. This equipment generates, 
uses, and can radiate radio frequency energy and, if not installed and used in accordance with the 
instructions, may cause harmful interference to radio communications. However, there is no 
guarantee that interference will not occur in a particular installation. 

It is recommended the antenna must not be co-located or operating in conjunction with any other 
antenna or radio transmitter. During operation, the transmitter must be separated at least 20cm 
(8 inches) from any human contact. 

Note

: The radiated output power of this wireless device is far below the FCC radio frequency 

exposure limits. Nevertheless, this device should be used in such a manner that the potential for 
human contact during normal operation is minimized. 

Canada – Industry Canada Notice 

This device complies with Industry Canada RSS-210 regulations. Operation is subject to the 
following two conditions: (1) This device may not cause harmful interference, and (2) this device 
must accept any interference received, including interference that may cause undesired 
operation. 

To prevent radio interference to the licensed service, this device must be operated indoors only 
and should be kept away from windows to provide maximum shielding. 

This Class B digital apparatus complies with Canadian ICES-003. Cet appareil numérique de la 
classe B est conforme à la norme NMB- 003 du Canada. 

Exposure of Humans to RF Fields 

The installer of this radio equipment must ensure that the antenna is located or pointed such that 
it does not emit RF field in excess of Health Canada limits for the general population; consult 
Safety Code 6, obtainable from Health Canada’s website: 

http://www.hc-sc.gc.ca/ewh-

semt/pubs/radiation/radio_guide-lignes_direct/index-eng.php


Australia & New Zealand – Wireless Notice 

This product has been found to be compliant with the wireless regulatory requirements for Australia 
and  New  Zealand  and  is  designated  to  have  met  Compliance  Level  2.  The  compliance  mark  is 
designated with the circle and check mark inside is called the “C-Tick” mark. 

Summary of Contents for DC3P

Page 1: ...essories 2016 Lytx Inc Confidential Proprietary This guide is protected as confidential and proprietary information of Lytx Inc Copying and use of this guide for any purpose other than installing DC3P...

Page 2: ...n 11 Windshield Mounting Options Restrictions Recommendations 12 Mark the Mounting Location on the Glass 13 Attach the Bracket to the Windshield 15 Mount the Event Recorder in the Bracket 15 Bracket W...

Page 3: ...What is the best way to ROUTE THE POWER CABLE 25 What is the best way to CONNECT THE WIRING 25 What if I need to EXTEND THE WIRING 25 Why are there TWO DIFFERENT POWER CONNECTIONS 25 What is the even...

Page 4: ...s power has been removed or the area is known to be non hazardous WARNING Substituting or supplementing components may impair suitability and performance If you are missing any components contact Lytx...

Page 5: ...nada Notice This device complies with Industry Canada RSS 210 regulations Operation is subject to the following two conditions 1 This device may not cause harmful interference and 2 this device must a...

Page 6: ...3 5 MHz Italy If used outside of own premises general authorization is required Luxembourg General authorization required for public service Romania Individual license is required Declaration of Confo...

Page 7: ...nstimmung mit den grundlegenden Anforderungen und den anderen relevanten Vorschriften der Richtlinie 1999 5 EG befindet BMWi Hiermit erkl rt Lytx Inc die bereinstimmung des Ger tes DC3P mit den grundl...

Page 8: ...the following standards Manufacturer s Contact Lytx Inc 9785 Town Centre Drive San Diego CA 92121 USA Phone Number 858 430 4000 Fax Number 858 430 4001 Safety IEC 60950 1 2001 EN 60950 1 2001 Low Volt...

Page 9: ...after installation of the DC3P there is a malfunction of the vehicle s computer systems contact Lytx Inc U S Technical Support Center at 866 910 0403 or email support lytx com immediately Lytx recomm...

Page 10: ...vent recorder is a driver aid only and is not a substitute for a safe conscientious driver The Lytx DC3P event recorder cannot compensate for a driver who is distracted inattentive or impaired by fati...

Page 11: ...erious personal injury or death or severe property damage For additional product and service information contact the Lytx U S Technical Support Center at 866 910 0403 or email support lytx com BEFORE...

Page 12: ...mirror on the passenger side of the vehicle subject to any vehicle manufacturer s guidelines or any applicable federal state provincial or local laws that prohibit mounting devices on a vehicle s wind...

Page 13: ...otor Carrier Safety Administration FMCSA Lytx s Two Inch Allowance is within the federal guidelines for video event recorders However some states have adopted laws that restrict locations where object...

Page 14: ...the event recorder is located outside the driver s sight lines to the road and highway signs and signals Larger commercial motor vehicles Mount the event recorder near the center of the windshield on...

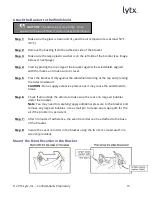
Page 15: ...will lie flush against the glass Step 4 Final Location Check Before attaching the bracket take a moment to verify that you have selected a good mounting location and that the outward facing view is t...

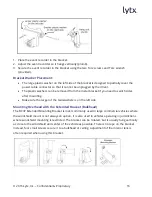
Page 16: ...top and pressing the sides downward CAUTION Do not apply excessive pressure as it may cause the windshield to break Step 6 Check from outside the vehicle to make sure there are no large air bubbles un...

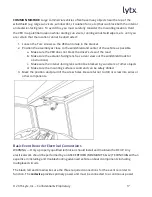
Page 17: ...if you need to switch sides after mounting Make sure the larger of the two washers is on the left side Mounting Overhead with the Extended Bracket Bulkhead The DC3P Extended Mounting Bracket is most c...

Page 18: ...road b Make sure the exterior facing lens has a clear view out the windshield look for obstructions c Make sure the interior facing lens cannot be blocked by sun visors or other objects d Make sure t...

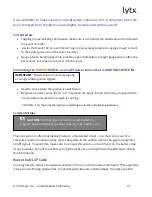
Page 19: ...all wire runs outside the vehicle cab with a loom Always protect against wire fatigue and harness abrasion by properly attaching wires at closely spaced intervals while avoiding contact with sharp ed...

Page 20: ...n the key is turned all the way forward to the on position and when the engine is running CAUTION Test the connection before completing any further installation procedures Common Mistake This connecti...

Page 21: ...of any sharp edges moving parts and cannot get pinched in the door jam b Make sure the cable is tucked away and secured so that it cannot come loose We recommend using cable ties every few inches alo...

Page 22: ...light turns off and the RIGHT status turns red After an additional 30 60 seconds the RIGHT status light begins to blink Can vary depending on cell coverage and signal strength OR At this point the ev...

Page 23: ...irmware upgrade in progress These patterns may continue for several minutes All of them indicate the event recorder is powered Errors If the right light is not lit or if the left light is solid red or...

Page 24: ...on mistake If the test continues to fail contact Lytx Inc U S Technical Support Center at 866 910 0403 or email support lytx com Lytx recommends to not drive the vehicle until the malfunction is resol...

Page 25: ...o bundle and secure all wires so they don t come loose Replace any trim pieces on the door pillar and dash that were removed Make sure the cable is routed under the trim and cannot get pinched in the...

Page 26: ...CT THE WIRING Due to the variety of preferred wiring methods ring terminal connectors splice connectors Add A Circuit fuse taps and Posi Taps electrical connectors are not included in the hardware kit...

Page 27: ...he vehicle with infrared light invisible to the eye This enables the event recorder to record clearly lit images in low light situations The Illuminator draws additional power from the vehicle which i...

Page 28: ...state off is typical Alternating green red An event was triggered and is being recorded The light will turn to solid red within 10 15 seconds Additional recordings may be triggered during this process...

Reviews: