background image

Table of Contents

FCC Class B and CE Compliance

3

Features

4

Package Contents

5

Basic Theory of Operation

5

MIDI Modes

5

SMPTE Modes

6

Front and Back Panel

8

Front Panel

8

Dip Switch Settings

8

Back Panel

9

Mechanical Installation

10

About the Parallel Cable

11

About Your Printer Port

13

Running the DOS Diagnostics

13

1.  Internal Hardware Test

15

2.  Internal Buffer Test

15

Delay Value

16

3.  Transmit/Receive

16

4.  Receive Interrupt Test

17

5.  SMPTE I/O Test

17

Drivers

18

Windows 3.1 and 3.11 Driver Installation

18

About the "<Advanced>" Button

20

Windows 95 Driver Installation

20

Remote Control Software

22

Remote Control Software Windows Installation

22

Remote Control Windows 95 Installation

24

Typical System Set-up — Fig. 1

23

Configuring Applications

25

SMPTE/MIDI Time Code Tutorial

26

What is SMPTE (Time Code)?

26

What is MIDI Time Code (MTC)?

27

About Frame Rates

28

What Frame Rate and Settings Should You Use?

29

SMPTE and MTC User Bits

29

SMPTE Offset

30

Flywheeling

31

Portman 4x4

™ 

M A N U A L

1

Summary of Contents for Portman 4x4

Page 1: ...smit Receive 16 4 Receive Interrupt Test 17 5 SMPTE I O Test 17 Drivers 18 Windows 3 1 and 3 11 Driver Installation 18 About the Advanced Button 20 Windows 95 Driver Installation 20 Remote Control Sof...

Page 2: ...e Remote Control Software 35 SMPTE Setup 35 Patchbay Setup 36 Menus 36 File 36 Hardware 37 Help 37 Using the Patchbay Features 38 Trouble Shooting 40 General Trouble Shooting 40 Patchbay Trouble Shoot...

Page 3: ...occur in a particular installation If this equipment does cause harmful interference to radio or television recep tion which can be determined by turning the equipment off and on the user is encourage...

Page 4: ...and 64 channels of MIDI input Large high performance data buffers ensure full MIDI throughput with absolutely no data loss Built in SMPTE Time Code reader writer regenerator supports all standard tim...

Page 5: ...is controlled by the MIDI application s on the host computer To use the PORTMAN 4x4 S as a MIDI interface turn off your computer s power and the PORTMAN 4x4 S power connect the PORTMAN 4x4 S to the c...

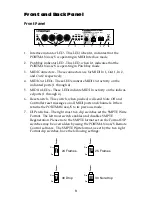
Page 6: ...connected while either is powered up Important note Holding the Write Button while powering up the PORTMAN 4X4 S will reset all internally stored values to their factory defaults all User programs bec...

Page 7: ...set up on the SMPTE Format DIP switches These DIP settings affect Write mode only On the other hand when SMPTE is being Read or Regenerated the output format is always the same as the input format Aut...

Page 8: ...te Off and Controller reset messages on all MIDI ports and channels It then returns the PORTMAN 4x4 S to its previous mode 7 DIP switches The right most two dip switches set the SMPTE Write Format The...

Page 9: ...LED is lit in combination with the Write LED the PORTMAN is in SMPTE regeneration mode 10 Write LED This LED when lit indicates that the PORTMAN 4x4 S is currently writing SMPTE When this LED is lit...

Page 10: ...g it into a convenient power outlet Although it won t hurt your PORTMAN 4x4 S to leave it plugged in we recommend hav ing it on a power strip so you can turn it on and off as you need it 5 Connect you...

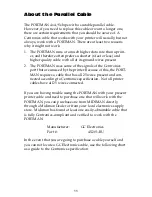
Page 11: ...are unused by the printer Because of this the PORT MAN requires a cable that has all 25 wires present and con nected according to Centronics specification Not all printer cables have all 25 wires con...

Page 12: ...ionally active when low The ground lines on the DB25s end of the cable can tie to any of the ground pins on the Centronics side but they must run as separate wires and not share any pin at the Centron...

Page 13: ...the DOS Diagnostics Now that the PORTMAN 4x4 S is connected to the computer there are a few short diagnostic programs to run On the included diskette there is a directory called 4X4DIAGS which contain...

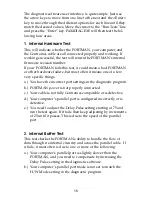
Page 14: ...is connected to MIDI Out 1 on the front of the PORTMAN oth erwise the diagnostics will indicate that your unit is failing Now connect the SMPTE In jack to the SMPTE Out jack using a standard male to m...

Page 15: ...ou have the incorrect port settings in the diagnostic program b PORTMAN power is not properly connected c Your cable is not fully Centronics compatible or is defective d Your computer s parallel port...

Page 16: ...Pulse will not adversely affect your MIDI performance because even with a huge Delay Pulse setting the computer to PORTMAN speed is much faster than MIDI Printer Port Hardware Modes Most computers par...

Page 17: ...P4X4DIAG EXE but it fails the Receive Interrupt Test you could have a computer with IRQ5 assigned to LPT1 Try changing the IRQ setting to IRQ5 in the P4X4DIAG EXE program If you are unsure what your p...

Page 18: ...usually proprietary set of drivers Consequently the PORTMAN 4x4 S can only be used with a DOS program if a spe cific PORTMAN 4x4 S driver is written for that program Please contact the developer of yo...

Page 19: ...o set those parameters See the About the Advanced Button section below 12 In order for Windows to install the new driver completely you will now be required to exit and restart Windows 13 As you are r...

Page 20: ...rectly change the delay setting without first veri fying the settings from the DOS diagnostic program or going through the Trouble Shooting section later in this manual Once the proper settings are ma...

Page 21: ...21 Driver Advanced Windows 95 Wizard...

Page 22: ...but ton Adjust the Extra Pulse Width to 75 by incrementing up Click on OK to get out and then re boot Windows for this to take effect If you still have problems or it s not initializing then adjust t...

Page 23: ...In Master Keyboard 2 Master Keyboard MIDI Out MIDI In Out4 In4 Out3 In3 MIDI Printer Port Portman 4x4 S top view front panel MIDI In1 Out1 In2 Out2 MIDI Sound Module 1 MIDI Out MIDI In Master Keyboar...

Page 24: ...ypical system set up see Fig 1 consists of your computer with the PORTMAN 4x4 S installed your sequencing software a tape deck a Master Keyboard and additional MIDI sound mod ules or keyboards This se...

Page 25: ...ivers The manner in which each application does this is different so it is impossible to go over all possible scenarios here However most Windows MIDI applications have a configuration or settings dia...

Page 26: ...applications Cakewalk for Windows for example will allow you to select and access all the PORTMAN 4x4 S ports within the same session Other applications for instance as of this writing Master Tracks P...

Page 27: ...ng software and hardware manufacturers as a method of synchroniz ing to audio and video gear Interfaces such as the PORTMAN 4x4 S perform the essential task of reading longitudinal SMPTE from a audio...

Page 28: ...m the A C line frequency of the indigenous country e g 50 Hz in Europe 60 Hz in the U S In the U S when color video was introduced part of the black and white frame information was used to encode the...

Page 29: ...numbers of their own choos ing This is accomplished by setting aside some spare data 32 bits within the time code message to be used as User Bits SMPTE and MTC allow you to encode these User Bits int...

Page 30: ...offsets that may wrap around from 23 59 59 29 back to 00 00 00 00 Some programs become confused by this wrap around Choose an offset that will allow your entire session to be striped without rolling...

Page 31: ...rrupted time code the PORTMAN 4x4 S continues to flywheel outputting time code from the last properly received frame and incrementing at the proper frame rate This flywheeling continues until valid ti...

Page 32: ...se 30 non drop for U S NTSC video 2 From the Remote Control software set the SMPTE offset time to the desired value SMPTE offset is displayed on a large but ton and pressing this button will allow you...

Page 33: ...a SMPTE sync track 8 Click on Stop Writer to stop the SMPTE code You are now set to begin recording the SMPTE stripe 9 Take the tape deck out of pause Allow the tape to pre roll for at least 10 secon...

Page 34: ...t MTC streaming in from this port and sync to it Others such as Master Tracks require you to designate which input port MTC is coming in on If this is the case make sure that you designate PORTMAN 4x4...

Page 35: ...s of the interface Insert Fig RCMain The controls are fairly self explanatory Format sets the SMPTE frame rate for the PORTMAN SMPTE generator Flywheel sets the number of frames the reader regenerator...

Page 36: ...outputs Insert Fig RCPatch Menus Following are brief explanations of the program menu choices File Load Config Retrieve a previously saved SMPTE configuration If the Save current configuration before...

Page 37: ...y closes Hardware Current Status Gives you the current status of the PORTMAN MIDI drivers and displays whether or not the PORTMAN hardware is present and detected Patchbay Brings up the patchbay setup...

Page 38: ...rams or even a single one they are permanently avail able at least until you choose to overwrite them when the PORT MAN 4x4 S is in Patchbay mode See the section on Using the Remote Control Software f...

Page 39: ...am like this Insert Fig Program 2 This program adds MIDI Out 4 to the already active MIDI Outs 1 and 2 There are many more possibilities for the patchbay than we have space to cover here As an exercis...

Page 40: ...Shooting SYMPTOM The computer won t boot with the interface installed Everything is fine without the interface connected to the computer This may include strange error messages SOLUTION Run through t...

Page 41: ...ing of your parallel port Make sure they are set to the same value If this does not alleviate the prob lem then your port is probably using another IRQ than you think it is or you have another periphe...

Page 42: ...ny sound when I run my sequencer SOLUTION Your Windows application must select the PORT MAN 4x4 S as its MIDI Input and Output device This is done from within the application itself SYMPTOM The PORTMA...

Page 43: ...is is a problem that all mergers have and it is due to the fact that a Sys Ex message can never be interrupted by note on off messages or other controller messages for that matter Once a Sys Ex messag...

Page 44: ...a mixing board to set levels make sure any EQ is off or flat If you EQ a SMPTE signal it may turn to mush Are you trying to use SMPTE mode with a sequencer that does not support MTC or is not set to c...

Page 45: ...fee The customer will have the option to pay this fee and have the unit repaired and returned or not pay this fee and have the unit returned unrepaired The remedy for breach of this limited warranty...

Reviews: