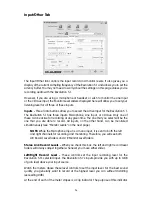
is to inform you that an incoming signal is too loud, thereby producing distortion. The
Clip Indicator will turn red when the input is too loud (exceeds 0dB). Reduce the input
level of your audio source so the indicators remain in the blue region rather than the
red. To reset the Clip Indicators, click on each one with your mouse and they will return
to their normal state.
Sample Settings -
This section gives you a display of the current sample rate that the
Revolution 5.1 is receiving. The sample rate shown here is controlled by the application you
are using to record and/or playback audio. Sometimes the audio that is playing back is
controlled by the source, such as a CD or DVD that is playing back at a particular sample rate.
This is a bit like the “SP/EP” control on a VCR. A higher sample rate will sound better, but
will require more memory space for storage. 44100Hz is the standard CD sampling rate
and is usually your best choice. Higher sampling rates such as 96000Hz will cause
certain features to be disabled, such as Circle Surround II.
The Latency setting is expressed in the number of “Samples” that are held in a buffer.
The greater the number of samples buffered, the higher the latency. This control is
automatically set by the installer to compensate for processor speed. It introduces a
delay, usually less that 1/60th of a second, to make sure that audio is played properly.
This setting might become important if you are recording, and you are monitoring
through the software. Otherwise, you probably will never need to change this setting. If
you encounter problems during recording and/or playback, such as stuttering audio,
you can try raising this value to see if the problem goes away. See the Recording section
under “Revolution Applications” for more information.
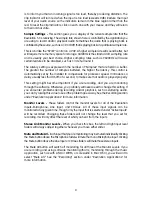
Monitor Levels -
These faders control the monitor levels for all of the Revolution
inputs—Microphone, Line Input, and CD/Aux. All of these input signals can be
monitored at any given time, though only the input that is selected under “Active Inputs”
will be recorded. Changing these faders will not change the level that you set for
recording. It will only affect the level of what you hear from the inputs.
Stereo Link Monitor Levels -
When you check this box, the left and right input level
faders will always adjust together whenever you move either slider.
Mute and Mute All -
Each input that you are monitoring may be muted individually. Clicking
the Mute button above the Microphone fader will mute the mono Microphone input. Clicking
the Mute button above the Line Input or CD/Aux faders will mute those stereo inputs.
The Mute All button will switch off monitoring for all three of the Monitor Levels. If you
are recording and using software monitoring (that is, monitoring through the music
application, such as with ASIO or WDM, or coreAudio in Mac OS X), you will want to
select “Mute All.” See the “Recording” section under “Revolution Applications” for
more information.
27


