MV-RAD
Page 7
9.3.
Switching ON
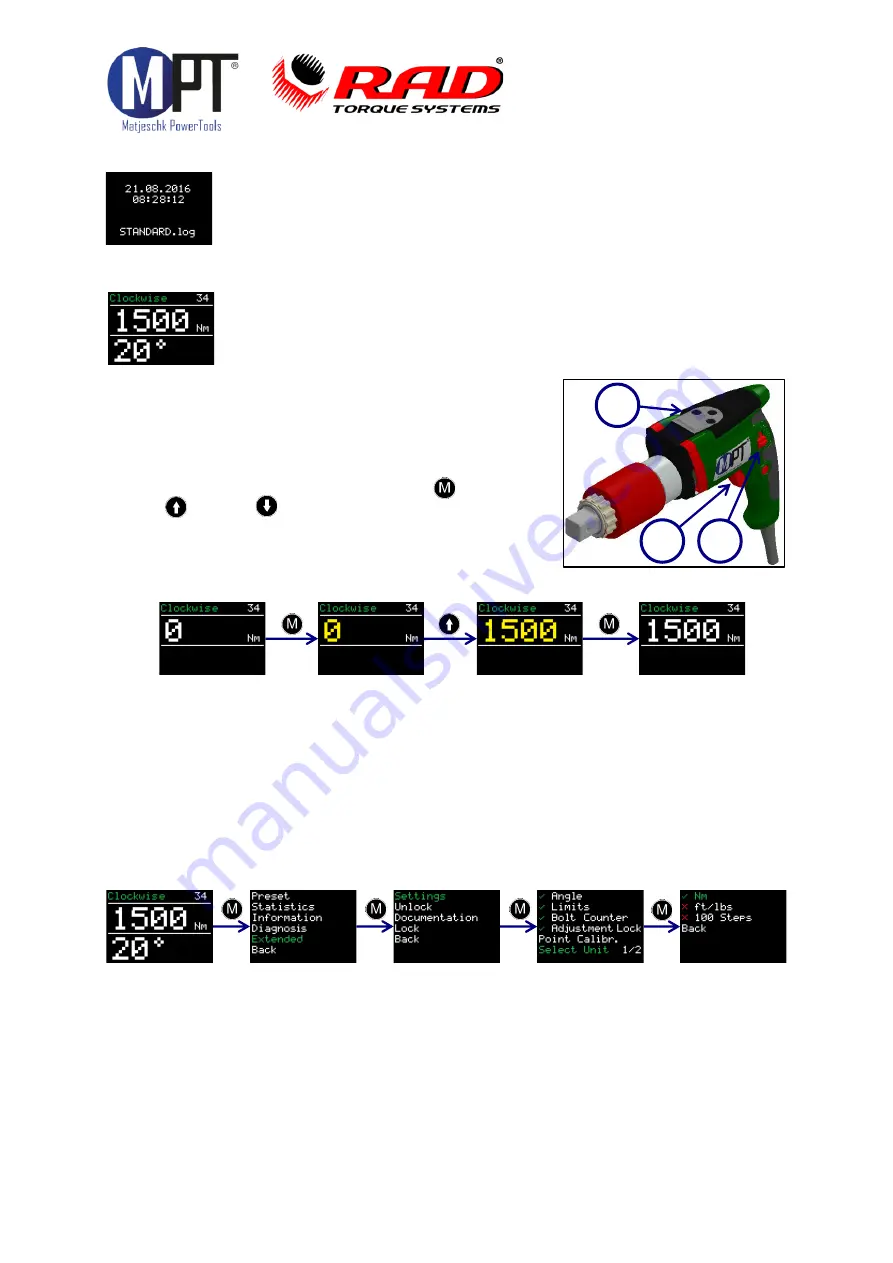
After initialization, the screen displays time and date together with the file
currently open. If date and time require adjustment, refer to chapter 9.18.
The screen has to be confirmed by pressing key
M
.
Note that the screen appears only in the case of bolt documentation system
enabled.
9.4.
Main Screen
•
Upper left: Current sense of rotation
•
Upper right: Model (“34” designates the
MV-RAD 34 series.)
•
Center line: Current set value of torque
•
Lower line: Set value for angle of rotation
•
The last result still remains on the display for 10 sec. after completion
of the bolting process.
•
In the case of bolting failure, the color of displayed
values changes to red. The fault can be
acknowledged by any key.
9.5.
General Procedure
•
Settings have to be entered by keys (
M
),
(
↑
) and (
↓
) (1).
•
Sense of rotation is determined by selector switch
(2).
•
Initiate rotation by start button (3).
9.6.
Setting the Torque
•
The last torque in use is shown immediately after switching ON.
•
Default value is 0 Nm.
•
The sense of rotation is displayed at the upper left corner (as explained above).
•
The device type appears at the upper right corner.
•
Adjustment of torque is enabled by key
M
.
•
The torque value display changes to yellow.
•
Increase or decrease the value by keys
↑
and
↓
.
•
To speed up adjustment, press and keep pressed the corresponding key (
↑
resp.
↓
).
•
To confirm the setting, press
M
one more time.
•
The torque value from now on is shown in white.
9.7.
Units
•
The torque unit can be chosen in the Settings option of the Advanced Menu and
then selecting the unit desired.
•
The following possibilities are available:
·
Newtonmeter
–
Nm
·
Foot-pound
–
ft/lbs
·
In 100 steps (for fine tuning, consult factory service).
•
Recalibration after change of units is not necessary.
•
For working in step mode, a torque table is available, consult factory service.
1
2
3


