background image

48NDVA

5-2-55, Minamitsumori, Nishinari-ku, Osaka 557-0063 JAPAN
Phone: +81(6)6659-8201  Fax: +81(6)6659-8510  E-mail: info@m-system.co.jp

EM-9441-A  Rev.9  P. 2 / 9


AND ....

• The unit is designed to function as soon as power is sup-

plied, however, a warm up for 10 minutes is required for 
satisfying complete performance described in the data 
sheet.

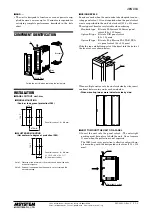
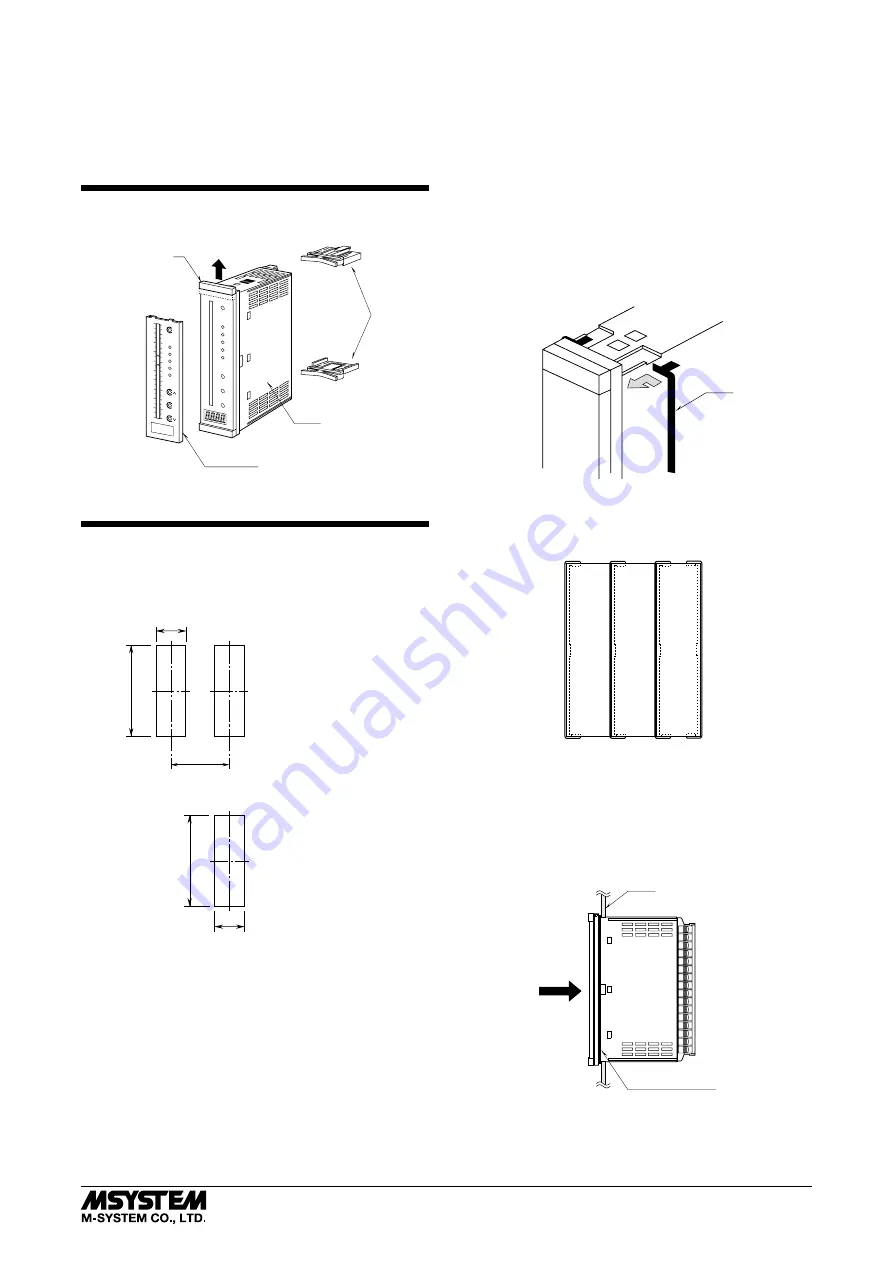
COMPONENT IDENTIFICATION

50

40

30

20

10

0

10

20

30

40

50

m

3

/h

%

mA

100 SET

H

S

P

Z

L

90

80

70

60

50

40

30

20

10

0

M

Brackets

Body

A

Scale Plate

Pull up the part ‘A’ when replacing the scale plate.

INSTALLATION


PANEL CUTOUT  unit: mm

138

+1 –0

31.5

Note 1:  Observe at the minimum of 3 cm above and below the units 
              for heat dissipation.
Note 2:  No bezel is needed when the panel is cut according to the 
              above drawings.

Panel thickness: 1.6 – 8.0 mm

■ 

SINGLE MOUNTING 

    (Conform to degree of protection IP65)

138

+1 –0

L

Panel thickness: 1.6 – 8.0 mm

 
L = {31.5 + 36 × (N – 1)}
(N : number of units)

+1

–0

■ 

CLUSTERED MOUNTING 

    (Not conform to degree of protection IP65)

+1

–0

61.5 min.


USING BEZELS

Bezels are used when the unit needs to be adapted to an ex-
isting panel cutout.  It is not required when the panel cutout 
size is as specified in the unit’s data sheet (31.5 × 138 mm).
Three types of bezels are selectable when ordering.
  Standard type:   Fits into M-System’s 48 Series’ panel   

cutout (38 × 139.5 mm)

  Option /D type:  Fits into DIN panel cutout


(33 × 138 mm)

  Option /F type:  Fits into Fuji Electric PAJ, PAK, PBA,


etc, panel cutout (44 × 138 mm)

Slide the top and bottom parts of the bezel into the back of 
the front cover as shown below.

Bezel

When multiple units are to be clustered side by side, insert 
one bezel between two units as shown below.

• When mounting two or more indicators side by side:


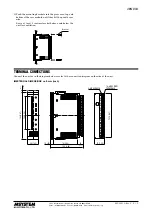
HOW TO MOUNT THE UNIT ON A PANEL

1) Insert the unit into the panel cutout.  The watertight 

packing must be in place to hold the unit.  Do not remove 

it even when the protection is not required.

  The IP65 front cover protection is effective only with sin-

gle mounting, with the designated cutout size (31.5 ×138 

mm).

Panel

Watertight Packing

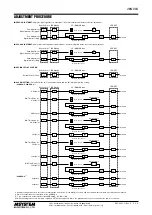
Summary of Contents for 48NDVA

Page 1: ...cted wires may af fect the protection level of this unit when it is integrated in a panel system The user may have to review the CE requirements in regard to the whole system and employ additional protective measures to ensure the CE conform ity In order to enable the operator to turn off the power in put immediately install a switch or a circuit breaker ac cording to the relevant requirements in ...

Page 2: ...STERED MOUNTING Not conform to degree of protection IP65 1 0 61 5 min USING BEZELS Bezels are used when the unit needs to be adapted to an ex isting panel cutout It is not required when the panel cutout size is as specified in the unit s data sheet 31 5 138 mm Three types of bezels are selectable when ordering Standard type Fits into M System s 48 Series panel cutout 38 139 5 mm Option D type Fits...

Page 3: ...nd below the unit for ventilation Bracket TERMINAL CONNECTIONS Connect the unit as in the diagram below or refer to the connection diagram on the side of the unit EXTERNAL DIMENSIONS unit mm inch 75 2 95 103 4 06 10 39 18 71 1 2 3 4 5 6 7 8 9 10 11 12 13 14 15 16 16 M3 SCREW TERMINALS 2 M3 SCREWS 144 5 67 137 5 5 41 4 1 16 36 1 42 31 1 22 100 3 94 Rounded corners for the option D OPTION D BEZEL 3 ...

Page 4: ...mm etc STANDARD BEZEL 2 10 4 41 7 5 30 3 9 15 136 5 5 37 144 5 67 11 4 45 7 5 30 4 9 19 136 5 5 37 144 5 67 8 5 33 10 4 41 7 5 30 136 5 5 37 144 5 67 OPTION F BEZEL 4 CONNECTION DIAGRAM 1 2 12 13 14 INPUT 15 16 7 8 9 ALARM OUTPUT CODE 2 2 points 1 2 INPUT 5 6 5 6 1 2 INPUT 5 6 15 16 ALARM OUTPUT CODE 0 None ALARM OUTPUT CODE 4 4 points 12 13 14 15 16 LLa 11 La LLb Lc LLc 8 9 10 HHa 7 Hc HHc HHb Ha...

Page 5: ...olor code 2 orange green green red red red H L 50 40 30 20 10 0 10 20 30 40 50 m3 h mA 100 SET H S P Z L 90 80 70 60 50 40 30 20 10 0 SET ENTER Button H Setpoint Adj Alarm Function Span Adj Setting Decimal Point Position Moving Average Brightness Adj Zero Adj Setting L Setpoint Adj Alarm Function Setting UP Button Switcing Detailed Settings Mode Setting Selector Setting DOWN Button Switcing Detail...

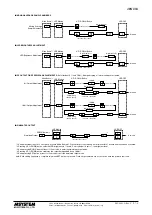
Page 6: ...ay for L Setpoint Increase Decrease Complete Digital Indicator SET L LL M Press at once ON Time Delay for LL Setpoint Increase Decrease Complete Digital Indicator SET LL Z M Press at once Zero Adjustment Digital Indicator Bargraph Z SET Z M Increase Decrease Zero Adjustment Digital Indicator Only Complete Z ON LED OFF SPAN ADJUSTMENT Apply 100 input signal before adjustment All alarm setpoints wil...

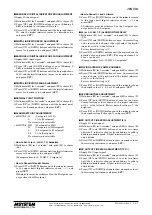
Page 7: ... is set to 7 the brightest level 3 Keep pressing DOWN button at least for 5 seconds to enter the simulated output mode 4 Pressing UP or DOWN button simulates the output between 000 0 and 100 0 5 Keep pressing SET button at least for 5 seconds to exit the simulated output mode Note Each setting sequence is complete only when SET button is pressed Once set parameters are not lost even after the powe...

Page 8: ...before H as the H setpoint can not go above the HH setpoint How to Cancel LL and L Alarms 1 Press UP or DOWN buttons until the indicator comes to the lower limit digital indicator shows and press SET LL indicator must be set before L as the L setpoint can not go below the LL setpoint LL or L H HH 1 2 ALARM ON TIME DELAY 1 Hold down M for 3 seconds 1 and push M to choose LL 2 Press UP and DOWN butt...

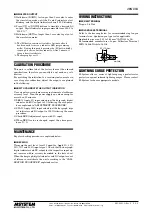
Page 9: ...vel Turn the power supply on and warm up for more than 10 minutes 1 ZERO Apply 0 input and adjust the bargraph digital indicator and DC output to 0 following the each proce dure explained in ADJUSTMENT PROCEDURE 2 SPAN Apply 100 input and adjust the bargraph digi tal indicator and DC output to 100 following the same procedure 3 Check ZERO adjustment again with 0 input 4 When ZERO value is changed ...

Reviews: