M8BS-16U2
5-2-55, Minamitsumori, Nishinari-ku, Osaka 557-0063 JAPAN
Phone: +81(6)6659-8201 Fax: +81(6)6659-8510 E-mail: info@m-system.co.jp
EM-5490-U2 P. 4 / 4
MAINTENANCE
For maintaining AC power supply types, Power Supply
Units are available as follows:
• 85 – 132V AC single power supply: HDC6-1
• 85 – 132V AC two independent power sources: HDC4-K-R
• 170 – 264V AC single power supply: HDC4-L-R
Power units’ standard life is expected for 10 years with
average ambient temperature 35°C (95°F) and 1.0A load.
Contact M-System for use in extremely different conditions.
■
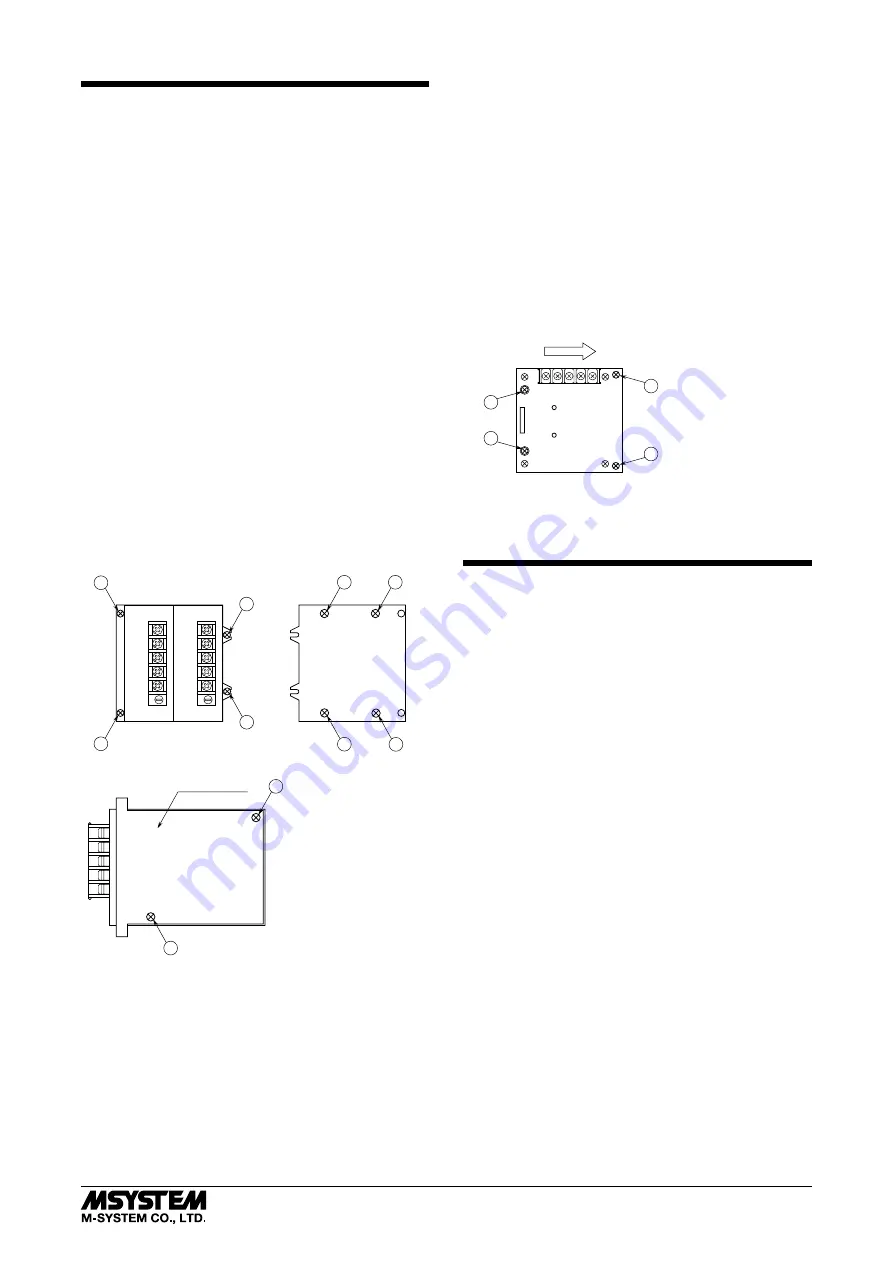
HOW TO REPLACE THE POWER UNIT
(power supply unit code: KK, L)
1) Prepare Power Unit (switching regulator) model HDC4-
K-R or HDC4-L-R.
2) Turn off the power supply connected to the Power Unit.
3) Remove the wire binding and wiring connected to the ter-
minal 1 – 2 and 4 – 5.
4) Loosen and remove the mounting screws
A
(4 places).
Remove also the screws
B
behind the base plate, fixing
the unit to be replaced.
5) Detach the Power Unit from the Installation Base.
6) Remove the mounting screws
C
(2 places) from the new
Power Unit.
7) Separate the new Power Unit from the mounting plate.
8) Attach the new Power Unit to the Installation Base and
tighten the screws in reverse order as explained above.
A
A
A
A
B
B
B
B
5
4
3
2
1
5
4
3
2
1
C
Mounting Plate
C
A
B
C
1
2
3
4
5
: Mounting screws with
washer, M3 x 6 (4 pls.)
: Mounting screws with
washer, M3 x 5
(2 pls. per unit)
: Flat-head mounting
screws, M3 x 4 (+)
(2 pls.)
: 24V DC (+)
: 24V DC (–)
: FG
: AC power input (U)
: AC power input (V)
■
SIDE VIEW OF THE POWER UNIT
■
FRONT VIEW
■
REAR VIEW
■
HOW TO REPLACE THE POWER UNIT
(power supply unit code: K)
1) Prepare Power Unit (switching regulator) model HDC6-
1.
2) Turn off the power supply connected to the Power Unit.
3) Remove the wiring connected to the terminals 1 – 2 and
3.
4) Loosen and remove the mounting screws
A
(2 places).
Loosen the mounting screws
B
(2 places) and pull out the
Power Unit in sliding it to the direction pointed by the
arrow in the figure below.
5) Disconnect the connectors of the Power Unit.
6) Place the new Power Unit in reverse order as explained
above.
B
B
A
A
1 2 3
A
B
1
2
3
: Mounting screws with
washer, M3 x 6 (2 pls.)
: Mounting screws with
washer, M3 x 10L (2 pls.)
: AC power input (U)
: AC power input (V)
: FG
■
FRONT VIEW
Note: Check that the internal wiring does not get caught
between other objects when assembling.
LIGHTNING SURGE PROTECTION
M-System offers a series of lightning surge protector for
protection against induced lightning surges. Please contact
M-System to choose appropriate models.


