Light Replacement Instructions
The locomotive’s lights are controlled by a constant voltage circuit in the engine. They
are easy to remove and replace when they burn out. See the diagrams and directions
below for instructions on accessing and replacing the light bulbs in this locomotive.
You can obtain replacement bulbs directly from the M.T.H. Parts Department (phone:
410-381-2580; e-mail: parts@mth-railking.com; mail: 7020 Columbia Gateway Drive,
Columbia MD 21046-1532).
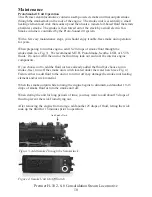
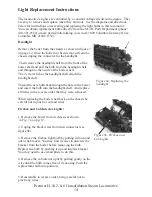
Headlight
Remove the boiler from the chassis as shown in figure 7
on page 12. Once the boiler has been removed from the
chassis unplug the connector for the headlight.
Then remove the headlight shell from the front of the
boiler shell and pull the bulb from the headlight shell
and through to the inside of the boiler shell.
The 2 screws below the headlight shell attach the
headlight shell.
Thread the new bulb back through the hole in the boiler
and insert the bulb into the headlight shell. And replace
all items in the reverse order that they were removed.
When replacing the boiler shell back on the chassis be
careful not to pinch or cut and wires.
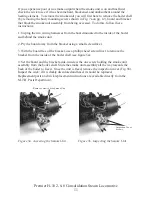
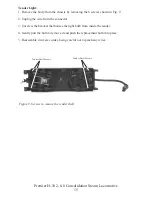
Firebox and Cab Interior Lights:
1. Remove the boiler from its chassis as shown
in Fig. 7a on pg. 12.
2. Unplug the black wires from their connector (see
figure 8b).
3. Remove the firebox light bulb by pulling it down and
out of its bracket. You may find it easier to unscrew the
bracket from the boiler before removing the bulb.
Replace the bulb by pushing it up and into the bracket.
You may need to use small pliers to do this.
4. Remove the cab interior light by pulling gently on the
wire until the bulb comes free of its housing. Push the
replacement bulb into position.
5. Reassemble in reverse order, being careful not to
pinch any wires.
Figure 8a. Replacing the
headlight.
Figure 8b. Firebox and
Cab Lights
Premier H-10 2-8-0 Consolidation Steam Locomotive
14


