NASH
MC/MM PHONO PREAMPLIFIER
REVISION P
R
A – JUNE 2018
Copyright © 2018, M2Tech Srl
15
M2Tech
www.m2tech.biz
5. Connecting and Powering the Unit
WARNING: All connections between the
NASH
and other equipment must be made
when all units are turned off and completely powered down or unplugged. Failing to
do so may cause damage to the
NASH
and/or other units.
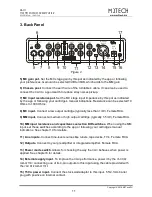
Please refer to chapter 3, “Back Panel”.
Connect the turntable, as well as other sources, to the dedicated inputs (Fig. 2, 8, 9 and
11). Please note you can connect two turntables at the same time: one fitted with an MC or
other low-level cartridge, another fitted with MM or other high-level cartridge. Optionally, a
second low-level cartridge can be connected to the MM input by means of an external
step-up transformer or MC stage. Alternatively, if a reduced output level can be accepted
and a high load resistance is not problematic for the frequency response, an MC cartridge
can be directly connected to the MM input.
Connect the
NASH
output (Fig. 2, 12) to your preamplifier or integrated amplifier input.
If the trigger feature is to be used, connect a mono cable with 3.5mm jack to the
NASH
trigger input (Fig. 2, 16).
WARNING: Be sure to apply a voltage in the allowed range.
Connect the stock wall adaptor to the
NASH
power input (Fig. 2, 15) and to a wall outlet.
NOTE: If you also own the
Van Der Graaf MkII
and you with to power the
Nash
with it, do
not connect the stock wall adaptor and connect the
NASH
to the
Van Der Graaf MkII
instead,
using one of the 4-pin cables provided with the latter.
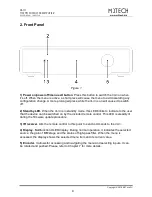
Set the power mode switch (Fig. 2, 13) according to the way the
NASH
should behave when
power is applied.
6. Cleaning the Unit
The
NASH
should be cleaned with a soft, slightly damp cloth. Do not use alcohol or any
other types of cleaning fluids as they could damage the unit.
Avoid fluids from dropping or leaking inside the unit. Fluids of any type poured into the unit
will void your warranty.
Be careful not to scratch the Plexiglas front screen.

