background image

Welcome to 3D Printing! 

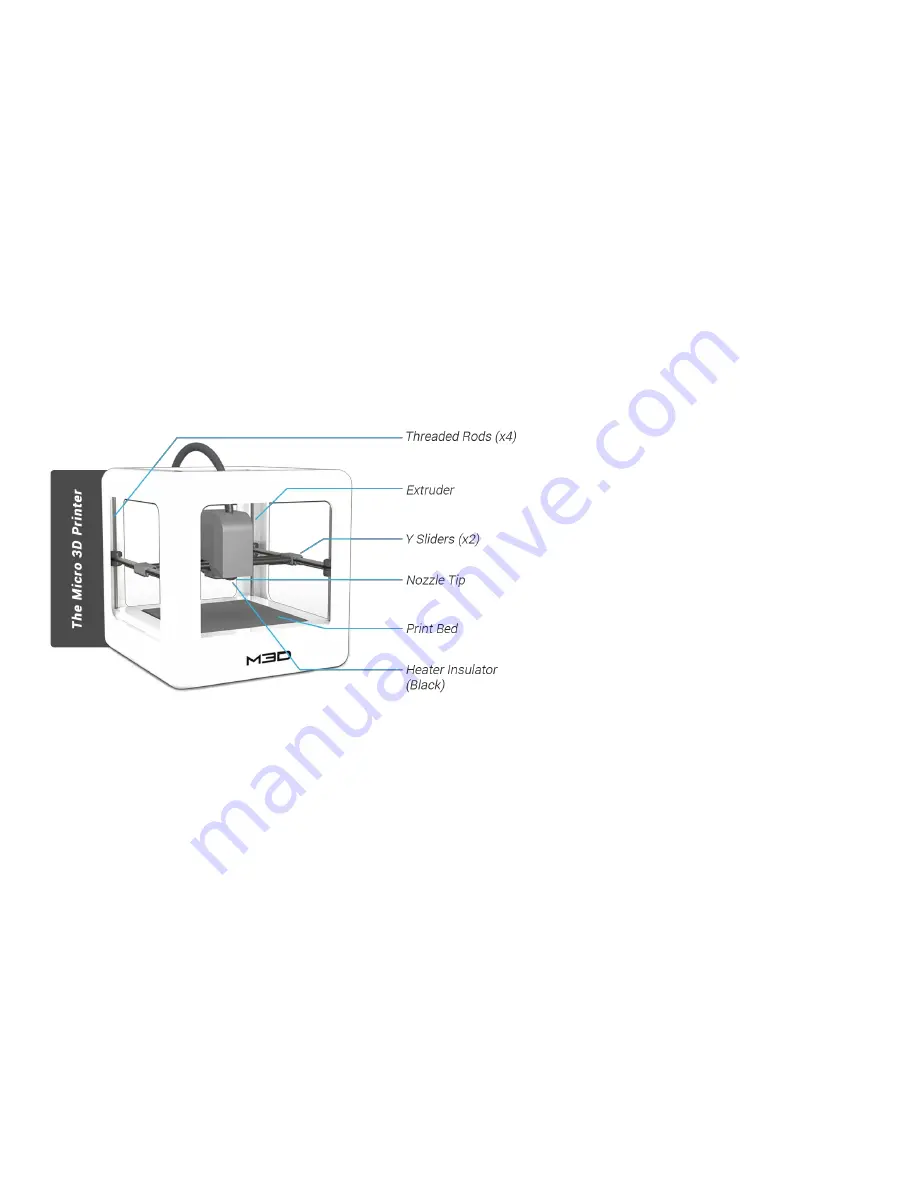
Thank you for purchasing The Micro+ 3D Printer, the first truly consumer 3D printer. The Micro+ is ready right out 

of the box to make your custom creations come to life. Just plug in the printer, download the models, hit print, and watch as you bring an object into the 

world through 3D printing. Let’s see what you print! 

Specifications 

Lower Build Volume: 110 mm x 107 mm x 73.5 mm 

Upper Build Volume: 80 mm x 68 mm x 38 mm Layer 

Resolution: 50 to 350 Microns 

Filament Diameter: 1.75 mm 

Nozzle Diameter: 0.35 mm 

Layer Thickness: 0.05 mm 

Speed: Up to 55 mm/s 

Position Precision: XY - 15 microns; Z - 3 Microns 

Software: M3D  

Supported File Types: .STL and .OBJ System 

Compatibility: Windows/Mac/Linux

Power Supply: 20W UL/CE listed power supply USB: 2.0 

or above

Weight: 2.0 lbs 

www.PrintM3D.com 

Visit and explore our website for new content, 

features, and news related to The Micro

+

www.PrintM3D.com/Downloads 

Find new software, 3D models, and in-depth 

documentation. 

www.PrintM3D.com/Support 

View our expansive customer support network, 

technical articles, and FAQ. 

This Manual is subject to change. For updated specifications, languages, and information visit www.printM3D.com/support. 

Summary of Contents for Micro+

Page 1: ...The Micro 3D Printer User Manual...

Page 2: ...meter 1 75 mm Nozzle Diameter 0 35 mm Layer Thickness 0 05 mm Speed Up to 55 mm s Position Precision XY 15 microns Z 3 Microns Software M3D Supported File Types STL and OBJ System Compatibility Window...

Page 3: ...untry specific power supply Be sure to remove the Gantry Clips located on the front left and front right corners of the printer Safety Considerations Caution Hot Keep your fingers away from the Nozzle...

Page 4: ...trol Panel this will prevent Windows Automatic Updates from restarting your computer resulting in a print failure while The Micro is in operation 3 0 Connect and Power The Micro 1 Insert the provided...

Page 5: ...nal Filament Figure An example of an ideal external filament path External filament is installed via the external feed port located at the top of the extruder head Always keep a clear path between you...

Page 6: ...rinter is simple just drag the model from the Recent Models library to the printer Your first model is already loaded in the M3D Software Werecommend printing this model first as a test calibration Se...

Page 7: ...ed by adjusting the options on the left Models can be scaled by all three dimensions simultaneously by using the right mouse button individually adjusted using the scale bar or manually entered into t...

Page 8: ...ion drug delivery or ingestion PRECAUTION If any allergy develops as a result of direct or indirect contact using M3D s products or from the 3D printed objects discontinue use immediately MAINTENANCE...

Page 9: ...that the user manual for M3D s products this end user agreement and the limited warranty may have been provided as a physical copy where required by law with the initial customer purchase A digital c...

Page 10: ...www printM3D com M3D 3D Ink and Print Anything are registered trademarks of M3D LLC in Fulton MD...

Reviews: