background image

11

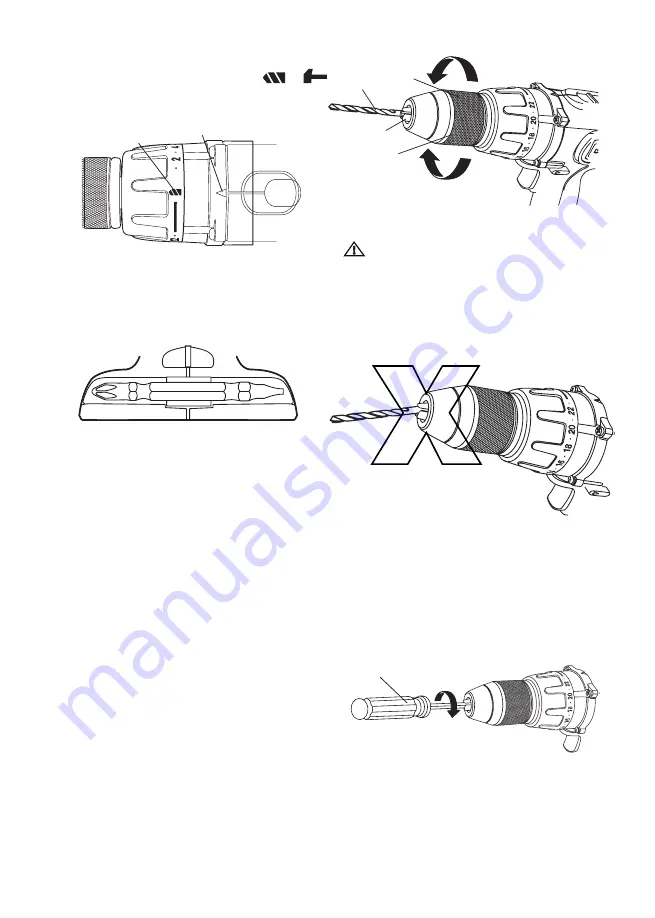
To select the mode, rotate the hammer/screw/

drill  mode  selection  ring  until  the  icons                  Or                                                

align with the indicator and clicks into position.

16. BIT STORAGE

When not is use, the bit provided with the drill can 

be stored on the base of the drill by snapping it 

into place in the bit clip.

17. INSTALLING BITS

1)  Lock the trigger switch by placing the direction 

of rotation selector in the OFF (center) position.

2)  Open or close the chuck jaws to a point where 

the opening is slightly larger than the bit size 

you intend to use. Also, raise the front of the 

drill slightly to keep the bit from falling out of the 

chuck jaws.

3))  Insert a drill bit.

4)  Tighten the chuck jaws securely on the bit.

NOTE: 

Rotate the chuck body in the direction of 

the arrow marked GRIP to close the chuck jaws. 

Do not use a wrench to tighten or loosen the 

chuck jaws.

18. REMOVING BITS

1))  Lock the trigger switch by placing the direction 

of rotation selector in the OFF (center) position.

2))  Open the chuck jaws.

NOTE: 

Rotate the chuck body in the direction 

reverse to the arrow marked GRIP to open the 

chuck jaws. Do not use a wrench to tighten or 

loosen the chuck jaws.

3))  Remove the drill bit.
      

WARNING: 

Make sure to insert the drill bit 

straight into the chuck jaws. Do not insert the 

drill bit into the chuck jaws at an angle then 

tighten, as shown in the figure.

This could cause the drill bit to be thrown from 

the drill, resulting in possible serious personal 

injury or damage to the chuck.

19. CHUCK REMOVAL

The chuck can be removed and replaced by a 

new one.
1)  Lock the trigger switch by placing the 

direction of rotation selector in center position.

2) Open the chuck jaws.

3)  Using a screwdriver to turn the chuck 

clockwise to remove the chuck screw. 

4)  Insert a 5-16-in. or larger hex key into the 

chuck of the drill and tighten the chuck jaws 

securely. 

5)  Tap the hex key sharply with a mallet in a 

clockwise direction. This will loosen the screw 

in the chuck for easy removal. 

Drill icon

Torque indicator

OPEN 

(release)

GRIP 

(tighten)

Ratcheting

keyless

chuck

Chuck

body

Chuck

jaws

Drill bit

Screwdriver

Summary of Contents for DD1813

Page 1: ...our rel cher le bloc batterie 7 Indicateur de charge 8 Mandrin auto serrant sans cl 9 Ajusteur de couple DH1826 avec fonction chocs 10 Bo te de deux vitesses 11 vents 12 Poign e suppl mentaire seuleme...

Page 2: ...z pas le c ble Ne portez pas l appareil par le c ble D branchez le c ble de la prise uniquement en tirant sur la fiche Prot gez le c ble contre l huile contre la chaleur et contre des ar tes vives et...

Page 3: ...ira le risque de blessures graves 4 Utilisation et entretien de l outil lectrique 1 Ne surchargez pas l appareil Utilisez l outil lectrique adapt votre travail Vous travaillerez mieux et de mani re pl...

Page 4: ...contacts de la batterie peut provoquer des br lures ou une incendie 4 En cas de mauvaise manipulation de l acide peut s chapper de la batterie vitez tout contact avec celui ci En cas de contact invol...

Page 5: ...DB1826 2 6Ah DC01 DH18262A DB1813 1 3Ah DB1826 2 6Ah DC01 10 N crasez ni laisser tomber ni endommager le bloc batterie N utilisez pas un bloc batterie ou un chargeur qui est tomb ou qui a re u un choc...

Page 6: ...m talliques de l appareil sous tension et engendrer une d charge lectrique 2 Utilisez la poign e suppl mentaire fournie avec l outil Une perte de contr le peut conduire aux blessures graves 3 Utilisez...

Page 7: ...chimiques connus pour causer le cancer les malformations cong nitales ou autres anomalies de la reproduction Quelques exemples de ce genre de produit chimique sont du plomb des peintures base de plomb...

Page 8: ...puissance constante soutenue pendant toute la dur e de la batterie Cet outil ne perdra pas progressivement de puissance lorsque vous travaillez Pour signaler que le bloc batterie arrive la fin de sa d...

Page 9: ...oussez l inverseur vers la gauche pour une rotation vers l avant 2 Poussez l inverseur vers la droite pour une rotation vers l arri re 3 Mettre l inverseur en position centrale blocage central r duit...

Page 10: ...ngues p riodes La perceuse peut surchauffer lors de l utilisation constante faible vitesse Si cela arrive refroidissez la perceuse en la faisant tourner vide haute vitesse ATTENTION Ne changez jamais...

Page 11: ...z les mors du mandrin Remarque Tournez le corps de mandrin dans le sens marqu OPEN pour desserrer les mors N utilisez pas de cl pour serrer ou desserrer les mors AVERTISSEMENT Assurez vous d ins rer l...

Page 12: ...es blessures retirez le bloc batterie de l outil et d branchez le chargeur avant tout travail d entretien ou nettoyage 21 L utilisation de la poign e suppl mentaire uniquement pour la DD18132A Une poi...

Page 13: ...art Augmentez la vitesse lorsque l embout s enfonce dans le bois 2 Quand vous percez travers des trous placez un bloc de bois derri re la pi ce pour viter d avoir des bords tranchants ou dentel s sur...

Page 14: ...doux pour enlever la salet la poussi re etc ATTENTION Ne laissez jamais l eau entrer dans le moteur ni immerger l outil Ceci conduira une d faillance du moteur et une d charge lectrique Protection de...

Page 15: ...U on ROSH and their amendments and is manufactured and tested according to the following standards EN 60745 1 EN 60745 2 1 EN 62133 EN 55014 1 EN 61000 3 2 EN 61000 3 3 EN 55014 2 and EN 50581 Declare...

Page 16: ...ROSH and their amendments and is manufactured and tested according to the following standards EN 60745 1 EN 60745 2 1 EN 62133 EN 55014 1 EN 61000 3 2 EN 61000 3 3 EN 55014 2 and EN 50581 Declared in...

Page 17: ...17...

Page 18: ...18 1 2 Chuck Cordless Drill ltem No DD18132A...

Page 19: ...1 16 DD 1813P16 Handle Hoop 1 17 DD 1813P17 Bits Holder 1 18 DD 1813P18 Handle Hoop 1 19 DD 1813P19 Stop Spring 1 20 DD 1813P20 Lantern Ring 1 21 DD 1813P21 Name Plate 1 22 DD 1813P22 Name Plate 1 23...

Page 20: ...20 1 2 Chuck Cordless Hammer Drill ltem No DH18262A...

Page 21: ...DH 1826P16 Pinion 1 17 DH 1826P17 Depth Stop 1 18 DH 1826P18 Handle Hoop 1 19 DH 1826P19 Bits Holder 1 20 DH 1826P20 Handle Hoop 1 21 DH 1826P21 Stop Spring 1 22 DH 1826P22 Lantern Ring 1 24 DH 1826P...

Page 22: ...de garantie DOIT contenir les informations suivantes Nom et num ro de t l phone du client Nom et carte de visite du concessionnaire La date de l achat N de mod le et de s rie de l outil Cette garanti...

Page 23: ...rotation selector 5 Battery 6 Battery pack release button 7 Power bar 8 Ratcheting keyless chuck 9 Torque adjustment clutch DH1826 with impact function 10 Two speed gear box 11 Vents 12 Auxiliary han...

Page 24: ...ntering a power tool will increase the risk of electric shock 4 Do not abuse the cord Never use the cord for carrying pulling or unplugging the power tool Keep cord away from heat oil sharp edges or m...

Page 25: ...OL USE AND CARE 1 Do not force the power tool Use the correct power tool for your application The correct power tool will do the job better and safer at the rate for which it was designed 2 Do not use...

Page 26: ...starting the power tool accidentally 4 Store idle power tools out of the reach of children and do not allow persons unfamiliar with the power tool or these instructions to operate the power tool Powe...

Page 27: ...No DD1813 DB1813 1 3Ah DB1826 2 6Ah DC01 DH1826 DB1813 1 3Ah DB1826 2 6Ah DC01 10 Do not crush drop or damage the battery pack Do not use a battery pack or charger that has been dropped or received a...

Page 28: ...insulated gripping surfaces when performing an operation where the cutting tool may contact hidden wiring or its own cord Contact with a live wire will also make exposed metal parts of the tool live...

Page 29: ...xamples of these chemicals are lead from lead based paints Arsenics and chromium from chemically reacted lumber Your risk from these exposures varies depending on how often you do this type of work To...

Page 30: ...eliver fade free power for their entire run time The tool will not experience a slow gradual loss of power as you work To signal that the battery pack is at the end of its run time and needs to be cha...

Page 31: ...in normal operating position 1 Position the direction of rotation selector to the left of the tool for forward rotation 2 Position the direction of rotation selector to the right of the tool for reve...

Page 32: ...ed for extended periods of time Running at LO speed under constant usage may cause the drill to become overheated If this occurs cool the drill by running it without a load at HI speed CAUTION Never c...

Page 33: ...e OFF center position 2 Open the chuck jaws NOTE Rotate the chuck body in the direction reverse to the arrow marked GRIP to open the chuck jaws Do not use a wrench to tighten or loosen the chuck jaws...

Page 34: ...erious personal injury always remove the battery pack from the tool and unplug the charger when cleaning or performing any maintenance 21 USING THE AUXILIARY HANDLE ASSEMBLE only for No DD1813 An auxi...

Page 35: ...illing at a very low speed to prevent the bit from slipping off the starting point Increase speed as the drill bit bites into the material 2 When drilling through holes place a block of wood behind th...

Page 36: ...to remove dirt dust etc WARNING Do not allow the water entering the tool and the tool full immersed in the ware which will result in tool malfunction and electric shock ENVIRONMENT PROTECTION 1 Tool...

Page 37: ...U on ROSH and their amendments and is manufactured and tested according to the following standards EN 60745 1 EN 60745 2 1 EN 62133 EN 55014 1 EN 61000 3 2 EN 61000 3 3 EN 55014 2 and EN 50581 Declare...

Page 38: ...ROSH and their amendments and is manufactured and tested according to the following standards EN 60745 1 EN 60745 2 1 EN 62133 EN 55014 1 EN 61000 3 2 EN 61000 3 3 EN 55014 2 and EN 50581 Declared in...

Page 39: ...17...

Page 40: ...18 1 2 Chuck Cordless Drill ltem No DD1813...

Page 41: ...Pinion 1 16 DD 1813P16 Handle Hoop 1 17 DD 1813P17 Bits Holder 1 18 DD 1813P18 Handle Hoop 1 19 DD 1813P19 Stop Spring 1 20 DD 1813P20 Lantern Ring 1 21 DD 1813P21 Name Plate 1 22 DD 1813P22 Name Plat...

Page 42: ...20 1 2 Chuck Cordless Hammer Drill ltem No DH1826...

Page 43: ...ck 1 16 DH 1826P16 Pinion 1 17 DH 1826P17 Depth Stop 1 18 DH 1826P18 Handle Hoop 1 19 DH 1826P19 Bits Holder 1 20 DH 1826P20 Handle Hoop 1 21 DH 1826P21 Stop Spring 1 22 DH 1826P22 Lantern Ring 1 24 D...

Page 44: ...rd AND invoice receipt copy This warranty card MUST be completed with the following information customer name telephone no dealer name and card date of purchase tool model and serial no This warranty...

Reviews: