background image

2

1. This  tool should  only  be used  as a


hand  operated  tool.  It is powered by compressed  air  and is not 

insulated against electric shock.

2. This tool is specially designed for riveting sheet metals together. Any


application or use of this tool other


than what it is designed for is strictly prohibited.


3. High sound levels may cause hearing damage. Always wear hearing protection when operating this tool.
4. Wearing eye/face protection can reduce the danger of high-speed materials being ejected from tool use.
5. User must wear proper clothing. Loose clothing, long hair, stings, straps, belts and jewelry should not be 

worn when operating this tool.

 used are compatible with this tool.

7. Check the protection against the ejecting of rivet stem in place and is operative.

this tool.

9. Always  turn o ff t he a ir s upply  and d isconnect  t he a ir  hose  before  changing  r ivet n ose  or m aking 

adjustments on this tool.


r

o


g

n

it

c

e

n

n

o

c


n

e

h

w


r

o


yl

p

p

u

s


y

g

r

e

n

e


f

o


e

r

u

li

a

f


a


si


e

r

e

h

t


fi


r

e

g

n

a

d


d

i

o

v

a


o

t


r

e

v

e

l


e

lt

t

o

r

h

t


e

h

t


e

s

a

e

l

e

R

.

0

1

disconnecting the air hose.

11.Prolonged use will cause user fatigue. Periodic breaks are recommended for user safety.
12.It is recommended to stop operating the tool whenever the user experiences discomfort, tingling or pain 

during use.

13.Beware  i f  the  compressed  air  hose  breaks  unexpectedl y, o r  is  being  c onnected  or d isconnecte d 

improperly. This whipping action may cause injury.

Warning:

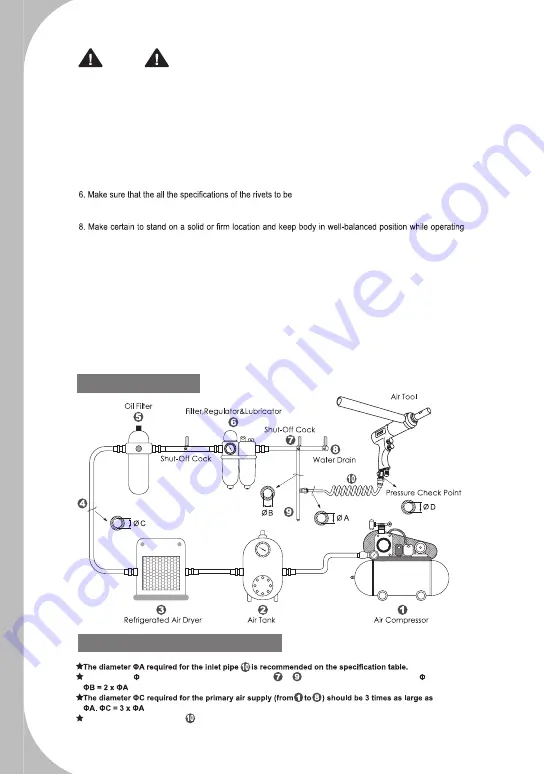
Ideal system connection:

Piping diameters and length requirement:

      .

A


s

a


e

g

r

a

s

a


s

e

m

it


2


e

b


d

l

u

o

h

s

 )


o


m

o

r

f(


e

p

i

p


h

c

n

a

r

b


e

h

r

o

d

e

ri

u

q

e

B

 r

e

t

e

m

a

i

d


e

h

T

The length for the inlet pipe       should be less than 

 feet ( . m).

Summary of Contents for PC-1012

Page 1: ...ast of compressed air before connecting the hose to the air tool This will prevent both moisture and dust inside the hose from entering the tool and causing possible rust or malfunction 1 Using these...

Page 2: ...ive this tool 9 Always turn off the air supply and disconnect the air hose before changing rivet nose or making adjustments on this tool r o g n i t c e n n o c n e h w r o y l p p u s y g r e n e f o...

Page 3: ...EN ISO 11148 3 EN ISO 15744 EN ISO 28927 5 Declared in Taichung Taiwan Dated 2013 06 01 Jonney Chen Declared by QA Manager Signature Manufacturer Mighty Se ven In ternational Co Ltd No 70 25 Ch ing Q...

Page 4: ...o prevent repeated tapping 4 Not leakage do not cause high temperature Chemical Factory available 1 Fuselage with knobs adjustable air pressure and air volume size 2 Separation type of rotary reverse...

Page 5: ...ue Adjustment Manual AUXILIARY SIDE GRIP FORWARD TRIGGER REVERSING TRIGGER AIR INLET REVERSE VALVE KNOB AIR INLET 17MM WRENCH 14MM WRENCH HEX SPECIAL WRENCH L TYPE FIXED WRENCH 1 0mm HEX WRENCH 7 SIZE...

Page 6: ...6 M 3 M 1 2 Use 1 0mm Hex wrench to hold up the pipe and can loose the screws M 3 M 1 2 Remove the screw Note to be careful when disassembly the small screws...

Page 7: ...7 M 3 M 1 2 Then adjust the pipe with the L Typed Fixed wrench to hold the side of the pipe M 3 M 1 2 Use Hex wrench to hold up the pipe and the special Hex wrench to remove the screws...

Page 8: ...8 M3 M 1 2 M 8 Adjustment ring can be graduated to the appropriate and required position After set rigidly the tool you can turn left or right to adjust the pipe reach to the prorer setting position...

Page 9: ...9 M 8 M 1 2 Put in the front the Collet Install the tapping bit...

Page 10: ...10 M3 M12 Use a 17mm wrench together with a14mm wrench to adjust the screws M 3 M 1 2 Adjust and tighten the set of screws Pay attention to not use too much force to avoid to broke the screws...

Page 11: ...11 M 3 M 4 M 1 2 M 3...

Page 12: ...12 AIR TAPPING TOOL ltem No PC 1012...

Page 13: ...27 PC 1012P27 Pin 1 28 PC 1012P28 Cylinder 1 29 PC 1012P29 Pin 1 NO PART NO DESCRIPTION Q TY 30 PC 1012P30 Rotor 1 31 PC 1012T31 Rotor Blades 5 pcs 1 SET 32 PC 1012P32 Rear End Plate 1 33 PC 1012P33 B...

Page 14: ...14...

Reviews: