background image

t +31 88 500 2800

12

260123

7.3 OPBOUWMONTAGE (HOUT)

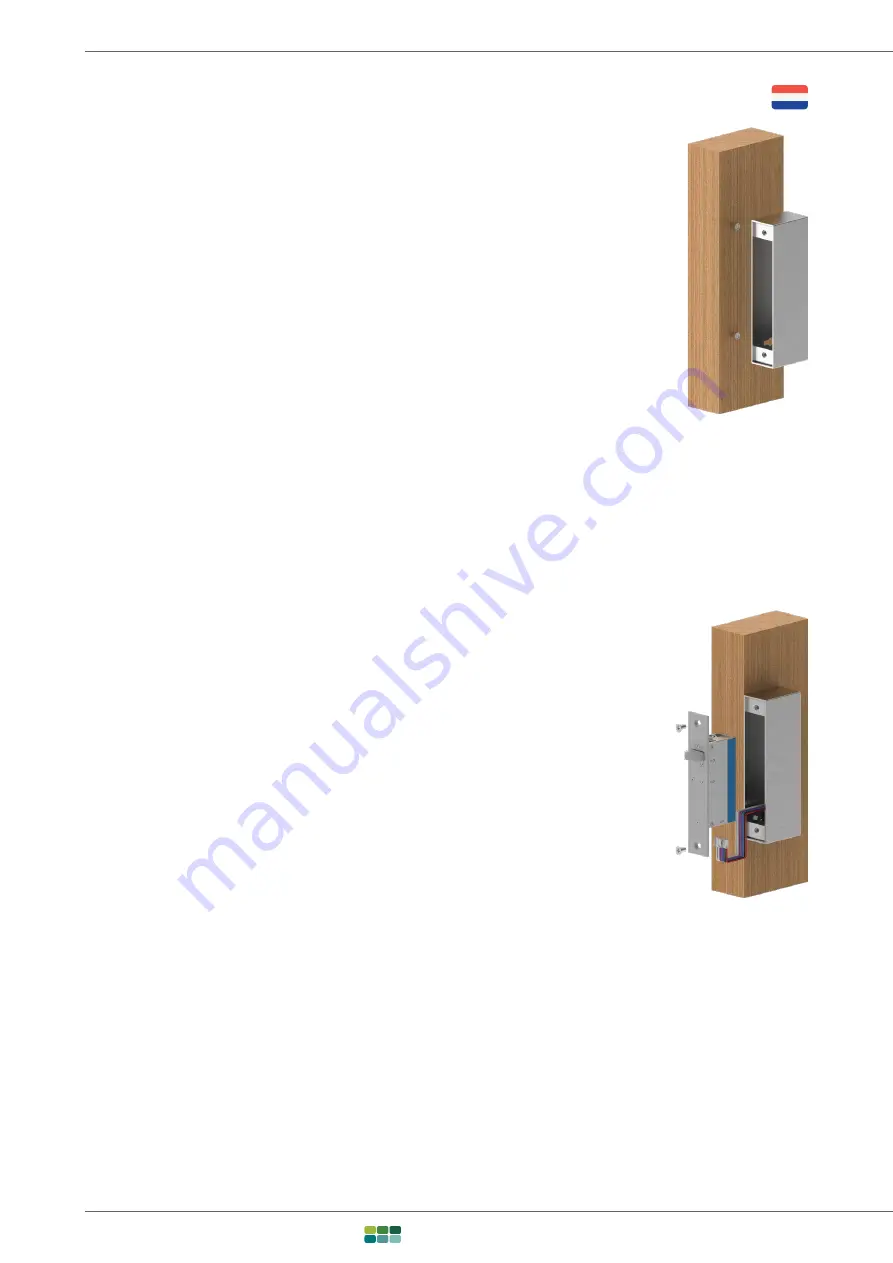
1. Preparing the mounting surface

Install two 10Gx1” self-tapping screws (included with housing) in the mounting surface, 
as per the product dimension drawings they should be 125mm apart, 20mm from the 
surface edge. 

2. Preparing the housing

An 8mm hole should be drilled through the housing wall at the position chosen by the 
installer for the wiring to enter. The wiring can be guided to the housing through surface 
mount conduit, or through a hole in the mounting surface material. Push a rubber 
grommet (included with housing) over the drilled hole to protect the wires from any sharp 
edges.

3. Fitting the housing

Position the keyhole cutouts of the housing over the screw heads and slide into position 
flush with the surface edge, and then tighten screws in place to secure the housing.

4. Wiring the lock

Feed the wires through the 8mm hole in the housing and a connection can be made to 
the supplied wire loom which in turn plugs into the lock.

Refer to the Wiring section of this document for detailed instructions on wiring.

5. Setting the operating mode

Ensure the operating mode switch is positioned to the required state, Fail Safe or Fail 
Secure.

Refer to the Operating Mode section of this document for detailed instructions on wiring.

6. Fitting the lock

The lock is then placed into the housing, ensuring that the wiring integrity is maintained, 
and then secured in place with M5 machine screws (included with housing). Please 
ensure the lock is the correct orientation as to pull the door into the door jamb.

ELEKTRISCHE SLOTEN

Summary of Contents for ML420

Page 1: ...VERSIE 2023 HANDLEIDING ML420...

Page 2: ...itplaat 6 5 3 Afmetingen behuizing 7 5 4 Afmetingen afdekplaat 7 5 5 Afmetingen montageplaatjes 7 6 Voorbereiding installatie 8 6 1 Voorbereiding montage 8 6 2 Voorbereiding bekabeling 9 6 3 Voorberei...

Page 3: ...eenheid kan leiden tot productstoringen of letsel Verwijder de afdekplaten of frontplaat niet om het slot te openen Zorg ervoor dat bij de installatie geen scherpe randen van het product aan de gebrui...

Page 4: ...not occur in a particular installation Modifications Any modifications made to this device that are not approved by the manufacturer may void the authority granted to the user by the FCC to operate th...

Page 5: ...when the unlock signal is given the ML420 will still unlock even with loads in excess of about 600kg on the door Critically the ability of the ML420 to instantly release with excessive pre load on the...

Page 6: ...own are approximate and subject to change without prior notice 5 2 AFMETINGEN SLUITPLAAT Dimensions shown are approximate and subject to change without prior notice 96mm 47mm 160mm 3mm 10mm 140mm 10mm...

Page 7: ...hange without prior notice 5 4 AFMETINGEN AFDEKPLAAT Dimensions shown are approximate and subject to change without prior notice 5 5 AFMETINGEN MONTAGEPLAATJES Dimensions shown are approximate and sub...

Page 8: ...ed morticed 1 surface mounted 2 or a combination of the two 3 Regardless of the installation method it is vital that the lock face plate and strike plate are aligned vertically to each other and that...

Page 9: ...that the wire runs can be between the power supply and the lock assuming the power supply outputs 12VDC or 24VDC Conductor Cross Sectional Area Maximum Distance AWG mm at 12VDC at 24VDC 24 0 20 10m 3...

Page 10: ...be drilled in the back of the mortice to bring the wires out and a connection can be made to the supplied wire loom which in turn plugs into the lock Refer to the Wiring section of this document for d...

Page 11: ...is installed will be no more than 6mm 2 Wiring the lock Feed the wires out of the hollow chamber of the frame and a connection can be made to the supplied wire loom which in turn plugs into the lock R...

Page 12: ...of the housing over the screw heads and slide into position flush with the surface edge and then tighten screws in place to secure the housing 4 Wiring the lock Feed the wires through the 8mm hole in...

Page 13: ...ting the dress plate Clean the glass surface with isopropyl alcohol and peel the protective layer from the double sided tape of the dress plate Position the dress plate flush with the edge of the glas...

Page 14: ...l input VIOLET Bolt Position Monitor Normally open contact NO closed when the bolt pin is extended optional VIOLET WHITE Door Position Monitor Normally open contact NO closed when the strike is aligne...

Page 15: ...is applied to the BLUE wire and the door is closed In the event of a power failure the ML420 unlocks 9 2 WERKING ARBEIDSSTROOM Assume the lock is installed wired and set to fail secure The door is op...

Page 16: ...e to be determined by the operator Check for Tight fit Smooth running Noise during operation Play of the latch Contamination Escaping lubricant Moisture If there are unusual noises noticeable play esc...

Page 17: ...info maaslandgroep nl www maaslandgroep nl 17 260123 ELEKTRISCHE SLOTEN...

Page 18: ...QG 7 LQIR PDDVODQGJURHS QO ZZZ PDDVODQGJURHS QO 0DDVODQG URXS HOJLXP 9 HGYHUERQGNDDL EXV 17 HOJLs 7 LQIR PDDVODQGJURXS EH ZZZ PDDVODQGJURXS EH 0DDVODQG RX R WG ORRU ORFN XDQODQ 7RZQ RQJKXD 6 1 1 KLQD...

Reviews: