background image

28

28

Swim Spa

BLUETOOTH CONNECTION

Spas purchased with a factory-installed 
Bluetooth/MP3 Audio System option come 
equipped with a built in amplifier, BlueTooth 
(BT) receiver, subwoofer, and weather-tight 
portable media (MP3) dock to allow you to 
stream your favorite audio source through the 
spa’s sound system.

 
Bluetooth/MP3 Audio System Option
CAUTION: Audio/MP3/Cell Phone/Portable 
Electronic Devices
Many consumers own some form of portable 
electronic device, and some spas come 
equipped with systems designed to interface 
with these devices. It is important to protect 
a spa’s audio equipment and your portable 
electronics by following a few simple 
procedures found on pages 38 and 39 of this 
manual.
 
Connecting via BlueTooth (BT):

The spa’s BT audio system is “On” all of the 
time and looking for suitable BlueTooth audio 
sources within its range.  All one needs to do 
is stand close to the spa with your BT device 
(smartphone, tablet, MP3 player, etc.) and 
go to the device’s BT settings.  There you will 
see a source named “Belkin xXX”, “Fusion___”, 
“AUVIO___”  or something similar.  Click on 
(or “Select”) that Belkin BT receiver, which will 
Sync it to your BT device.  Then just open your 
BT device’s audio player and play your favorite 
song, station, podcast, etc.  If the sync was 
successful, you will hear that audio as long as 
your mobile audio source is within range of 
the spa’s BT receiver.  You will then control the 
volume and audio source playing through the 
spa’s audio system from your BT device. 


Connecting via MP3 (wired connection):

Or if you prefer, you can achieve a wired 
version of the connection described above 
by plugging a mobile audio player (e.g., MP3 
player, smartphone, etc.) directly into the 1/8” 
(3.5mm) receptacle inside the dock on the 
front of your spa.
 
Whichever form of connection you use, we 
recommend placing your mobile audio source 
inside the dock on the front of the spa to 
protect it from the elements or from splashed 
water.

Summary of Contents for DT6

Page 1: ...behavior Please reset the breaker and enjoy your spa The trip test has been completed successfully If your swim spa was not wired to a GFCI breaker or your breaker fails the GFCI Trip Test the spa wil...

Page 2: ...fore entering the swim spa or hot tub measure the water temperature with an accurate thermometer WARNING Do not use a swim spa or hot tub immediately following strenuous exercise WARNING Prolonged imm...

Page 3: ...y 20 Show and Set Time of Day 20 Flip Invert Display 20 Restricting Operation 21 Unlocking 21 AdjustingFiltration 21 Wi Fi Connectivity 21 GFCI Trip Test 21 TP800 Control Panel 22 ButtonFunctions 22 T...

Page 4: ...a Surface Care and Cleaning 38 Underwater LED light cluster 38 Common Water Problems 40 Common Hardware Problems 43 Swim Spa Soaking Guidelines 45 MXBP20 Series System Wiring Diagram 47 VS501 Series S...

Page 5: ...ings are broken or missing Never replace a suction fitting with one rated less than the flow rate marked on the original suc tion fitting 6 DANGER Risk of Electric Shock Install at least 5 feet 1 5m f...

Page 6: ...nt IEC Publication 417 Symbol 5019 2 At least two lugs marked BONDING LUGS are provided on the external sur face or on the inside of the supply termi nal box or compartment Connect the local common bo...

Page 7: ...Use an extension cord to power your spa Allow anyone to stand on the spa cover It is not designed to support weight Power the spa unless it is filled with water 5 6 below top of the lip of the spa Ope...

Page 8: ...he distance that the crane boom must travel Be sure that the crane operator uses an 8 spreader bar and that the straps wrap all the way around the bottom frame of the Swim spa Locate the Swim spa on a...

Page 9: ...in off water that may cause falls and or water damage Water will splash out of the Swim spa during normal use when swimming and when exiting the Swim spa 3 Surface area of foundation pad and surroundi...

Page 10: ...wing devices electronic control pack pumps heater UV water sanitizer ozone generator LED lighting interface and associated electrical controls not shown E Drain Access Adjacent to the equipment servic...

Page 11: ...Pack All swim spa functions are operated by this control There are no user serviceable components in this control Opening this control may subject you to high voltage and danger of electrical shock o...

Page 12: ...tension This jet may be the entry point for ozone produced during automatic filtration and therefore it is not adjustable Note Ozone production is stopped when functions are activated on control pane...

Page 13: ...ician shall connect the spa to a circuit protected by a GFCI or RCD European This is a requirement by the National Electric Code article 680 42 and is also in compliance with Underwriter s Laboratorie...

Page 14: ...ee phase service Refer to wiring diagram or pouch on control system inside cabinet for specific wiring and phase info 240 Volt Installation Units Electrical Requirements Number Meaning 1 The heater wi...

Page 15: ...RTH AMERICA 240V 60A 240V 50A 240V 40A 240V 50Hz DT6 Swim side A1 C2 D DT6 Spa side B1 C2 D LT6 A1 C2 D MT6 A1 C2 D RB4 A1 C2 D RL4 A1 C2 D RS1 A1 C2 D RS2 A1 C2 D XB4 A1 C2 D XL4 A1 C2 D XS1 A1 C2 D...

Page 16: ...disconnect panel 3 Open the air controls located on the top lip and cycle the jets from high to low Water should come from the therapy jets If water flow is not established turn off jets and see Primi...

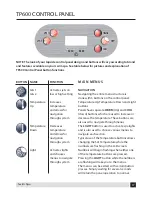
Page 17: ...te spa lights and is also used to choose various menus to navigate each section Typical use of the Temperature buttons allows changing the Set Temperature while the numbers are flashing in the LCD scr...

Page 18: ...ion Sometimes turning the pump off on helps it to prime If the pumps will not prime after 5 times turn power off and call for service IMPORTANT A pump should not be allowed to run without priming for...

Page 19: ...rature thresholds determined by the switch See your dealer for details Clean up Cycle optional When a pump or blower is turned on by a button press a clean up cycle begins 30 minutes after the pump or...

Page 20: ...ure is reached or 1 hour has passed After 1 hour the System will revert to Rest Mode This mode can also be reset by entering the Mode Menu and changing it SHOW SET TIME OF DAY Setting the time of day...

Page 21: ...flashing indicate numbers that can be changed Scroll through with the up and down temperature buttons to choose what time your filter cycle will start and press the Light button to make your choice RU...

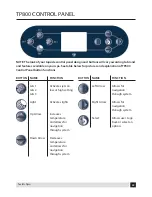
Page 22: ...tton functions BUTTON NAME FUNCTION Jets 1 Jets 2 Jets 3 Light Up Arrow Down Arrow Activates jets on low or high setting Activates lights Increases temperature and allows for navigation through system...

Page 23: ...e right side of the screen the menu selections can be selected with the Up and Down Buttons Use the Select Button to choose an item Selecting one of these items will change to a different screen with...

Page 24: ...his way when a range is chosen the spa will heat to the set temperature associated with that range High Range can be set between 80 F 104 F Low Range can be set between 50 F 99 F Freeze Protection is...

Page 25: ...high speed to facilitate priming If the pumps have not primed after 2 minutes and water is not flowing from the jets in the spa do not allow the pumps to continue to run Turn off the pumps and repeat...

Page 26: ...ptional additional freeze sensor may be added to protect against freeze conditions that may not be sensed by the standard sensors Auxiliary freeze sensor protection acts similarly except with the temp...

Page 27: ...t all automatic functions are still active Locking the Settings allows Jets and other features to be used but the Set Temperature and other programmed settings cannot be adjusted Settings Lock allows...

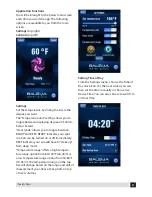
Page 28: ...do is stand close to the spa with your BT device smartphone tablet MP3 player etc and go to the device s BT settings There you will see a source named Belkin xXX Fusion___ AUVIO___ or something simila...

Page 29: ...r for download After Application Download Make sure your smart device s WiFi setting is on and that you are near your spa Open your device s WiFi settings and find the BWG SPA network which will look...

Page 30: ...gs in the top right corner 3 Choose Advanced at the bottom center 4 Type in your home WiFi connection informa tion and SAVE 5 Be sure to select Open WEP WPA or WPS based on your home WiFi router s enc...

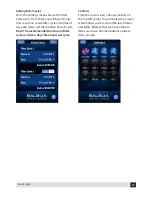
Page 31: ...n READY and REST READY indicates your spa s controls can be turned on or off immediately REST indicates your spa will have to wake up from sleep mode Temperature range offers a high tempera ture range...

Page 32: ...day each starts and the duration of each cycle Note The recommended duration of filter cycles is twice a day three hours per cycle Controls From the main screen choose Controls on the top left corner...

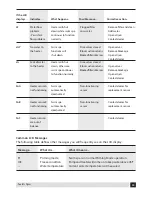
Page 33: ...e the heater Overheat One sensor has detected temperature of swim spa water entering heater to be 108 F 42 C Heater flow problem What happens Swim spa heater will automatically shut down until tempera...

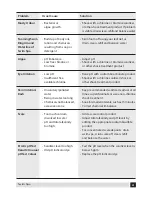
Page 34: ...d Block suction returns Blockedfilter skimmer Slice valves closed Block suction returns Blockedfilter skimmer Non functioning sensor Non functioning sensor Corrective action Remove filter and clean Ad...

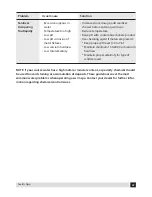
Page 35: ...al amount before using Also use your Clean Up Cycle after heavy use for additional filtration Tests should be done daily with your test kit to keep a chlorine or bromine residual of 3 0 to 5 0 ppm pH...

Page 36: ...a substitute All chemicals should continue to be monitored especially during periods of heavy usage and when changing replenishing the spa water Draining your swim spa NOTE Always turn the circuit br...

Page 37: ...ld climates where freezing temperatures occur special care is required to prevent the possibility of damage to the swim spa and associated equipment due to freezing If you plan on using your swim spa...

Page 38: ...ce to come in contact with products such as acetone nail polish remover nail polish dry cleaning solution lacquer thinners gasoline pine oil orange oil citrus based cleaners etc Remove dust and dry di...

Page 39: ...ution Do not connect any auxiliary components for example cable additional speakers headphones additional audio video compentents etc to the system These units are not provided with an outdoor antenna...

Page 40: ...zer or other shock treatment product Increase sanitizer level to balance water and shock if needed Adjust pH add appropriate sodium bisulfate product Use clarifier NOTE Your swim spa may use an ozone...

Page 41: ...ther shock treatment product If problem is visible drain clean refill and balance water Skim foam off using your leaf net or drain clean refill and balance water Adjust pH Shock with a chlorine or bro...

Page 42: ...ith sodium bicarbonate product Use chelating agent if metals are present Keep proper pH level 7 2 to 7 6 Maintain minimum 150 200 ppm calcium hardness Maintain proper alkalinity for type of sanitizer...

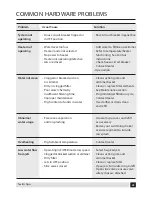
Page 43: ...low speed Clogged or blocked suction or skimmer Dirty filter Jets in OFF position Slice valves closed Solution Reset circuit breaker in panel box Add water to fill line on skimmer Refer to temperatur...

Page 44: ...in OFF position Improper or defective wiring or electrical supply Pump thermal overload switch tripped Wearing in of turbo blower brushes Swim spa is in heating cycle Swim spa is in filter cycle Swim...

Page 45: ...e water temperature Exit slowly to accommodate relaxed leg muscles and possible light headedness 6 Soaking for too long may cause some users to feel nauseous dizzy or light headed If you wish to soak...

Page 46: ...the jets is similar to using a treadmill You will want to pace your swim strokes and kicks to maintain your place in the water for an optimal workout If you like to sprint during your workout you can...

Page 47: ...9 J19 J50 J13 J12 J88 J62 F6 30A F8 30A J56 J57 J55 J59 J51 J52 J98 J10 J81 J20 J18 J43 CIRC PUMP OZONE A V HOT PUMP 1 J14 K9 J5 AUX J8 AUX J40 REMOTE J35 MAIN J34 MAIN J109 J27 J91 J22 J23 SERIAL J29...

Page 48: ...be same voltage Do not remove Fuse F7 20A 12V Light 2 Spd P1 PCBA Rev D E only Black jumper required Do not remove Wiring Configuration and DIP Settings Setup 4 As Manufactured 240V Pump 1 2 Speed 120...

Page 49: ...QUIPMENT AND AT LEAST 5 FEET 1 52 M FROM THE INSIDE WALLS OF THE POOL SPA OR HOT TUB CONNECT ONLY TO CIRCUITS PROTECTED BY A CLASS A GFCI USE COPPER CONDUCTORS ONLY EMPLOYER UNIQUEMENT DES CONDUCTEURS...

Page 50: ...50 50 Swim Spa GS501 SERIES SYSTEM WIRING DIAGRAM GS501Z Wiring Diagram Contact Balboa 800 645 3201 for Hi Res Version...

Page 51: ...2 F6 30A F8 30A J56 J57 J55 J59 J51 J52 J98 J10 J81 J20 J18 J43 CIRC PUMP OZONE A V HOT PUMP 1 J14 K9 J5 AUX J8 AUX J40 REMOTE J35 MAIN J34 MAIN J109 J27 J91 J22 J23 SERIAL J29 VAC J28 AUX FRZ J17 J16...

Page 52: ...warranty service you must return your warranty card completed with model and serial number to your dealer immediately upon completion of the spa installation MAAX Spas Industries Corp provides a limi...

Page 53: ...Spas Industries Corp assumes no responsibility for errors or omissions Nor is any liability assumed for damages resulting from use of the information contained herein Specifications subject to change...

Page 54: ...54 54 Swim Spa NOTES...

Reviews: