background image

4

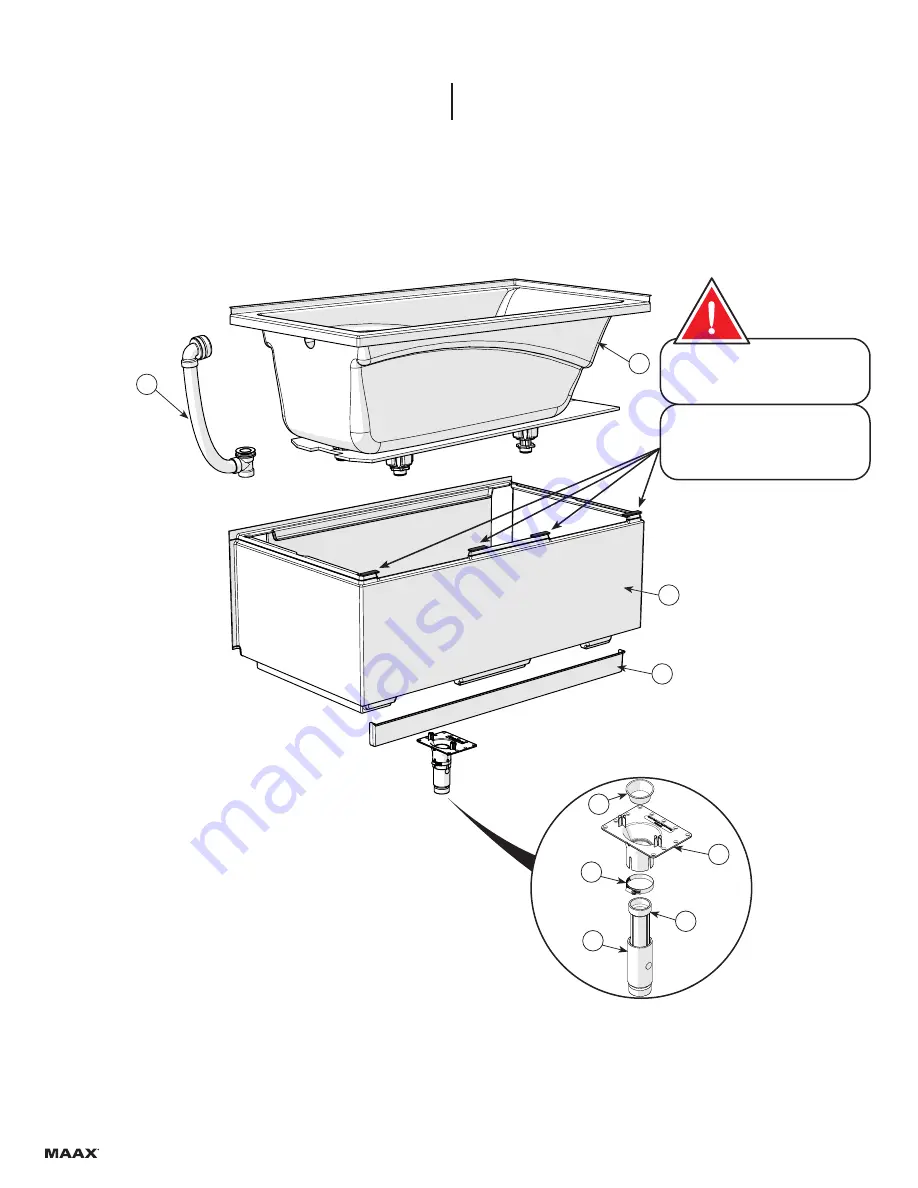
PARTS

AND COMPONENTS

PIÈCES

ET COMPOSANTES

4

1

3

2

7

6

5

8

9

Optional

 F2 drain kit

Ensemble de drain F2 

optionnel

These rubber parts must be removed 

before installing the bathtub.

Il faut retirer ces pièces en caoutchouc 

avant d'installer la baignoire.

CRITICAL STEP

ÉTAPE CRITIQUE

Summary of Contents for ModulR 410007

Page 1: ...ommencer l installation Serial number Num ro de s rie IMPORTANT Record the serial number IMPORTANT Noter le num ro de s rie A two person installation is recommended Une installation par deux personnes...

Page 2: ...Unpacking the unit 8 3 Skirt installation 9 4 Bathtub preparation and installation 10 Warranty 16 Indice Page Pi ces et composantes 4 Outils et quipements 6 1 Construction de la structure 7 2 D balla...

Page 3: ...3...

Page 4: ...NTES 4 1 3 2 7 6 5 8 9 Optional F2 drain kit Ensemble de drain F2 optionnel These rubber parts must be removed before installing the bathtub Il faut retirer ces pi ces en caoutchouc avant d installer...

Page 5: ...in Inclus avec la baignoire 1 10032807 OPTIONAL F2 DRAIN PARTS PIECES DU DRAIN F2 OPTIONNEL PIEZAS DEL DESAG E OPCIONAL F2 Part Nom de la pi ce Qt Qt Code 5 Installation flange Bride d installation 1...

Page 6: ...Silicone claire Measuring tape Ruban mesurer Square querre Utility knife Couteau lame r tractable Safety equipment quipement de s curit Screwdriver Tournevis drill bit M che de po SUPPLIES SOLD SEPARA...

Page 7: ...niveau Build a structure based on the dimensions in the chart below IF THE STRUCTURE IS ALREADY BUILT CHECK THAT IT RESPECTS THE DIMENSIONS BELOW Construire la structure en respectant les dimensions f...

Page 8: ...e to pro tect the bathtub while is upside down Turn the bathtub upside down Unscrew the wooden slats from the skirt Unscrew the slats from the wooden blocks 8 screws in total D couper la boite de cart...

Page 9: ...he skirt by pushing it completely against the studs at the back and on the side of the alcove Installer la jupe en la poussant fond contre les montants arri re et lat raux de l alc ve STEP Installing...

Page 10: ...llation de la jupe suite 3 3 Check me Cochez moi 3 4 Check me Cochez moi With a 1 8 bit drill holes in the skirt flange then secure the skirt to all the wall studs with 8 x 1 screws not included Only...

Page 11: ...aster ma nipulation once the bathtub is placed inside the skirt Ajuster la hauteur du bain en tournant les pattes ajus tables Tourner en sens horaire pour faire descendre le bain et antihoraire pour l...

Page 12: ...le pourtour Leveling the bathtub is critical for the finish seam between the bathtub and the skirt Mettre le bain de niveau est une tape critique pour la finition entre le bain et la jupe Adjust the s...

Page 13: ...in connections Do a water test verify for leaks Ins rer le bain dans la jupe Utiliser un 2x4 ou un objet similaire pour garder un espace entre le bain et la jupe afin de pouvoir connecter les tuyaux V...

Page 14: ...adjusted THE TOE KICK SHOULD BE TOUCHING THE FLOOR installer le coup de pied amovible La hauteur du coup pied est ajustable LE COUP DE PIED DOIT TOUCHER LE SOL 4 8 Check me Cochez moi The toe kick mus...

Page 15: ...15...

Page 16: ...com us warranty MAAX Bath Inc offers express limited warranty on each of its products This warranty extends only to the original owner end user for personal household use For commercial uses addition...

Reviews: