background image

P a g e


23 


PRINTED : JAN’2015 

                                                                              REF NO. SM7715010-01-11  

6  Trouble 

shooting 


Before


calling


for


service,


please


read


the


following


troubleshooting


table


first.


This


can


save


both


your


time


and


money.


The


table


contains


common


problems


except


those


caused


by


defects


in


workmanship


or


material


of


the


refrigerator.


Problem


Cause


Solution


Refrigerator


Operation


The


compressor


does


not


work


The


refrigerator


is


in


the


defrosting


cycle.


The


refrigerator


is


not


plugged


into


a


power


outlet.


This


is


normal


for


an


automatic


defrosting


refrigerator.


Verify


the


plug


is


plugged


in


the


socket


firmly.


The


refrigerator


runs


frequently


or


runs


for


too


long


period


The


indoor


or


outdoor


temperature


is


high.


The


refrigerator


has


been


powered


off


for


a


period


of


time.


The


door


is


opened


too


frequently


or


for


long


period.


The


door


of


the


fridge/freezer


storage


compartment


is


not


tightly


closed.


The


temperature


setting


is


too


low.


The


door


gasket


of


the


fridge/freezer


storage


compartment


is


dirty,


worn,


cracked


or


mismatched.


In this


case,


it


is


normal


for


the


refrigerator


to


run


longer.


Normally,


it


takes


8


to


12


hours


for


the


refrigerator


to


totally


cool


down.


Warm


air


enters


the


refrigerator


and


causes


it


to


start


frequently.


Please


do


not


open


the


door


too


frequently.


Ensure


the


refrigerator


is


located


on


a


level


ground


and


there


is


no


food


or


container


jarring


the


door.


See


“door/drawer


opening/closing”


in


section


“Problem”


Set


the


temperature


higher


until


a


satisfactory


refrigerator


temperature


is


obtained.


It


takes


24


hours


for


the


refrigerator


temperature


to


become


stable.


Clean


or


replace


the


door


gasket.


A


leakage


gap


of


door


gasket


can


cause


a


longer


running


time


of


the


refrigerator


in


order


to


maintain


desired


temperature.


Summary of Contents for ITV085ICER

Page 1: ...SERVICE MANUAL Model ITV085ICER ITV095ICER ITV110ICER ITV120ICER Contents Specifications 1 Circuit Diagram 4 Refrigerant Circuit 7 Replacement of Parts 8 Control function 18 Trouble shooting 23 ...

Page 2: ...or 1 Specifications 1 1 Specific parts for specific countries Item No Model Destination Power Source Voltage ac Hz Power Cord 1 ITV085ICER Philippines PH 220 50 B2 2 ITV095ICER Philippines PH 220 50 B2 3 ITV110ICER Philippines PH 220 50 B2 4 ITV120ICER Philippines PH 220 50 B2 ...

Page 3: ... WxDxH mm 545 x 645 x 1573 5 545 x645x1678 5 595x 677 x 1650 5 595 x677x1754 5 Packing Dimension WxDxH mm 580 x 726 x 1674 5 580x726x1779 5 630x755x1751 5 630x755x1846 5 Net Weight kg 50 52 55 59 Gross Weight kg 56 58 61 65 1 3 Electrical Parts Compressor Model VNX113Y Electrical data Input 220 240V 50 60Hz Connection Connector CN6 on main PCB Between circuit 1 BL 3 BR Resistance value V U 7 3 Ω V...

Page 4: ...ween circuit 3 G 5 B R Sensor Model NTC Thermister Electrical data Resistance value 0 6 0KΩ 25 2 18KΩ Connection Connector CN7 on PCB Between circuit 4 B 6 W Ambient Sensor Model NTC Thermister Electrical data Resistance value 0 6 0KΩ 25 2 18KΩ Connection Connector CN11 on PCB Between circuit 1 W 3 W R Volume Model Electrical data Volume resistance 10 KΩ at Center position Connection Connector CN7...

Page 5: ...P a g e 4 PRINTED JAN 2015 REF NO SM7715010 01 11 2 Circuit Diagram Model ITV085ICER ITV095ICER ITV110ICER ITV120ICER Inverter compressor 2 1 Circuit Diagram ...

Page 6: ...P a g e 5 PRINTED JAN 2015 REF NO SM7715010 01 11 2 2 Reference wiring diagram ...

Page 7: ...3 Cu ft Voltage 220 V Frequency 50 Hz Current 0 9A Power Input 135 W Defrosting Input 120 W Refrigerant R600 A 46 g Net Weight 52 kg Model ITV110ICER Total Volume 305 L 10 8 Cu ft Voltage 220 V Frequency 50 Hz Current 0 9 A Power Input 135 W Defrosting Input 130 W Refrigerant R600 A 64 g Net Weight 55 kg Model ITV120ICER Total Volume 335 L 11 8 Cu ft Voltage 220 V Frequency 50 Hz Current 0 9 A Pow...

Page 8: ...P a g e 7 PRINTED JAN 2015 REF NO SM7715010 01 11 3 Refrigerant Circuit ...

Page 9: ...g Part Name Frz Fan blade Operating Procedure 1 Remove Ice Storage Box 2 Remove Ice Cube Tray Assy 3 Remove Shelf F 4 Dig Cover Cap out 5 Release screws at FF Cover 6 Lift Cover and Fan Cover out 7 Dig Spring 8 Lift Spring 9 Pull out Fan Blade from Fan Motor 10 After replacing Fan Blade reverse the steps above ...

Page 10: ...perating Procedure Follow step 1 10 of replacing Fan Blade 1 Lift Plate MTG Motor out 2 Take out socket of Fan Motor 3 Release screw at Cover A 4 Pull Cover A from Plate MTG Motor 5 Pull out Fan Motor from Plate MTG Motor 6 After replacing Fan Motor reverse the steps above ...

Page 11: ...ng Procedure Follow step 1 10 of replacing Fan Blade Follow step 1 2 of replacing Fan Motor 1 Take out socket of Defrost sensor 2 Cut out Cable Tie from Evaporator tube 3 Remove Al tape 4 Pull Defrost Sensor from Evaporator tube 5 After replacing Bimetal Thermo reverse the steps above ...

Page 12: ...se Operating Procedure Follow step 1 10 of replacing Fan Blade Follow step 1 2 of replacing Fan Motor 1 Take out socket of Thermal Fuse 2 Cut out Cable Tie from Evaporator tube 3 Pull Thermal Fuse from Evaporator tube 4 After replacing Thermal Fuse reverse the steps above ...

Page 13: ...lacing Fan Blade Follow step 1 2 of replacing Fan Motor 1 Take out socket of Glass Tube Heater 2 Take out socket of Glass Tube Heater 3 Remove aluminium tape that cover electrical wire 4 Hold and lift Evaporator up 5 Hold Glass Tube Heater at the rubber connector 6 After replacing Glass Tube Heater reverse the steps above ...

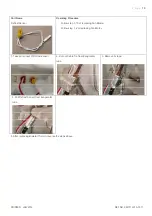
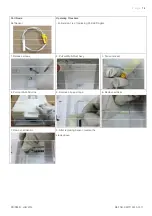
Page 14: ...REF NO SM7715010 01 11 Part Name LED LAMP Operating Procedure 1 Pull out Chiller 2 Remove all Glass Shelf 3 Remove Lamp Cover 4 Release screws 5 Pull out socket 6 Remove LED Lamp 7 After replacing LED lamp reverse the steps above ...

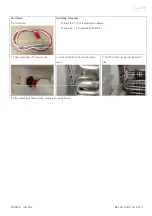
Page 15: ...nsor Operating Procedure Follow step 1 6 of replacing Chill LED Lights 1 Release screws 2 Pull out Multi Duct Assy 3 Pull out socket 4 Pull out Multi Duct Ins 5 Remove all paper tape 6 Remove all Seal 7 Remove all Sensor 8 After replacing Sensor reverse the steps above ...

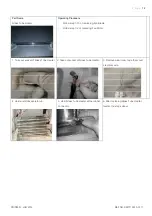
Page 16: ...t Name Volume Assy Operating Procedure Follow step 1 6 of replacing Chill LED Lights Follow step 1 4 of replacing Ref sensor 1 Pull out Socket 2 Release screws 3 Remove all Volume Assy 4 Pull out Socket 5 After replacing Volume Assy reverse the steps above ...

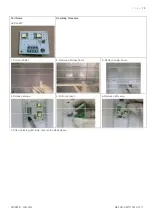
Page 17: ...mponent Ass y Main PCB Operating Procedure 1 Release screws that Cover B 2 Pull out Rear Cover B 3 Release screws that Elec Component Ass y Main PCB 4 Pull out Socket 5 Pull out Elec Component Ass y Main PCB 6 After replacing Elec Component Ass y reverse the steps above ...

Page 18: ...EF NO SM7715010 01 11 Part Name Inverter model 1 Remove inverter box 2 pull out socket 3 Release screws that inverter box 4 pull out socket electrical wires from inverter box 5 After Replacing inverter model reverse the steps above ...

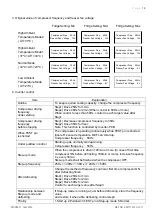
Page 19: ...wer supply ON Keep compressor forced ON for 5min when SHORT pin is shorted 1sec When sensors are abnormal When R sensor D sensor is disconnected or detect short circuit turn the compressor OFF compulsively Under defrosting The compressor is OFF Minimum ON time If compressor is turned ON it is not turned OFF within 5min when SHORT pin is shorted 1sec But Manual DEF is prior Adjustment process in lo...

Page 20: ...ep up frequency 25Hz 30Hz 36Hz 40Hz 50Hz After defrosting Change the method of frequency control at first time compressor ON after defrosting finish Step1 Drive 25Hz for 1min Step2 Drive 46Hz for 2min Step2 Drive 50Hz for 2min Control to each target value after Step3 Relationship between Step up mode and defrosting If Step up mode is running at just before defrosting store the frequency value and ...

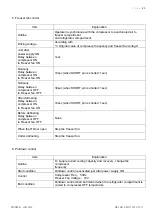
Page 21: ...ween compressor OFF to Freezer fan OFF 30sec when SHORT pin is shorted 1sec After defrosting Delay between compressor ON to Freezer fan ON 10sec when SHORT pin is shorted 1sec Before defrosting Delay between compressor OFF to Freezer fan OFF None When the R Door open Stop the freezer fan Under defrosting Stop the freezer fan 6 Pulldown control Item Explanation Outline To keep required cooling capa...

Page 22: ... cycle When the compressor continues ON for 3hours in first time after defrosting End judgement 8 0o C D sensor temperature Control before defrosting When accumulated time reaches fixed value compressor and freezer fan operate to compressor OFF temperature Next defrost heater output shall be started For details refer 8 Compressor Fan motor control before defrost Maximum time of defrost heater outp...

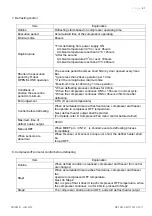
Page 23: ...hen R door is closed return to normal control 11 Inspection mode Item Explanation Outline Switch to special mode for doing inspection in PCB factory Start condition Short between K1 and K2 and Power supply ON Input Output check For details refer the inspection specification 12 Handling of the AT sensor Item Explanation Outline AT sensor is on PFB Therefore it affected heat from other parts or neig...

Page 24: ...s opened too frequently or for long period The door of the fridge freezer storage compartment is not tightly closed The temperature setting is too low The door gasket of the fridge freezer storage compartment is dirty worn cracked or mismatched In this case it is normal for the refrigerator to run longer Normally it takes 8 to 12 hours for the refrigerator to totally cool down Warm air enters the ...

Page 25: ...tes on the refrigerator s outside surface or between two doors Damp climate The refrigerator door is not closed tightly This causes condensation of the cold air in the refrigerator and the warm air outside it This is normal in damp climate The moisture will decrease when the humidity drops See Door drawer opening closing in section Problem Bad odors in the refrigerator The inside of the refrigerat...

Reviews: