


EN
17
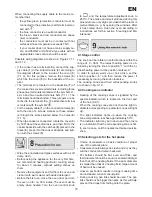
Right ! (9.3.1)
Low current consumption
•
Good heat transmission
•
pot is somewhat larger than the hotplate
–
even pot
–
pot lid is on
–
Wrong ! (9.3.2, 9.3.3, 9.3.4)
High current consumption
•
Poor heat transmission
•
Long boiling times
•
9.3.2 - Pot too small!
9.3.3 - Uneven pot bottom!
9.3.4 - Soiled pot bottom or heating field
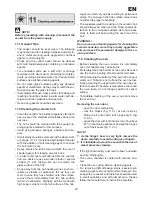
10.1 Parts and accessories (10.1.1)
[1], [2], [3], [4], [5] – guide levels
1 – upper heater
2 – lower heater
3 – oven lamp
4 – temperature sensor
10.2 Oven control knob
Oven control knob (fig. 10.2.1) enables the user to
select a function suitable for preparing a particular
dish. The knob can be rotated in both directions.
Lower heater turned on
Heat is delivered by the lower heater located be-
neath the floor of the oven. This function allows
for extra heating the bottom surface of the dish.
It is recommended to use this function during the
last 10 – 15 minutes of baking.
Lower and upper heater turned on – conven-
tional baking
Both heaters deliver heat to the oven. Dishes
should be placed on one level of the oven, prefe-
rably the middle one. This kind of heating is ideal
for cooking cakes, meat, fish, bread, pizza, etc.
Upper heater turned on
This heating method can be used for extra he-
ating of the top surface of the dish.
Traditional grilling
Traditional grilling is used for small portions of
meat. The thickness of the grilled dish should not
be greater than 2 - 3 cm. The dishes can be pla-
ced both on the plate or on the wire shelf. Before
grilling, meat and fish should be covered with a
small amount of fat. The grilling time is assumed
approximately 8 - 12 minutes per each centime-
tre of the meat thickness.
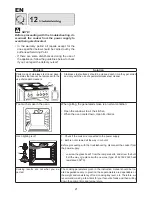
How to use the electric grill:
preheat the oven by setting the maximum tem-
–
perature (250
0
C),
put the dish in the oven,
–
insert the drip tray on the bottom runner,
–
set the function change-over switch knob to po-
–
sition
,
set the required temperature,
–
after half of the grilling time, turn the grilled por-
–
tions over.
WARNING !
While grilling, the appliance must not be left wi-
thout supervision. Accessible parts of the cooker
are very hot ! Keep children well away.
10.3 Temperature adjustment knob (10.3.1)
Temperature adjustment knob enables to adjust the
temperature in the oven and maintain it at the de-
sired level. The temperatures indicated on the knob
correspond to the temperatures in the oven (after the
heat-up).
Adjusting the temperature:
– turn the knob right to the desired position within the
temperature rage of 50 – 250 °C.
After baking – turn the knob left and set it to zero
indicated by a symbol of a dot (•).
10.4 Indicator lights (panels 2.6.1)
Orange indicator light indicates that the oven or the
•
hot plate is turned on. This indicator light turns on
each time when any of the oven function has been
selected or the hot plate has been turned on, and
turns off after the oven has been switched off by
setting the oven control knob to “0” (off), or after
the hot plate has been turned off.
Red indicator light indicates that the temperature
•
adjustment knob has been used. The light appears
when the temperature adjustment knob has been
set to a particular temperature and goes off when
the selected temperature has been reached in the
oven. When the oven is being used, the light will
turn on or off, thereby signaling that the heaters
have been automatically switched on to maintain
the temperature in the oven or switched off when
the desired temperature has been reached.
10.5 Oven light
For your comfort and safety, the oven has been fitted
with a light bulb which lights up the inside of the oven
during its operation. The light turns on after any of
Summary of Contents for MVC1 2428B
Page 1: ...RU EN INSTRUCTION MANUAL MVC1 2428B O...
Page 2: ...1 6 8 1 6 6 1 1 1 1 2 6 1 7 1 1 7 1 2 7 1 3...
Page 4: ...3 10 8 1 10 8 2 10 8 3 10 8 4 11 3 1 11 3 2 11 3 3 11 2 1 11 2 2...
Page 6: ...RU 5 1 2 9 2 1 1 2 3 4 5 6 6 1 6 2 6 3 6 4 6 5 6 6...
Page 12: ...RU 11 11 2 2 CERA FIX 11 3 11 3 1 1 2 3 11 3 2 450 11 3 3 1 2...
Page 13: ...RU 12 inoks 1 2 1 2 3 E14 230 25 3000C...
Page 14: ...RU 13 2002 96 MVC1 2428B 1 A 2 0 79 2 58 45 2 1080 1 G 2...
Page 24: ...05 2010 C600983I5...


