


EN
18
If the dough bottom is too brown, next time place
•
the cake tin on a higher level in the oven and set a
lower temperature.
If you place dough in the overheated oven, the cake
•
may be doughy or fail to rise. If the dough stays in
the oven too long, it may dry out or the outer layer
may become too brown.
When selecting the baking time and temperature
•
take into account the weight and consistency of the
pastry.
Place utensils with food at any level of the oven,
•
depending on the used function.
Observation and experience help in choosing the
•
best level, temperature and oven function for a par-
ticular dish.
It is recommended to start the first baking with me-
•
dium temperatures, according to the recipe, and
then adjust the temperature to suit the needs the
next time. If baked in lower temperatures, the cake
becomes evenly brown all over its surface.
In order to check whether the cake is baked, it sho-
•
uld be pierced with a thin wooden rod a few minu-
tes before switching off the oven. The cake is ready
if it does not stick to the rod. After baking the cake
should be kept in the oven for about 5 minutes.
The following are recommended when using the
•
oven:
do not use the oven for storage purposes,
–
cake tins, casseroles and dishes for roasting
–
meat should be placed on the gridiron (central-
ly) and not on the tray (fig. 10.8.3 and 10.8.4),
when selecting cooking parameters, take the
–
type of cookware to be used into consideration;
dishes have different levels of heat conduction
depending on their material, wall thickness and
colour.
Stewing meat is best when done using the function
, especially for lean meat.
In case of heavy steam when baking very mo-
ist food, it is recommended to put a lid on the
dish and remove it towards the end of cooking to
brown the dish.
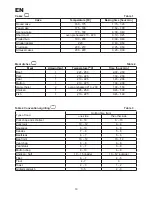
Important !
Below in tables the approximate cooking times
for various foods have been summarized. These
are only suggestions and in practice these va-
lues may vary. We recommend making several
tries for a particular dish and noting down the
optimum time and temperature.
the available baking functions has been selected and
goes off after the oven has been switched off.
10.6 Accessories
Standard accessories of the oven include one baking
tray (fig. 10.6.1) and a baking grid (fig. 10.6.2). The
baking grid is designed for placing baking tins with
dishes intended for baking or roasting. Certain foods
may be placed directly on the grid, e.g. meat, sausa-
ges or fish. In such cases, a drip tray filled with ca.
0.5 l of water must be placed underneath to collect
the dripping fat. This will keep the oven clean
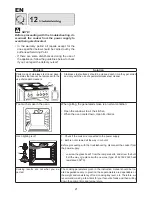
10.7 Using the oven
1. Heat the oven and put the baking tin containing the
dish on a selected oven level (fig. 10.7.1).
2. Select a baking function using the oven control
knob, e.g.
(10.7.2).
3. Set the oven to the desired temperature (e.g.
200°C) using temperature adjustment knob (fig.
10.7.3).
4. After baking, switch off the oven by turning the
oven control knob and the temperature adjust-
ment knob to zero (off).
Note !
1. When in operation, the appliance must not
be left unattended, as certain parts of the co-
oker may become very hot. Keep children well
away!
2. Dishes must not be placed on the highest level
[5].
10.8 Oven use
For baking cakes, traditional metal cake tins may
•
be used as well as Teflon, ceramic, glass or alu-
minium foil cake trays (fig. 10.8.1). The most uni-
versal are metal tins due to their various shapes
and application. Before first use, all metal cake tins
must be baked in a well-heated oven to remove
the smell.
Fill the tins 2/3 full of dough, leaving enough place
•
for it to rise.
Ceramic, glass, enamelled steel and castiron co-
•
okware with heat-resistant handles may be used
(fig. 10.8.2) for roasting meat.
Before putting a cake into the oven, the oven must
•
be pre-heated.
During baking the dough should be heated evenly.
•
This can be done by choosing the
function.
If the dough outer layer is too brown, next time pla-
•
ce the cake tin on a lower level in the oven, set a
lower temperature, and allow the dough to bake
longer.
Summary of Contents for MVC1 2428B
Page 1: ...RU EN INSTRUCTION MANUAL MVC1 2428B O...
Page 2: ...1 6 8 1 6 6 1 1 1 1 2 6 1 7 1 1 7 1 2 7 1 3...
Page 4: ...3 10 8 1 10 8 2 10 8 3 10 8 4 11 3 1 11 3 2 11 3 3 11 2 1 11 2 2...
Page 6: ...RU 5 1 2 9 2 1 1 2 3 4 5 6 6 1 6 2 6 3 6 4 6 5 6 6...
Page 12: ...RU 11 11 2 2 CERA FIX 11 3 11 3 1 1 2 3 11 3 2 450 11 3 3 1 2...
Page 13: ...RU 12 inoks 1 2 1 2 3 E14 230 25 3000C...
Page 14: ...RU 13 2002 96 MVC1 2428B 1 A 2 0 79 2 58 45 2 1080 1 G 2...
Page 24: ...05 2010 C600983I5...


