


EN
20
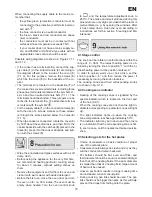
NOTE !
Before proceeding with cleaning, disconnect the
cooker from the power supply.
11.1 General Tips
The cooker should be kept clean. The following
•
may not be used for cleaning: abrasive powder cle-
aners, metal scouring pads, aggressive chemical
agents or sharp objects.
Knobs and the control panel should be cleaned
•
with mild liquid detergents containing no abrasive
agents.
For enamelled parts use a soft cloth or sponge
•
moistened with warm water containing mild deter-
gents, avoiding excessive water. For heavily soiled
surfaces use kitchen-cleaning agents.
Do not clean glass surfaces using any abrasive
•
agents or metal items, as they may scratch the sur-
face and cause the glass to break.
Immediately after use, trays and tins for baking and
•
roasting should be soaked in warm water with de-
tergent and then washed and wiped dry.
Oven door gasket should be kept clean.
•
11.2 Cleaning the ceramic hob
Clean the ceramic hob surface regularly after each
•
use, as even the smallest dirt will bake during the
next use.
The hob should be cleaned with the special cle-
•
aning agents intended for this purpose.
Avoid using abrasive sponges, powders and cre-
•
ams.
Small stains should be removed with a damp cloth
•
or sponge (11.2.1) moistened with lukewarm water
with the addition of soft cleaning agent, then wipe
the hob until it is dry.
Heavy stains should be removed with the use of
•
special agents for cleaning ceramic hobs.
In order to remove food build-up from the ceramic
•
hob, we advise to use a wooden blade or special
scraper (11.2.2), taking care not to scratch the
glass surface of the hob.
Keep away from the hob heating zones such ma-
•
terials as plastics, or aluminium foil, as they can
melt. In case they have malted onto the surface,
remove them immediately from the hob surface
(when it is still warm). Similarly, with the foods with
high sugar content; on the hot surface of the hob,
sugar can melt very quickly resulting in permanent
stains. The change in the hob surface colour does
not affect its proper functioning.
The cookware used for cooking on the ceramic hob
•
should always be clean and dry. Draw special at-
tention to the cookware bottoms as food residue
stuck to them will bake during the next use of the
hob.
WARNING !
Do not use oven cleaning agents for cleaning the
ceramic cook-top, since they are very aggressive
and can cause the permanent damage to the co-
ok-top surface.
11.3 Cleaning the oven
Before cleaning the oven, ensure it is completely
•
cool. Hot heaters may cause burns.
Preferably clean the bottom of the oven after each
•
use to avoid re-heating of food and fat remnants..
When cleaning the bottom of the oven do not pour
•
water on it. Take care not to flood the oven burner.
During cleaning the upper wall of the oven pay at-
•
tention to electric heaters, temperature sensor and
the oven lamp; do not change position of sensor
setting.
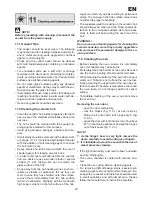
To facilitate cleaning of the oven you can remove
•
the oven door.
Removing the oven door:
open the door completely,
–
lock the hinges (fig. 11.3.1) at each side by
–
fitting clip
1
onto catch
2
of hinge bow
3
(fig.
11.3.2),
grasp the door with both hands, turn it by about
–
45
0
(in the closing direction) and pull the hinges
out of their seats (fig. 11.3.3).
NOTE !
1. As the hinge’s bow is very tight, remove the
doors carefully to avoid hurting your fingers.
2. It is forbidden to clean the oven with the use of
steam pressure cleaners.
If the light bowl is dirty, unscrew the bowl, and wash
•
and dry it thoroughly.
The oven’s chamber is coated with ceramic ena-
•
mel.
Clean the oven using kitchen-cleaning agents.
•
For removing difficult baking stains, special oven
•
cleaning agents are recommended. However, the-
se agents are caustic and therefore should be used
in small quantities and with utmost care. Please
follow the manufacturer’s instructions carefully.
Summary of Contents for MVC1 2428B
Page 1: ...RU EN INSTRUCTION MANUAL MVC1 2428B O...
Page 2: ...1 6 8 1 6 6 1 1 1 1 2 6 1 7 1 1 7 1 2 7 1 3...
Page 4: ...3 10 8 1 10 8 2 10 8 3 10 8 4 11 3 1 11 3 2 11 3 3 11 2 1 11 2 2...
Page 6: ...RU 5 1 2 9 2 1 1 2 3 4 5 6 6 1 6 2 6 3 6 4 6 5 6 6...
Page 12: ...RU 11 11 2 2 CERA FIX 11 3 11 3 1 1 2 3 11 3 2 450 11 3 3 1 2...
Page 13: ...RU 12 inoks 1 2 1 2 3 E14 230 25 3000C...
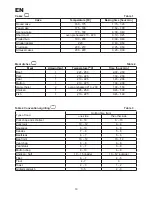
Page 14: ...RU 13 2002 96 MVC1 2428B 1 A 2 0 79 2 58 45 2 1080 1 G 2...
Page 24: ...05 2010 C600983I5...


