background image

Summary of Contents for MGENER-220

Page 1: ...Gasoline Generating Sets I Operator Manual MGENER 220 MGENER 221 MGENER 450 MGENER 550 ...

Page 2: ...e provided important safety messages in this manual and on the generator Please read these messages carefully A safety message alerts you to potential hazards that could hurt you or others Each safety message is preceded by a safety alert symbol filand one of three words DANGER WARNING or CAUTION These mean f lJ Vmij lij You Will be KILLED or SERIOUSLY HURT if you don t follow instructions f l M l...

Page 3: ...nd Terminal 11 Oil Alert System 11 Pilot Lamp 12 DC Termina ls 12 DC Circuit Protector 12 GENERATOR USE i 3 Connections to a Building s Electrical System 13 Generator Ground Circuit 13 AC Applications 14 AC Operation i 5 DC Operation 16 Disconnecting the battery cables 17 PREOPERATION CHECK 18 Engine Oil 18 Fuel Recommendation 19 STARTING THE ENGlNE 21 STOPPING THE ENGINE 22 I 2 i I ...

Page 4: ...aintenance Schedule 23 Engine Oil Air Cleaner Fuel Sediment Cup Spark Plug Service 27 TRANSPORTING STORl GE 29 TROUBLESHOOTING 31 SPECIFICATIONS 33 SPECIFICATIONS 35 Generator set electric wiring diagram 37 Operation 3 ...

Page 5: ...C VOLTAGE VOLTAGE 12V FREQUENCY 60Hz CURRE IT BA RATED OUTPUT kw MAX OUTPUT kw FUEL GASOLINE PHASE 1 PETR PL Do not connect to a building s electrical system unless an isolation switch has been installed by a qualified electrician Using a generator or an electrical appliance in wet conditions such as rain or snow or near a pool or sprinkler system or when your hands are wet could result in electro...

Page 6: ...usness and may lead to death If you run the generator in an area that is confined or even partially enclosed the air you breathe could contain a dangerous amounts of exhaust gas To keep exhaust gas from building up provide adequate ventilation Electric Shock Hazards The generator produces enough electric power to cause a serious shock or electrocution if misused Using a generator or electrical app...

Page 7: ...for a while after stopping the engine Be careful not to touch the muffler while it is hot Let the engine cool before storing the generator indoors Gasoline is extremely flammable and is explosive under certain conditions Do not smoke or allow flames or sparks where the generator is refueled or where gasoline is stored Refuel in a well ventilated area with the engine stopped Fuel vapors are extreme...

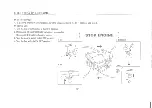
Page 8: ...CHOKE ROD VOLTfVIETEFi ELECTRICAL OUTLET FUEL VALVE GROUND TERfVllN L AIR CLEANER CIRCUIT BREAl ER ENGINE ON OFF SWITCH SERIAL NO 7 ...

Page 9: ...NK CAP FUEL METER MUFFLER SPARK PLUG CAP Record the engine number for your future reference See Page 7 Refer to this serail number when ordering parts and when making technical requests Engine serial number 8 ...

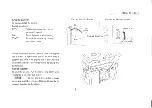
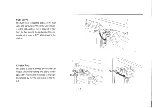
Page 10: ...ngine has started Do not use the starter for more than 5 seconds at a time II the engine rails to start release the switch and wait 1O seconds before opreating the starter again Recoil Starter To start the engine Pull the starter grip lightly until resistance is felt then pull briskly I NOTICE I Do no ailDw he start r tc1 snap back against the engine Ret m1 ii gently to prevent damage to the start...

Page 11: ...n fuel is allowed to flow from the fuel tank to the carburetor Be sure to return the lever to OFF after stopping the engine Choke Rod The choke is used to provide an emiched fuel mixture when cold starting The choke can be opened by moving the choke rod to the right and closed by moving the choke rod to the left 10 ...

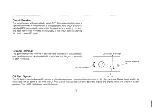
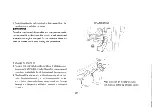
Page 12: ...enerator ground terminal is connected to the frame of the generator on a metal non current carrying parts of the generator and the ground terminals of each receptacle circuit breaker _ DC circuit protertor 0 0 Oil Alert System DC 12 Ground terminal The Oil Alert system is designed to prevent engine damage caused by an insufficient amount of oil in the crankcase Before the oil level in the crankcas...

Page 13: ...e battery must be connected to the generator DC terminals with the proper polarity battery positive to generator red terminal and battery negative to the generator black terminal DC Circuit Protector The DC circuit protector automatically shuts off the DC battery charging circuit when the generator is overloaded when there is a problem with the battery or the connections between the battery and th...

Page 14: ...s are required by law to be registered with local utility companies Check local regulations for proper registration and use procedures Generator Ground Circuits Portable generators have a system ground that connects the generator frame components to the ground terminals in the AC ouiput receptacles The system ground is not connected to the AC neutral wire Local regulations codes or laws may requir...

Page 15: ...aximum power rating of the generator Power levels between rated and maximum may be used for no more than 5 minutes I NOTICE I Substantial overloading wm open the circuit breaker Exceeding U1e ime limit for maximum power operation or siigMly overloading the generator may no switch thii circuil breaker OFF but will shorten the service iiie of the generator Limit operation requiring maximum power to ...

Page 16: ... Plug in the appliance Most motorized appliances require more than their rated wattage for startup Do not exceed the current limit specified for any one receptacle If an overloaded circuit causes the AC circuit breaker to swith OFF reduce the electrical load on the circuit wait a few minutes and then reset the circuit breaker 15 ...

Page 17: ...ositive terminal c C j circuit breaker Ground terminal j DC 12 4 Connect the negative battery cable to the battery negative terminal 5 Connect the other end of the negative battery cable to the generator negative terminal 6 Start the rnerator I NOTICE Do not start the vehicle while the battery charging cables are connected and the generator is n mning The vehicle or the generator may be damaged An...

Page 18: ...tery negative terminal 4 Disconnect the positive battery cable from the generator positive terminal 5 Disconnect the other end of the positive battery cable to the battery positive terminal 6 Connect the vehicle ground cable to the battery negative terminal 7 Reconnect the vehicle grounded battery cable DC circuit protector Ground terminal circuit breaker DCl2 17 ...

Page 19: ...G SF CC CD Motor oils classified SG SF CC CD will show this designation on the container 1 SG SF CC CD SINGLE VISCOSITY 2 SG SF CC CD MULTI VISCOSITY SAE 1OW 30 is recommended for general all temperature use Other viscosities shown in the chart may be used when the average tempera ture in your area is within the indicated range 1 Remove the oil filler cap and wipe the dipstick clean 2 Check the oi...

Page 20: ...o overi ill the fuel tank sl101Jlci be Iilier when wiih skin m br eatMng ol CMILDREM See specifications Pages 33 34 FUEL TANK CAP FUEL LEVEL GAUGE Use gasoline with a pump octane rating of 86 or higher We recommend unleaded gasoline because it produces levver engine and spark f Jever use stale or contaminated gasoline or oil gasoline mixture Avoid getting th tan cap is closed is spi ed sum FUEL ST...

Page 21: ...ol Gasoline containing more than 10 ethanol by volume may cause siarting and or performance problems Gasoline containing ethanol may be marketed under the name Gasohol Methanol meUiyi or wood alcohol Gasoline containing methanol must contain cosolvents and corrosion inhibitors to protect the fuel system Gasoline containing more than 5 methanol by volume may cause starting and or performance proble...

Page 22: ... operate the choke manually move the choke rod out of the CLOSED position 4 Start the engine With recoil starter Turn the engine switch to the ON position Pull the starter grip lightly until resistance is felt then pull briskly I NOTICE I Do not allow the starter grip to snap back against the engine Return ii gently to prevent damage lo the starter or housing 5 If you have manually closed the chok...

Page 23: ...o the OFF posiiion See step 3 in nmmal use 1 Turn the AC circuit breaker to the Ol F position 2 Disconnect all electrical loads from panel receptacles Disconnect DC battery charging cables 3 Turn the engine switch to the OFF position 4 Turn the fuel valve to the OFF position 22 ...

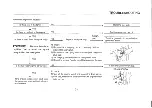
Page 24: ...DULE REGULAR SERVICE PERIOD First Every Every Every Performed at every indicated month Each month 3 months 6 months year or operating hour interval whiche11er or or or or comes first use 20 Hrs 50 Hrs mo Hrs 300 Hrs llEM 3 3 3 3 Engine oil Check level 0 Change 0 0 Air cleaner Check 0 Clean 0 1 Sediment Cup Clean 0 Spark pulg Check Clean 0 0 2 Valve clearance Check Adjust 0 2 Fuel tank and strainer...

Page 25: ...UPPER LEVEL Used motor oil may cause skin cancer ii repealedif ell in ccm act wiih the skin fvr prc longed periods Alihough his is m1 il ely unless you handle used oil on a daily basis il still advisatile th m nghiy JIJash your hands wiih soap and water as as possible after harn lling used oiL Please dispose ol used motor oil in a manner that is compatible with the environment We suggest you take ...

Page 26: ...ICE I Never run the generator without the air cleaner Rapid engine wear will result 1 Unsnap the air cleaner cover clips remove the air cleaner cover and remove the element 2 Wash the element in a solution of household detergent and warm water then rinse thoroughly or wash in nonflammable or high flash point solvent Allow the element to dry thoroughly 3 Soak the element in clean engine oil and squ...

Page 27: ...g time the sediment cup should be cleaned 1 Turn the fuel valve to the OFF position Remove the sediment cup 0 ring and filter 2 Clean the sediment cup 0 ring and filter in nonflammable or high flash point solvent 3 Reinstall the filter 0 ring and sediment cup 4 Turn the fuel valve ON and check for leaks 26 FUEL VALVE SEDIMENT CUP FUEL FILTER 0 o RING J SEDIMENT CUP ...

Page 28: ...er 1 Remove the spark plug cap 2 Clean any dirt from around the spark plug base 3 Use the wrench supplied in the tool kit to remove the spark plug 5 Visually inspect the spark plug Discard it if the insulator is cracked or chipped Clean the spark plug with a wire brush if it is to be reused 6 Measure the plug gap with a feeler gauge Correct as necessary by carefully bending the side electrode The ...

Page 29: ...w spark plug tighten 1 2 turn after the spark plug seats to compress the washer If reinstalling a used spark plug tighten 1 8 1 4 turn after the spark plug seats to compress the washer NOTICE I The spark plug must be securely tightenecL An impmperly tightened spark plug can become very hot and could damage the engine Never use spark plugs which have an improper heat range Use only the recommended ...

Page 30: ... TO PREVENT HARD STARTING Less than 1 month No preparation required 1 to 2 months Fill with fresh gasoline and add gasoline conditioner Fill with fresh gasoline and add gasoline conditioner 2 months to 1 year Drain the carburetor float bowl Drain the fuel sediment cup Fill with fresh gasoline and add gasoline conditioner Drain the carburetor float bowl Drain the fuel sediment cup 1 year or more Re...

Page 31: ...ne oil 3 Remove the spark plug and pour about a tablespoon of clean engine oil into the cylinder Crank the engine several revolutions to distribute the oil then reinstall the spark plug 4 Slowly pull the starter grip until resistance is felt At this point the piston is coming up on its compression stroke and both the intake and exhaust valves are closed Storing the engine in this position will hel...

Page 32: ...O I Replace the spark plug I spark To check 1 Remove the spark plug cap and clean any dirt from around the spark plug 2 Remove the spark plug and install the spark plug in the plug cap 3 Set the plug side electrode on the cylinder head 4 Crank the engine Sparks should jump across the gap NO To check 1 Turn off the engine switch and loosen the drain screw 2 Fuel should flow from the drain when the ...

Page 33: ..._C_c_irc_u_i_tb_r_ea_l_ e_r_O_N_ ______ YES Check the electrical appliance or equipment NO DEFECTS Take the generator to an authorized generator for any defects l dealer DEFECTS 32 Replace the electrical appliance or equipment Take the electrical appliance or equipment to an electrical sl1op for repair ...

Page 34: ...oke air cooled Horsepower 2 6 5 5 5 5 6 7 6 7 1 1 0 13 0 13 0 14 0 14 0 14 0 Rated Speed 3600rpm 3600rpm 3600rpm 3600rpm 3600rpm 3600rpm 3600rpm 3600rpm 3600rpm 3600rpm Displacement 87cc 163cc 163cc 200cc 200cc 338cc 389cc 389cc 407cc 407cc 407cc Ignition Systerm 1ransistorized magneto Oil Alert Systerm i lo Yes Yes Yes Yes Yes Yes Yes Yes Yes Starting System Recoil Recoil Recoil Recoil Transistor...

Page 35: ...Stroke air cooled Horsepo ver 2_6 5 5 I 5_5 5_7 6_7 11 _o 13_0 13_0 14_0 i4_0 14_0 Rated Speed 3600rpm 3600rpm I 3600rpm 3600rprn 3600rpm 3600rpm 3600rpm 3600rpm 3600rpm 3600rpm Displacement 87cc 163cc 163cc 200cc 200cc 338cc 389cc 389cc 407cc 407cc 407cc Ignition Systerm Transistorized magneto Oil Alert Systerm No Yes Yes Yes Yes Yes ves Yes Yes Yes Starting S ysten1 Recoil Recoil Recoil Reco I r...

Page 36: ...troke air cooled Horsepower 2 6 5 5 5 5 6_7 6 7 11 0 11 0 13 0 14 0 14 0 14 0 Rated Speed 3600rpm 3600rpm 3600rpm 3600rpm 3600rpm 3600rpm 3600rpm 3600rpm 3600rpm 3600rpm Displacement 87cc 163cc 163cc 200cc 200cc 338cc 338cc 389cc 407cc 407cc 407cc Ignition Systerm Transistorized magneto Oil Alert Systerm No Yes Yes Yes Yes Yes Yes Yes Yes Yes Starting System Recoil Recoil Recoil Recoil Transistori...

Page 37: ...Stroke air cooled Horsepower 2 6 5 5 5 57 6 7 6 7 11 0 11 0 13 0 14 0 14 0 14 0 Rated Speed 3600rpm 3600rpm 3600rpm 3600rpm 3600rpm 3600rpm 3600rpm 3600rpm 3600rpm 3600rpm Displacement 87cc 163cc 163cc 200cc 200cc 338cc 338cc 389cc 407cc 407cc 407cc Ignition Systerm Transistorized magneto Oil Alert Systerm No Yes Yes Yes Yes Yes Yes Yes Yes Yes Starting System Recoil Recoil Recoil Recoil Transisto...

Page 38: ... BREAKER Bl FIELD WINDING MAIN WINDING STARTUP SWITCHING KEY OFF ON START r Ilirn _ cw_ _____________ w n _ w CURRENT LIMITERl f o _ Bi W w 9 BIW 6 0 B 6 G 9 BL Y G 6 GIW OC12V SOLENOID VALVE PU PURPLE BL BLUE RED w WHITE YELLOW Y G YELOW GREIOA BLACK B W BLACK WHITE GREEN 37 ...

Page 39: ...Every Every Performed at month month 3 months 6 months year or operating hour interval whichever or or or or comes first use 20 Hrs 50 100 Hrs 300 Hrs ITEM 3 3 3 3 Check level I Engine oil Change Check Air cleaner Clean Spark pulg Check Clean 38 ...

Reviews: