background image

MGSP18LI

 par Mac Allister

09

EN

Getting 

started...

Check for misalignment or binding of moving 

parts, breakage of parts and any other condition 

that may affect the product’s operation. If 

damaged, have the product repaired before 

use. Many accidents are caused by poorly 

maintained products.

4.  Improper maintenance will lead to malfunction/

failure of the product.

5.  Inspect the product before each use, after 

dropping the product or exposing to other 

impacts to identify significant defects. Check for 

loose fasteners and damaged parts, such as 

cracks in the cutting attachment.

6.  Use only the manufacturer’s recommended 

replacement parts and accessories.

7.  Inspect and maintain the product regularly. 

Have the product repaired only by an authorised 

service centre or similar qualified specialist.

8.  When not in use, store the product out of the 

reach of children.

Additional safety warnings for charger

1.  This charger can be used by children aged from 

8 years and above and persons with reduced 

physical, sensory or mental capabilities or lack 

of experience and knowledge if they have been 

given supervision or instruction concerning use 

of the charger in a safe way and understand the 

hazards involved.

2.  Children shall not play with the charger.

3.  Cleaning and user maintenance shall not be 

made by children without supervision.

4.  If the supply cord is damaged, it must be 

replaced by the manufacturer, its service agent 

Safety information

Summary of Contents for MGSP18LI

Page 1: ...Cordless Garden Saw 18V Original Instructions DFT_MGSP18LI_EN_V1_20180330 MGSP18LI EAN 3663602632344 WARNING Read the instructions before using the product...

Page 2: ...retain them for future reference Safety information Your product Before you start 03 17 18 Getting started 02 In more detail 23 24 27 30 33 34 35 36 38 Product functions Operation Care and maintenance...

Page 3: ...ntrol Electrical safety 1 Power tool plugs must match the outlet Never modify the plug in any way Do not use any adapter plugs with earthed grounded power tools Unmodified plugs and matching outlets w...

Page 4: ...n extension cord suitable for outdoor use Use of a cord suitable for outdoor use reduces the risk of electric shock 6 If operating a power tool in a damp location is unavoidable use a residual current...

Page 5: ...es better control of the power tool in unexpected situations 6 Dress properly Do not wear loose clothing or jewellery Keep your hair clothing and gloves away from moving parts Loose clothes jewellery...

Page 6: ...hat may affect the power tool s operation If damaged have the power tool repaired before use Many accidents are caused by poorly maintained power tools 6 Keep cutting tools sharp and clean Properly ma...

Page 7: ...tacts eyes additionally seek medical help Liquid ejected from the battery may cause irritation or burns Service 1 Have your power tools serviced by a qualified repair person using only identical repla...

Page 8: ...rol over the product 7 Before any work on the product e g maintenance changing the tool etc as well as during its transport and storage lock the On Off switch in the off position There is danger of in...

Page 9: ...eplacement parts and accessories 7 Inspect and maintain the product regularly Have the product repaired only by an authorised service centre or similar qualified specialist 8 When not in use store the...

Page 10: ...tteries 10 Protect the charger against moisture and wet conditions There is a danger of electric shock 11 Do not place any object on top of the charger as it could cause overheating Do not place the c...

Page 11: ...ery pack for any reason If the plastic housing of the battery pack breaks open or cracks immediately discontinue its use and do not recharge it 5 Do not store or carry a spare battery pack in a pocket...

Page 12: ...4 Keep tight grip on the handles grip surface 5 Maintain this product in accordance with these instructions and keep it well lubricated where appropriate 6 Plan your work schedule to spread any high...

Page 13: ...if necessary before you operate it again Residual risks Even if you are operating this product in accordance with all the safety requirements potential risks of injury and damage remain The following...

Page 14: ...m to reduce hazards like personal injuries and damage to property V V Hz W A mA mAh C min or min 1 mm kg dB A m s Volt alternating voltage Volt direct current voltage Hertz Watt Ampere Milliampere Mil...

Page 15: ...ble insulation Objects thrown by the product could hit the user or other bystanders Always ensure that other people and pets remain at a safe distance from the product when it is in operation In gener...

Page 16: ...y Li ion Do not dispose of battery packs in rivers or immerse in water Do not dispose of battery packs in fire They will explode and cause injury Do not expose battery packs to heat in excess of 45 C...

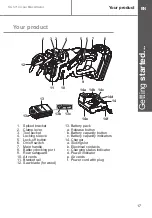
Page 17: ...le 8 Battery docking port 9 Rear safeguard 10 Air vents 11 Bracket rail 12 Saw blade for wood 13 Battery pack a Release button b Battery capacity button c Battery capacity indicators 14 Charger a Slid...

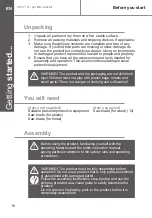
Page 18: ...e accessories and tools needed for assembly and operation This also includes suitable personal protective equipment WARNING The product and the packaging are not children s toys Children must not play...

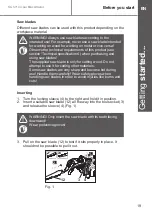
Page 19: ...w blades WARNING Always use saw blades according to the intended use For example never use a saw blade intended for working on wood for working on metal or vice versa Observe the technical requirement...

Page 20: ...battery docking port 8 and slide the battery pack in to attach it Ensure it clicks in place Fig 2 2 Press the release button 13a and remove the battery pack 13 from the battery docking port 8 Fig 3 C...

Page 21: ...inished this normally takes 1 hour see below Indicator lights section for charging status disconnect the charger 14 from power supply 4 Press the release button 13a and remove the battery pack 13 from...

Page 22: ...indicator GREEN 14c Status on off Connected to power supply off 1 flash second Charging off on Charging finished 1 flash second off Temperature too high it ll start charging automatically after coolin...

Page 23: ...Allister Product functions Operation Care and maintenance Trouble shooting Recycling and disposal Guarantee Technical specifications EC declaration of conformity In more detail In more detail EN 24 2...

Page 24: ...ould not be used as a stationary product mounted on a work bench The product must not be used on materials that are harmful to health For safety reasons it is essential to read the entire instruction...

Page 25: ...ver 2 3 Release the clamp lever 2 and ensure it is locked in place Fig 12 4 Pull on the clamp lever 2 to test if the spiked bracket 1 sits properly in place It should not be possible to pull it off Sw...

Page 26: ...switch the product off Speed control Adjust the speed directly when operating with the built in speed control The on off switch 6 of this product is combined with a speed control The speed is controll...

Page 27: ...putting it down 6 After sawing the blade may be hot let it cool down before touching it 7 Do not overwork yourself Take regular breaks to ensure you can concentrate on the work and have full control o...

Page 28: ...kpiece 5 Only apply as much pressure as necessary to guide the blade through the workpiece Higher pressure will not increase but lower the performance of the product 6 Switch the product off let it co...

Page 29: ...ce applying light pressure downward Fig 17 Cutting without spiked bracket 1 Remove the bracket from the product 2 Ensure the blade is not touching the workpiece and switch the product on as described...

Page 30: ...every use with a cloth and brush 3 Remove stubborn dirt with high pressure air max 3 bar 4 Check for worn or damaged parts Replace worn parts as necessary or contact an authorised service centre for r...

Page 31: ...oduct may not correspond with the coloured marking identifying the terminals in your plug proceed as follows The wire which is coloured blue must be connected to the terminal which is marked with N or...

Page 32: ...ge for storage or covering the product with a suitable cloth or enclosure to protect it against dust This product does not contain any parts that can be repaired by the consumer Contact an authorised...

Page 33: ...ir vents are blocked 2 1 Charge battery pack 2 2 Clean the air vents 3 Unsatisfactory result 3 1 Saw blade is worn damaged 3 2 Saw blade not suitable for work piece material 3 1 Replace with a new one...

Page 34: ...lease recycle where facilities exist Check with your Local Authority or local store for recycling advice Disposal of an exhausted battery pack To preserve natural resources please recycle or dispose o...

Page 35: ...other than an authorized agent Accidental damage caused by foreign objects or substances Lack of routine maintenance Failure to follow manufacturer s guidelines Loss of use of the goods Due to contin...

Page 36: ...utput voltage Rated output current Protection class Charging time Weight Sound pressure level LpA Sound power level LWA Uncertainty K Guaranteed sound power level LWA General Battery pack Charger Soun...

Page 37: ...lared vibration value may also be used in a preliminary assessment of exposure WARNING Depending on the actual use of the product the vibration values can differ from the declared total Adopt proper m...

Page 38: ...irectives The Machinery Directive 2006 42 EC EN 60745 1 2009 A11 2010 EN 60745 2 11 2010 The EMC Directive 2014 30 EU EN 55014 1 2017 EN 55014 2 2015 The Outdoor Noise Directive 2000 14 EC 2005 88 EC...

Page 39: ......

Page 40: ...Fabricante Produc tor Kingfisher International Products Limited 3 Sheldon Square London W2 6PX United Kingdom Distributor B Q plc Chandles Ford Hants SO53 3LE United Kingdom www diy com Distributor SF...

Reviews: