MLM1834-Li
by MacAllister
Getting
started...
EN
14
Your product
19a
19
13
9
8
7
6
5
4
3
2
1
18
17
16
15
15a
7a
12
11 10
12e
12d
12c
12b
12a
20c
20
20a
20b
21
MNL_MLM1834-Li_18V 34cm Lawnmower_IM_GB_V1_211009.indd 14
10/9/21 10:58 AM
Page 1: ...Instructions_MNL_MLM1834 Li_V1_211009 MLM1834 Li Cordless lawnmower 18V 34cm SOLO WARNING Read the instructions before using the product MNL_MLM1834 Li_18V 34cm Lawnmower_IM_GB_V1_211009 indd 1 10 9...
Page 2: ...echnical specifications Declaration of conformity 22 02 03 14 15 Getting started Safety information Your product Before you start These instructions are for your safety Please read through them thorou...
Page 3: ...without supervision Electrically powered lawn mower safety warnings IMPORTANT Read carefully before use Keep for future reference WARNING When using the product the safety rules must be followed For...
Page 4: ...all objects which can be thrown by the product 3 Before using always visually inspect to see that the cutting blade cutting blade bolts and cutting blade assembly are not worn or damaged Replace worn...
Page 5: ...ed for starting In this case do not tilt it more than absolutely necessary and lift only the part which is away from the operator 13 Do not start the product when standing in front of the discharge ch...
Page 6: ...nce will lead to malfunction failure of the product 4 Inspect and maintain the product regularly Keep all nuts bolts and screws tight to be sure the product is in safe working condition 5 Check the gr...
Page 7: ...objects like paper clips coins keys nails screws or other small metal objects that can make a connection from one terminal to another Shorting the battery terminals together may cause burns or a fire...
Page 8: ...nger life and better performance can be obtained if the battery is charged when the air temperature is between 18 C and 24 C Do not charge the battery in air temperature below 5 C or above 40 C This i...
Page 9: ...ion and well maintained 3 Use correct cutting attachments for the product and ensure they are in good condition 4 Keep tight grip on the handles grip surface 5 Maintain this product in accordance with...
Page 10: ...ulting from vibration emission if the product is being used over long periods of time or not adequately managed and properly maintained 2 Injuries and damage to property due to broken attachments or t...
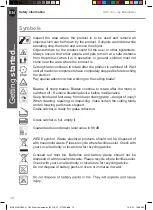
Page 11: ...hten or secure Unlock to loosen Read the instruction manual Note Remark Caution Warning IPX4 Protection against solid foreign bodies as well as against splashed water from all directions xxWyy Manufac...
Page 12: ...des Blades continue to rotate after the motor is switched off Remove disabling device before maintenance Keep hands and feet away from sharp rotating parts danger of injury When cleaning repairing or...
Page 13: ...Do not charge or store the battery pack in temperatures below 5 C 41 F and above 40 C 104 F The product complies with the applicable European directives and an evaluation method of conformity for the...
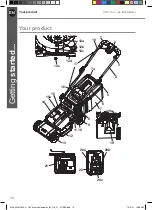
Page 14: ...er Getting started EN 14 Your product Your product 19a 19 13 9 8 7 6 5 4 3 2 1 18 17 16 15 15a 14 7a 12 11 10 12e 12d 12c 12b 12a 20c 20 20a 20b 21 MNL_MLM1834 Li_18V 34cm Lawnmower_IM_GB_V1_211009 in...
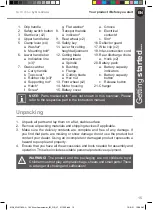
Page 15: ...ators b Battery capacity button c Release button 21 Charger NOTE Parts marked with are not shown in this overview Please refer to the respective part in the instruction manual Unpacking 1 Unpack all p...
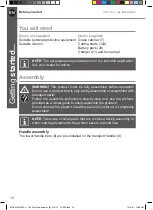
Page 16: ...d before operation Do not use a product that is only partly assembled or assembled with damaged parts Follow the assembly instructions step by step and use the pictures provided as a visual guide to e...
Page 17: ...ure the lower handle bars 6 are assembled on the same height level on both side 4 Hold the upper handle bar 4 with the safety switch button 2 facing upwards Align the mounting holes of the upper handl...
Page 18: ...y 17 18 Fig 4 WARNING Make sure the clamp levers 5 are properly tightened before using the product Grass catcher 1 Clip the three rubber clips 7c to the supporting rod 7d of the grass catcher 7 Fig 5...
Page 19: ...with the top part bottom part and collection tongue all in position before first use 7c 7d Fig 5 7b Fig 6 4 Open the deflector guard 16 and hold it in position Fig 7 step 1 5 Carry the grass catcher...
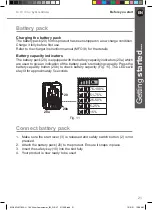
Page 20: ...d in one direction 6 Close the battery cover 15 7 Reinstall safety key 10 to its slot Fig 9 step 2 15a 15 10 2 1 Fig 8 20 15c 15b 15 10 2 1 Fig 9 Releasing the battery pack The battery pack 20 can t b...
Page 21: ...which are used to give an indication of the battery pack s remaining capacity Press the battery capacity button 20b to check battery capacity Fig 11 The LEDs will stay lit for approximately 5 seconds...
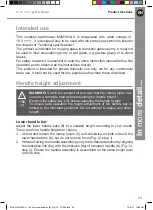
Page 22: ...e and maintenance Troubleshooting Recycling and disposal Guarantee Technical specifications Declaration of conformity MLM1834 Li by MacAllister 22 In more detail In more detail EN MNL_MLM1834 Li_18V 3...
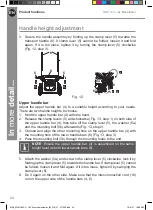
Page 23: ...ight adjustment WARNING Switch the product off and wait that the cutting blade has come to a complete stop before adjusting the handle height Remove the safety key 10 before adjusting the handle heigh...
Page 24: ...n take off the clamp lever 5 the washer 5a and the mounting bolt 5b afterwards Fig 13 step 2 3 Choose and align the other mounting hole on the upper handle bar 4 with the mounting hole of the lower ha...
Page 25: ...cutting height according to the needs of your lawn The cutting height depends on the kind of lawn and its actual height When mowing high grass start with the maximum cutting height and make a second...
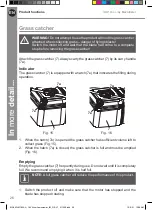
Page 26: ...h 7e that indicates the filling during operation 7e 7a 7 Fig 15 7a 7 7e Fig 16 1 When the hatch 7e is opened the grass catcher has sufficient volume left to collect grass Fig 15 2 When the hatch 7e is...
Page 27: ...k that accessories or attachments are properly fixed 3 Always push the product using the grip handle 1 Keep the handles dry to ensure safe support 4 Ensure that the air vents are always unobstructed a...
Page 28: ...ower starts release the safety switch button 2 6 The product starts moving forward and begins mowing 7 Release the start levers 3 to stop the mower 10 Fig 17 1 2 2 3 1 2 3 Fig 18 Mowing 1 Make sure th...
Page 29: ...on is an indication of damage The product should be promptly inspected and repaired After use 1 Switch the product off disconnect the safety key 10 remove the battery pack 20 and let it cool down 2 Ch...
Page 30: ...blade must be replaced by an identification no ref A056017900 Do not attach any other type of cutting blade The replacement of the cutting blade should be done by a qualified specialist Rework or shar...
Page 31: ...each use to prolong the life span of cutting blade and product Apply light machine oil along the edge of the cutting blade 12e 12d 12c 12b 12a Fig 20 Grass catcher 1 Inspect the grass catcher 7 before...
Page 32: ...key 10 and remove the battery pack 20 before transporting it anywhere 2 Attach transportation guards if applicable 3 Always transport the product by its transport handle 8 4 Protect the product from...
Page 33: ...satisfac tory 3 1 Cutting blade is dull dam aged 3 1 Replace with a new one 3 2 Cutting material exceeds capacity 3 2 Only cut materials ac cording to the product capacity 3 3 Cutting height is incorr...
Page 34: ...elivered and the product is working properly Recycle the package afterwards Disposal of an exhausted battery pack The battery is Li Ion type To preserve natural resources please recycle or dispose of...
Page 35: ...res and malfunctions provided the product was used for the purpose for which it is intended and subject to installation cleaning care and maintenance in accordance with the information contained in th...
Page 36: ...Guarantee Distributor B Q plc Chandlers Ford Hants SO53 3LE United Kingdom www diy com Screwfix Direct Limited Trade House Mead Avenue Yeovil BA22 8RT United Kingdom www screwfix com MNL_MLM1834 Li_1...
Page 37: ...20 70 mm 6 levels 35 l IPX4 150 mm approx 10 9 kg approx 1475 370 840 mm MBAT18 5 Li Ion 5 x 3 6 V 5000 mAh 18 V approx 693 g MFC18 21 4V d c 4 A MBAT18 4 MDVB36 4 4000 mAh 8000 mAh Usable charger sol...
Page 38: ...he product the vibration values can differ from the declared total Adopt proper measures to protect yourself against vibration exposures Take the whole work process including times the product is runn...
Page 39: ...EN 39 In more detail MLM1834 Li by MacAllister EN Declaration of conformity Declaration of conformity MNL_MLM1834 Li_18V 34cm Lawnmower_IM_GB_V1_211009 indd 39 10 9 21 10 58 AM...
Page 40: ...the mountain of waste is a more sustainable choice and you will be doing your bit for the environment Step 1 Find your proof of purchase and get in touch with the Customer Care and Technical Helpline...
Page 41: ...act the customer service helpline for assistance or visit www kingfisher spares com For assistance contact the customer services helpline UK 0800 0789647 uk Kingfisherservice com EIRE 1800 932226 eire...
Page 42: ......
Page 43: ......
Page 44: ...m tr To view instruction manuals online visit www kingfisher com products Pour consulter les manuels d instructions en ligne rendez vous sur le site www kingfisher com products Aby zapozna si z instru...