background image

51

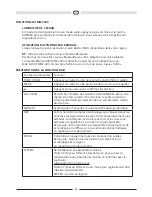
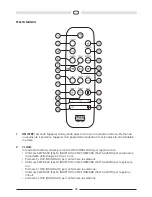
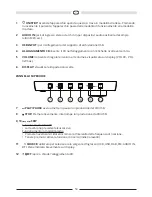
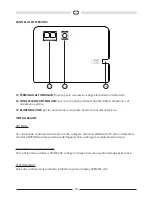
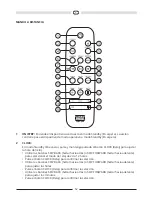
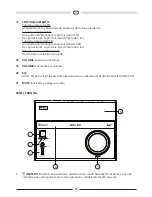
11 PLAY/PAUSE: 


Funzionamento FM


consente di passare da Mono a Stereo e viceversa. 


Funzionamento CD


Avvia o mette in pausa la riproduzione del CD. 


Funzionamento USB 


Avvia o mette in pausa la riproduzione.

12  FOLDER – (USB operation): Seleziona Folder- (Cartella-). 

13   (USB operation): Seleziona  (C). 

14   INTRO/INFO: 


Funzionamento FM


passa dalla ricezione di frequenza/servizio programmi (nome stazione)/tipo di programma 

(PTY), RT (testo radiofonico) e CT (ora), se è disponibile il supporto da parte della stazione e/o 

se la ricezione radio è sufficiente.


DAB:


Switch current station information


CD:


Intro function ON/OFF.


USB:


Intro function ON/OFF.

15  DAB


attiva/disattiva le informazioni sulla stazione


CD:


funzione Intro ON/OFF (ATTIVA/DISATTIVA).


USB:


funzione Intro ON/OFF (ATTIVA/DISATTIVA).

15  10 -/TUNE –: 


Funzionamento FM


Premere lievemente: riduce l’intervallo della frequenza di ricezione. 


Tenere premuto: attiva la funzione di ricerca (indietro). 


Funzionamento CD


riduce l’intervallo della frequenza di ricezione del brano riprodotto di -10. 


Funzionamento USB 


riduce l’intervallo della frequenza di ricezione del brano riprodotto di -10. 


DAB


navigazione menu DAB e selezione per Play/Pause (Riproduci/Pausa).

16  10 +/TUNE +: 


Funzionamento FM


Premere lievemente: incrementa l’intervallo della frequenza di ricezione. 


Tenere premuto: attiva la funzione di ricerca (avanti). 


Funzionamento CD


incrementa l’intervallo della frequenza di ricezione del brano riprodotto di +10. 


Funzionamento USB 


incrementa l’intervallo della frequenza di ricezione del brano riprodotto di +10. 

Summary of Contents for MMC 240

Page 1: ... 240 BEDIENUNGSANLEITUNG OWNER S MANUAL MODE D EMPLOI CERTIFICAT DE GARANTIE AVVERTENZE IMPORTANTI PER L INSTALLAZIONE CERTIFCATO DI GARANZIA NOTAS IMPORTANTES SOBRE LA INSTALACIÓN CERTIFICADO DE GARANTÍA ...

Page 2: ...nd of the product s useful life please dispose of it at appropriate collection points provided in your country The Bluetooth word mark and logos are registered trademarks owned by Bluetooth SIG Inc and any use of such marks by Mac Audio is under license Other trademarks and trade names are those of their respective owners ...

Page 3: ...4 18 32 46 60 ...

Page 4: ...n Sie keine Reinigungsmittel oder chemische Lösungsmittel da sonst die Oberfläche beschädigt werden könnte Öffnen Sie niemals das Gerät Das Netzkabel muss immer betriebsbereit sein und sollte nur so verlegt sein dass niemand auf das Netzkabel treten kann Auch darf es nicht durch Gegenstände eingeklemmt sein die das Kabel beschädigen können Bei Verwendung von Steckern und Mehrfachsteckdosen ist dar...

Page 5: ...erden müssen NICHT ÖFFNEN GEFAHR DES ELEKTRISCHEN SCHLAGES Um die Gefahr von Feuer oder eines elektrischen Schlages zu verringern darf das Gerät nicht Regen oder Feuchtigkeit ausgesetzt werden Dieses Zeichen macht den Benutzer des Geräts darauf aufmerksam dass innerhalb des Gerätes ein Laserstrahl der Klasse 1 arbeitet der außerhalb des Gerätes keinerlei gefährliche Strahlung verursachen kann KONF...

Page 6: ... Tasten SKIP BACK oder SKIP FORWARD Bestätigen Sie Ihre Auswahl mit der Taste CLOCK Stellen Sie nun die Minuten ein mit den Tasten SKIP BACK oder SKIP FORWARD Bestätigen Sie Ihre Auswahl mit der Taste CLOCK Drücken Sie nun die Tasten SKIP BACK oder SKIP FORWARD um die Uhrzeit Synchronisation auszuwählen SYNC ON oder OFF Bestätigen Sie Ihre Auswahl mit der Taste CLOCK Ist die Einstellung SYNC ON au...

Page 7: ...usschaltzeit von 90 Off in 10 Minuten Intervallen reduziert Das Abschalten der Ausschaltzeit erfolgt wenn Off eingestellt ist Die Einstellung wird automatisch gespeichert wenn innerhalb von 5 Sekunden keine weiteren Änderungen erfolgen 5 SOURCE Schaltet die Quellen in folgender Reihenfolge nacheinander durch CD USB DAB FM AUDIO IN und BT 6 DIMMER Displayhelligkeit kann eingestellt werden 7 PROG pr...

Page 8: ...AST REWIND SKIP BACK FAST FORWARD SKIP FORWARD FM Betrieb Kurzer Druck Wählt den Sender der im vorigen nächsten Senderspeicherplatz gespeichert ist CD Betrieb Kurzer Druck Die Wiedergabe beginnt am Anfang des aktuellen bzw vorherigen nächsten Titels Langer Druck Startet den schnellen Rücklauf Vorlauf innerhalb des Titels USB Betrieb Kurzer Druck Die Wiedergabe beginnt am Anfang des aktuellen bzw v...

Page 9: ...hlauf Richtung höherer Frequenzen CD Betrieb Der Abspieltitel wird um 10 erhöht USB Betrieb Der Abspieltitel wird um 10 erhöht DAB Senderspeicher durchschalten und per Play Pause auswählen 17 STOP UNPAIR AUTO FM Betrieb Automatische Stationsspeicher Belegung und Suche CD Betrieb Einmaliger Druck Stoppt die CD Wiedergabe Erneuter Druck Löscht programmierte Wiedergabelisten USB Betrieb Einmaliger Dr...

Page 10: ... Zum Anschluss einer Audioquelle mit einem 3 5 mm Stereo Klinkenstecker MP3 Player o ä 3 USB EINGANG Zum Anschluss von USB Speichermedien 4 CD SCHUBLADE Legen Sie die CD mit der Beschriftung nach oben in diese Schublade 5 VOLUME Stellt die Lautstärke ein Die Lautstärke wird dabei im Display angezeigt VOL 00 VOL 32 max 6 DISPLAY Zeigt Ihnen Ihre vorgenommenen Einstellungen an TOP PANEL 7 8 9 10 12 ...

Page 11: ... den Sendersuchlauf Richtung höhere oder niedrigere Frequenzen 11 SOURCE Zur Auswahl der Eingangsquelle CD USB DAB FM AUDIO IN BT Sie wird kurz auf dem Display angezeigt 12 EJECT Öffnet oder schließt die CD Schublade RÜCKSEITE DES GERÄTES 13 14 15 13 LAUTSPRECHERANSCHLÜSSE Ausgang zum Anschluss der mitgelieferten Lautsprecher 14 FM ANTENNENANSCHLUSS Zum Anschluss der beigefügten FM DAB Wurfantenne...

Page 12: ...n den ANTENNEN Eingang auf der Rückseite des Geräts an und rollen Sie das Kabel voll aus ZUSÄTZLICHE AUDIOGERÄTE Zusätzliche Audiogeräte werden vor der Inbetriebnahme des MMC 240 an die entsprechende Buchse angeschlossen FERNBEDIENUNG Zur Benutzung der Fernbedienung richten Sie diese auf das Display des MMC 240 ...

Page 13: ...B Radiosender in Ihrer Region Nach Abschluss des Durchlaufs kehrt das Radio zum vorher gewählten Sender oder zum ersten Sender in der Liste zurück MANUAL Manuelle Einstellung eines bestimmten Senders bzw einer Frequenz DRC Die DRC Funktion Dynamic range compression reduziert den Lautstärkeunterschied zwischen den lautesten und leisesten Passagen im Radioprogramm Dadurch werden die leisen Passagen ...

Page 14: ...0 Sender gespeichert werden AUTOMATISCHER SENDERSUCHLAUF Schalten Sie das Gerät ein Drücken Sie wiederholt die SOURCE Taste auf der Fernbedienung oder die Taste am Gerät um den DAB Modus zu wählen Drücken Sie die MENU Taste Im Display wird FULL SCAN angezeigt Drücken Sie die Taste Das Gerät beginnt dann die in Ihrer Region verfügbaren DAB DAB Sender zu durchlaufen Im Display erscheint die Meldung ...

Page 15: ...m innerhalb eines Titels vorwärts zurück zu suchen CD Wiedergabe stoppen Benutzen Sie die STOP Taste CD Repeat Modus Wiedergabewiederholung eines Stücks CD starten Die REPEAT Taste wiederholt das aktuelle Stück Auf dem Display erscheint REP ONE Wiedergabewiederholung der ganzen CD CD starten Die REPEAT Taste 2x drücken Auf dem Display erscheint REP ALL Zufallswiedergabe Shuffle der ganzen CD auswä...

Page 16: ...zeigen Die RDS Funktionen können über die INFO Taste der Fernbedienung 14 eingestellt werden PS Program Service Name Zeigt den Namen des Senders an PTY Program Type Identification Zeigt den Typ der Sendung an RT Radio Text Zeigt alle Meldungen des Senders an CT Clock Time Zeigt die Uhrzeit an Wird trotz RDS Signals eine dieser Funktionen vom Sender nicht unterstützt erscheint auf dem Display NONE ...

Page 17: ...amt Ausgangsleistung 2 x 30 Watt Anschlüsse Front USB Eingang Version 1 1 5V 500mA MP3 Wiedergabe Front AUDIO Eingang Line In 3 5 mm Klinke UKW DAB Antennenanschluss 75 Ohm Netzspannung 100 240 V AC 50 60 Hz eingebautes Linear Netzteil Stromaufnahme Max 30 W Standby 1 W Anzeige Einstellungen Display mit 8 stelliger Anzeige 12 24 Stunden Uhrzeit Einstellung 5 fach Equalizer FLAT ROCK POP JAZZ CLASS...

Page 18: ...ing as these could damage the surface of the device Never open the device The mains cable must always be suitable for operation and it should only ever be laid out in a manner that prevents it from being trodden on It should not be pinched by objects either as this can damage the cable When using plugs and power strips it must be ensured that the cable is not kinked at the point where it emerges f...

Page 19: ...T OPEN RISK OF ELECTRIC SHOCK To reduce the risk of fire or electric shock do not expose this unit to rain or moisture This symbol informs the user that there is a class 1 laser operating inside the device which does not pose any hazardous threat outside the device DECLARATION OF CONFORMITY Hereby Magnat Audio Produkte GmbH declares that the MMC 240 is in compliance with the essential requirements...

Page 20: ...our selection Use SKIP BACK or SKIP FORWARD to adjust the hours Press CLOCK to confirm your selection Use SKIP BACK or SKIP FORWARD to adjust the minutes Press CLOCK to confirm your selection Press SKIP BACK or SKIP FORWARD to select the time synchronization SYNC ON or OFF Press CLOCK to confirm your selection If the setting SYNC ON is selected the time is automatically updated during FM RDS and D...

Page 21: ... the sleep timer is set the SLEEP indicator is shown in the display Press SLEEP button repeatedly to set the desirad shut down time in 10 minute sequence from 90 to 10 minutes Cancelling the sleep function Press SLEEP button repeatedly until OFF appears on the display The settings are saved automatically after 5 seconds of inactivity 5 SOURCE Switch input source CD USB DAB FM AUDIO IN BT 6 DIMMER ...

Page 22: ...Repeat 1 track repeat the album repeat all tracks random playback of the USB tracks Off 9 10 FAST REWIND SKIP BACK FAST FORWARD SKIP FORWARD FM operation Brief press Skips backwards forward to the nearest station preset CD operation Brief press Playback starts from the beginning of the current or previous next track Press and hold Fast rewinds forwards the current track USB operation Brief press P...

Page 23: ...ress and hold Activates the search function forwards CD operation Increases the played track by 10 USB operation Increases the played track by 10 DAB DAB menu navigation and select per Play Pause 17 STOP UNPAIR AUTO FM operation Automatic station storing and search CD operation Press once Stops the playback of the CD Press twice Deletes the playlist USB operation Press once Stops USB playback Pres...

Page 24: ... 2 AUDIO IN 3 5 mm stereo input jack for an auxiliary audio device e g MP3 player etc 3 USB INPUT For connecting USB storage media 4 CD COMPARTMENT Insert the CD into the compartment with the label facing upwards 5 VOLUME Adjusts the volume The volume is shown on the display VOL 00 VOL 32 max 6 DISPLAY SCREEN Displays the settings you have made TOP PANEL 7 8 9 10 12 11 ...

Page 25: ...d hold Activates the search function backwards forwards 11 SOURCE Used for selecting the input source UCD USB DAB FM AUDIO IN BT This is indicated on the display briefly 12 EJECT Opens or closes the CD compartment REAR PANEL 13 14 15 13 SPEAKER TERMINALS Output for the connection of the supplied speakers 14 FM ANTENNA CONNECTION For connecting the supplied FM DAB aerial antenna or a house antenna ...

Page 26: ... ohm to the ANTENNA slot on the back side of the appliance and fully extend the cable AUXILIARY AUDIO EQUIPMENT Auxiliary audio devices are to be connected to the appropriate sockets before starting to use the MMC 240 REMOTE CONTROL When using the remote control aim it at the display on the MMC 240 ...

Page 27: ...can of DAB DAB radio stations in your area Once the scan is completed the radio returns to play the previously selected station or first station on the station list MANUAL Manual tune to a particular channel frequency DRC The DRC Dynamic range compression function reduces louder and loud sounds comparatively quieter The difference between the loudest and quietest audio being broadcasted Effectivel...

Page 28: ...the station Note Up to 30 stations can be saved AUTO SCAN AND STORE PRESET STATIONS Switch on the appliance Press SOURCE button on the remote control or button on the appliance repeatedly to choose DAB mode Press the MENU button FULL SCAN is shown in the display Press the button and the unit starts scanning DAB DAB stations around your area Scanning O is shown in the display Once the scan is compl...

Page 29: ... search forwards backwards within a track respectively Stopping playback from a CD Press the STOP button CD repeat mode Repeating a track Start the CD The REPEAT button repeats the current track The following appears in the display REP ONE Repeating the entire CD Start the CD Press the REPEANT button twice The following appears in the display REP ALL Shuffle function Plays all tracks on the CD in ...

Page 30: ...ay The RDS functions can be set via the INFO button on the remote control 14 PS Program Service Name Displays the name of the programme PTY Program Type Identification Displays the type of programme RT Radio Text Displays all information for the programme CT Clock Time Displays the clock time If one of these functions is not supported despite reception of an RDS signal NONE will appear in the disp...

Page 31: ... Total power output 2 x 30 watts Connections Front USB input version 1 1 5V 500mA MP3 playback Front AUDIO input Line In 3 5 mm jack FM DAB antenna input 75 ohms Mains voltage 100 240 V AC 50 60 Hz built in linear power mains adapter Electricity consumption Max 30 W Standby 1 W Display Settings Display with 8 digits 12 24 hour clock format 5x equalizer FLAT JAZZ CLASSIC ROCK POP Sleep timer 90 0 m...

Page 32: ...surface de l appareil Ne jamais ouvrir l appareil Les câbles d alimentation doivent toujours être adaptés à l appareil et installés de façon à ne pas marcher dessus Veillez à ne placer aucun objet sur ces câbles sous peine de les endommager Lorsque vous utilisez des fiches et des barres multiprises vous devez vous assurer que le câble n est pas tordu au point où il sort de la prise Veillez à ne pa...

Page 33: ...ntes devant impérativement être respectées ATTENTION NE PAS OUVRIR RISQUE D ÉLECTROCUTION Afin de reduire les risques d incendie ou de décharge électricque ne pas exposer cet appareil à la pluie ou à l humidité Ce symbole indique à l utilisateur de l appareil que l appareil contient un rayon laser de classe 1 qui ne présente aucun danger en dehors de l appareil DÉCLARATION DE CONFORMITÉ Magnat Aud...

Page 34: ...avant pour régler les heures Appuyez sur CLOCK pour valider votre sélection Utilisez la touche de saut arrière ou de saut avant pour régler les minutes Appuyez sur CLOCK pour valider votre sélection Utilisez la touche de saut arrière ou de saut avant pour sélectionner la synchronisation de l heure SYNC ON OFF Synchro activée désactivée Appuyez sur CLOCK pour valider votre sélection Si le paramètre...

Page 35: ...uteur de mise en veille est activé le voyant SLEEP Veille s affiche à l écran Appuyez plusieurs fois sur la touche SLEEP pour définir le délai de mise hors tension automatique de 10 à 90 minutes par incréments de 10 minutes Annulation de la fonction de mise en veille appuyez plusieurs fois sur la touche SLEEP jusqu à ce que l indication OFF Désactivé apparaisse à l écran Les paramètres sont automa...

Page 36: ...Syntoniseur DAB DAB Fonction CD La fonction de répétition est activée répétition de la liste 1 répétition de toutes les pistes lecture aléatoire de toutes les pistes sur le CD fonction désactivée Fonction USB La fonction de répétition est activée répétition de la piste 1 répétition de l album répétition de toutes les pistes lecture aléatoire des pistes USB fonction désactivée 9 10 FAST REWIND SKIP...

Page 37: ...e pour activer la fonction de recherche vers l arrière Fonction CD Cette touche permet de réduire le son de la piste en cours de lecture de 10 Fonction USB Cette touche permet de réduire le son de la piste en cours de lecture de 10 DAB Cette touche permet de parcourir le menu DAB et de sélectionner une option à l aide de la touche Lecture Pause 16 10 TUNE Fonction FM Appuyez brièvement sur cette t...

Page 38: ...tilisez cette touche pour sélectionner l un des préréglages de l égaliseur FLAT JAZZ CLASSIC ROCK POP 21 MUTE cette touche permet d activer et de désactiver le son PANNEAU AVANT 1 2 3 4 5 6 1 ON STBY cette commande permet de mettre l appareil sous tension lorsqu il est en mode veille Elle permet également de mettre l appareil en veille lorsqu il est sous tension 2 AUDIO IN connecteur d entrée stér...

Page 39: ...B 8 STOP appuyez brièvement sur cette touche pour arrêter la lecture sur un CD un périphérique USB 9 10 SKIP Fonctions CD USB Cette touche permet de passer à la piste précédente suivante Fonction Radio appuyez brièvement sur cette touche pour diminuer augmenter le pas de la fréquence de réception Maintenez cette touche enfoncée pour activer la fonction de recherche vers l arrière l avant 11 SOURCE...

Page 40: ...et de raccorder l appareil à une prise électrique INSTALLATION ANTENNE Pour optimiser la réception radio raccordez l antenne FM DAB fournie de 75 ohms au connecteur ANTENNA situé à l arrière de l appareil puis déployez complètement le câble ÉQUIPEMENT AUDIO AUXILIAIRE Les équipements audio auxiliaires doivent être raccordés aux prises appropriées avant d utiliser le MMC 240 TÉLÉCOMMANDE Lorsque vo...

Page 41: ...stations radio DAB DAB dans votre région Une fois la recherche terminée la radio revient à la station précédemment sélectionnée ou à la première station dans la liste MANUAL Syntonisation manuelle sur une bande fréquence spécifique DRC La fonction DRC compression de plage dynamique réduit les sons les plus puissants et les sons forts comparativement plus atténués La différence entre les sons forts...

Page 42: ...tionnée Remarque vous pouvez enregistrer 30 stations maximum RECHERCHE AUTOMATIQUE ET MÉMORISATION DES STATIONS PRÉSÉLECTIONNÉES Mettez l appareil sous tension Appuyez plusieurs fois sur la touche SOURCE de la télécommande ou sur le bouton de l appareil pour sélectionner le mode DAB Appuyez sur la touche MENU L indication FULL SCAN Recherche complète s affiche à l écran Appuyez sur la touche l app...

Page 43: ...rche droite gauche de la télécommande 9 10 pour effectuer une recherche vers l avant ou vers l arrière au sein d une piste Arrêt de la lecture sur un CD Appuyez sur la touche Arrêt Mode de répétition du CD Répétition d une piste démarrez le CD La touche REPEAT permet de répéter la piste en cours de lecture L indication suivante s affiche à l écran REP ONE Rép une Répétition de la totalité du CD dé...

Page 44: ... sur l écran Les fonctions RDS peuvent être définies à l aide de la touche INFO de la télécommande 14 PS nom du programme de service le nom du programme s affiche PTY identification du type de programme le type de programme s affiche RT texte radio toutes les informations du programme s affichent CT horloge l heure s affiche Si l une de ces fonctions n est pas prise en charge malgré la réception d...

Page 45: ...e 87 mm Divers Puissance de sortie totale 2 x 30 watts Connexions Entrée USB avant version 1 1 5 V 500 mA Lecture MP3 Entrée AUDIO avant Line In connecteur 3 5 mm Entrée d antenne FM DAB 75 ohms Tension secteur 100 240 V c a 50 60 Hz adaptateur secteur linéaire intégré Consommation électrique Max 30 W Standby 1 W Affichage Paramètres Affichage à 8 chiffres Format d horloge 12 24 heures 5 niveaux d...

Page 46: ...neggiare la superficie Non aprire mai il dispositivo Il cavo di alimentazione deve sempre essere idoneo al funzionamento e deve essere posato in modo che sia impossibile camminarci sopra Inoltre non deve essere impigliato in oggetti che potrebbero danneggiare il cavo stesso Se si utilizzano prese standard e prese multiple assicurarsi che il cavo non sia attorcigliato nel punto in cui esce dalla pr...

Page 47: ...tura sono presenti avvertenze importanti di riparazione che devono essere assolutamente rispettate Attenzione Non aprire il dispositivo Evitare di esporre questo apparecchio alla pioggia o all umidità onde prevenire il rischio di incendio e scosse elettriche Attenzione Non aprire il dispositivo Evitare di esporre questo apparecchio alla pioggia o all umidità onde prevenire il rischio di incendio e...

Page 48: ...er regolare l ora Utilizzare SKIP BACK SALTA INDIETRO o SKIP FORWARD SALTA AVANTI per selezionare la modalità dell orologio a 24 o a 12 ore Premere CLOCK OROLOGIO per confermare la selezione Utilizzare SKIP BACK SALTA INDIETRO o SKIP FORWARD SALTA AVANTI per regolare le ore Premere CLOCK OROLOGIO per confermare la selezione Utilizzare SKIP BACK SALTA INDIETRO o SKIP FORWARD SALTA AVANTI per regola...

Page 49: ...rmare premendo il pulsante TIMER La sveglia è impostata e attivata come indicato nel display TIMER Disattivare la sveglia premere il pulsante TIMER in modalità di attesa il TIMER scompare Spegnimento automatico modalità sleep Quando il dispositivo è in modalità attiva è possibile disattivarlo automaticamente allo scadere di un tempo preimpostato tra 90 e 10 minuti Quando il timer in modalità sleep...

Page 50: ... brani Premere PLAY RIPRODUCI per avviare la riproduzione della scaletta programmata 8 REPEAT MENU Funzionamento FM Premere PLAY PAUSE RIPRODUCI PAUSA e SKIP BACK SKIP FORWARD SALTA INDIETRO SALTA AVANTI per regolare la sensibilità di ricerca delle stazioni radio tutte le stazioni stazioni con ricezione potente FUNZIONAMENTO DAB Per la descrizione di DAB vedere il punto sul sintonizzatore DAB DAB ...

Page 51: ... informazioni sulla stazione CD funzione Intro ON OFF ATTIVA DISATTIVA USB funzione Intro ON OFF ATTIVA DISATTIVA 15 10 TUNE Funzionamento FM Premere lievemente riduce l intervallo della frequenza di ricezione Tenere premuto attiva la funzione di ricerca indietro Funzionamento CD riduce l intervallo della frequenza di ricezione del brano riprodotto di 10 Funzionamento USB riduce l intervallo della...

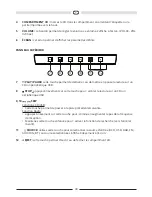
Page 52: ...remere due volte elimina la scaletta Funzionamento USB Premere una volta interrompe la riproduzione USB Premere due volte elimina la scaletta Funzionamento del Bluetooth annulla l accoppiamento di uno smartphone 18 VOLUME riduce il volume 19 VOLUME aumenta il volume 20 EQ Utilizzare EQ per scegliere una delle equalizzazioni preimpostate FLAT JAZZ CLASSIC ROCK POP 21 MUTE attiva e disattiva l audio...

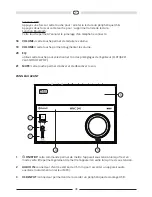
Page 53: ...e il volume Il volume è visualizzato sul display VOL 00 VOL 32 max 6 DISPLAY visualizza le impostazioni scelte PANNELLO SUPERIORE 7 8 9 10 12 11 7 PLAY PAUSE avvia o mette in pausa la riproduzione del CD USB 8 STOP Premere lievemente interrompe la riproduzione da CD USB 9 10 SKIP Funzionamento CD USB salta al brano precedente successivo Funzionamento in modalità radio Premere lievemente riduce inc...

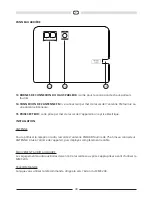
Page 54: ...a presa di corrente di alimentazione INSTALLAZIONE ANTENNA Per una buona ricezione delle stazioni radio collegare l antenna FM DAB da 75 ohm in dotazione allo slot ANTENNA sul lato posteriore dell apparecchio e allungare completamente il cavo DISPOSITIVO AUDIO AUSILIARE Prima di iniziare a utilizzare l MMC 240 collegare i dispositivi audio ausiliari alle apposite prese TELECOMANDO Quando si utiliz...

Page 55: ... volta completata la scansione la radio riprende la riproduzione della stazione selezionata in precedenza o della prima stazione memorizzata in elenco MANUAL Sintonizzare manualmente un determinato canale o una determinata frequenza DRC La funzione DRC Dynamic range compression compressione dell estensione dinamica rende i suoni a volume più alto e alto relativamente più silenziosi Viene quindi tr...

Page 56: ...one desiderata Nota è possibile memorizzare al massimo 30 stazioni SCANSIONE AUTOMATICA E MEMORIZZAZIONE DELLE STAZIONI PREIMPOSTATE Accendere l apparecchio Premere ripetutamente il pulsante SOURCE SORGENTE sul telecomando o il pulsante sull apparecchio per scegliere la modalità DAB Premere il pulsante MENU FULL SCAN SCANSIONE COMPLETA viene visualizzato sul display Premere il pulsante per avviare...

Page 57: ... cercare in avanti all indietro all interno di un brano Interruzione della riproduzione di un CD Premere il pulsante STOP Modalità di ripetizione CD Ripetizione di un brano avviare il CD Il pulsante REPEAT RIPETI ripete il brano corrente Sul display viene visualizzato REP ONE RIPETI UNA VOLTA Ripetizione dell intero CD avviare il CD Premere due volte il pulsante REPEAT RIPETI Sul display viene vis...

Page 58: ...ibile impostare le funzioni RDS con il pulsante INFO del telecomando 14 PS Program Service Name nome del servizio del programma visualizza il nome del programma PTY Program Type Identification identificativo del tipo di programma visualizza il tipo di programma RT testo radiofonico visualizza tutte le informazioni relative al programma CT ora visualizza l ora che appare nell orologio Se una di que...

Page 59: ... in uscita 2 x 30 watt Collegamenti Ingresso USB anteriore versione 1 1 5V 500 mA riproduzione MP3 Ingresso AUDIO anteriore Line In jack da 3 5 mm Ingresso antenna FM DAB 75 ohm Tensione di alimentazione 100 240 V CA 50 60 Hz adattatore incorporato di potenza lineare principale Consumo energetico Max 30 W Standby 1 W Display Impostazioni Display a 8 cifre Formato orario 12 24 ore Equalizzatore 5x ...

Page 60: ...cos durante la limpieza Ello podría dañar la superficie del dispositivo No abra el dispositivo El cable de red debe estar en todo momento listo para su funcionamiento y debe colocarse de tal forma que no se pueda pisar Para evitar daños en el cable no debe quedar comprimido por ningún objeto Si se utilizan enchufes y regletas asegúrese de que el cable no esté retorcido en la salida de la toma No c...

Page 61: ...reparaciones del producto los que en todo caso tienen que considerarse Atención No abra es dispositivo Para evitar riesgos de incendio y descarga electrica rogamos no exponer este aparato a la lluvia o la humedas Este símbolo informa al usuario de la existencia de un láser de clase 1 en el interior del dispositivo que no supone ninguna amenaza en el exterior del mismo DECLARACIÓN DE CONFORMIDAD Po...

Page 62: ...nes SKIP BACK Saltar hacia atrás o SKIP FORWARD Saltar hacia adelante para seleccionar el modo de reloj de 24 o 12 horas Pulse el botón CLOCK Reloj para confirmar la selección Utilice los botones SKIP BACK Saltar hacia atrás o SKIP FORWARD Saltar hacia adelante para ajustar las horas Pulse el botón CLOCK Reloj para confirmar la selección Utilice los botones SKIP BACK Saltar hacia atrás o SKIP FORW...

Page 63: ...e en la pantalla podrá establecer el volumen de la alarma con los botones y y confirmar pulsando el botón TIMER Temporizador La alarma ya se ha establecido y activado y en la pantalla se muestra TIMER Temporizador Apagado de la alarma Pulse el botón TIMER Temporizador en modo Standby En espera para que TIMER desaparezca Apagado automático suspensión Cuando el dispositivo está en modo activo se pue...

Page 64: ...la selección Seleccione la siguiente pista Se pueden almacenar 99 pistas como máximo en la lista de reproducción Pulse PLAY Reproducir para iniciar la reproducción de la lista programada 8 REPEAT MENU Funcionamiento de FM Pulse PLAY PAUSE Reproducir Poner en pausa y SKIP BACK SKIP FORWARD Saltar hacia atrás Saltar hacia adelante para ajustar la precisión de la búsqueda de emisoras todas las emisor...

Page 65: ...ficiente DAB Switch current station information CD Intro function ON OFF USB Intro function ON OFF 15 10 TUNE Funcionamiento de FM Pulsación breve Reduce la frecuencia de recepción de forma gradual Pulsar y mantener pulsado Activa la función de búsqueda hacia atrás Funcionamiento del CD Reduce la pista reproducida en 10 Funcionamiento del USB Reduce la pista reproducida en 10 DAB Vaya al menú DAB ...

Page 66: ...l USB Dos pulsaciones Suprime la lista de reproducción Funcionamiento del Bluetooth Desvincula un teléfono vinculado 18 VOLUME Reduce el volumen 19 VOLUME Aumenta el volumen 20 EQ Utilice EQ para elegir las presintonizaciones de ecualizador FLAT JAZZ CLASSIC ROCK POP 21 MUTE Enciende y apaga el sonido PANEL FRONTAL 1 2 3 4 5 6 1 ON STBY Enciende el dispositivo cuando está en modo Standby En espera...

Page 67: ...PANEL SUPERIOR 7 8 9 10 12 11 7 PLAY PAUSE nicia o pone en pausa la reproducción desde un CD USB 8 STOP Pulsación breve Detiene la reproducción de un CD USB que se está reproduciendo 9 10 SKIP Funcionamiento del CD USB Salta a la pista anterior siguiente Funcionamiento de la radio Pulsación breve Reduce aumenta la frecuencia de recepción de forma gradual Pulsar y mantener pulsado Activa la función...

Page 68: ...as INSTALACIÓN ANTENA Para conseguir una recepción de radio óptima conecte la antena aérea FM DAB de 75 ohm proporcionada en la ranura ANTENNA Antena de la parte trasera del dispositivo y extienda el cable por completo EQUIPO DE AUDIO AUXILIAR Los dispositivos de audio auxiliares se deben conectar a las tomas correspondientes antes de empezar a utilizar el sistema MMC 240 MANDO A DISTANCIA Cuando ...

Page 69: ...ras de radio DAB DAB de su zona Una vez finalizada la búsqueda la radio volverá a reproducir la emisora seleccionada previamente o la primera emisora de la lista de emisoras MANUAL Sintoniza manualmente un canal o frecuencia determinados DRC La función DRC Compresión de rango dinámico reduce los sonidos altos y más altos en comparación con los más bajos La diferencia entre el audio más alto y el m...

Page 70: ...DE EMISORAS PRESINTONIZADAS Encienda el dispositivo Pulse el botón SOURCE Fuente del mando a distancia o el botón del dispositivo repetidamente para elegir el modo DAB Pulse el botón MENU Menú FULL SCAN Búsqueda completa se muestra en la pantalla Pulse el botón para que la unidad empiece a buscar emisoras DAB DAB de su área Scanning O Buscando O se muestra en la pantalla Una vez terminada la búsqu...

Page 71: ...nte Detención de reproducción desde un CD Pulse el botón STOP Detener Modo de repetición de CD Repetición de pistas Inicie el CD El botón REPEAT Repetir repite la pista actual Se mostrará el siguiente texto en la pantalla REP ONE Repetir uno Repetición de todo el CD Inicie el CD Pulse el botón REPEAT Repetir Se mostrará el siguiente texto en la pantalla REP ALL Repetir todo Función de orden aleato...

Page 72: ... la emisora transmisión etc en la pantalla Las funciones RDS se pueden establecer mediante el botón INFO del mando a distancia 14 PS Nombre de servicio de programa Muestra el nombre del programa PTY Identificación de tipo de programa Muestra el tipo de programa RT Texto de radio Muestra la información del programa CT Hora del reloj Muestra la hora del reloj Si no se admite una de estas funciones a...

Page 73: ...l 2 x 30 vatios Conexiones Entrada USB frontal versión 1 1 5V 500mA reproducción MP3 Entrada de AUDIO frontal Line In Toma de 3 5 mm Entrada de antena FM DAB 75 ohms Voltaje de alimentación 100 240 V AC 50 60 Hz adaptador de red de corriente lineal integrado Consumo eléctrico Máx 30 W Standby 1 W Pantalla Configuración Pantalla con 8 dígitos Formato de reloj de 12 24 horas 5 ecualizadores FLAT JAZ...

Page 74: ...tattung bei Schadensbehebung durch Dritte ohne unser vorheriges Einverständnis Batterien und Akkus Congratulations You have made a wise selection in becoming the owner of a MAC AUDIO product We grant a 2 years warranty for this product The equipments are checked and tested continously during the entire production process In case you have problems with your MAC AUDIO equipment kindly observe the fo...

Page 75: ......
Page 76: ...Lise Meitner Str 9 D 50259 Pulheim Germany Tel 49 0 2234 807 0 Fax 49 0 2234 807 399 Internet http www mac audio de Manual_v1 0 ...

Reviews: