Mac Victor 2.0 Installation Operation Manual 042408.pdf - © 2008 Mac Victor Power, LLC.
Page 10 of 23
4.4 Mounting Instructions
CAUTION – Improper installation can result in serious personal injury. Make sure the mounting surface
can support a redundant weight factor five times the total weight of the equipment. If not, reinforce
the structure before installation of the Mac Victor 2.0
CAUTION – Improper installation can result in equipment damage. The installer is responsible for
verifying that the installation wall will safely support the combined load of the Mac Victor 2.0 and the
top mounted UPS (if applicable)
CAUTION – The combined weight of the Mac Victor 2.0 and the UPS on top must not exceed 200 lbs
CAUTION – Watch for pinch points. Do not put your fingers between moving parts such as the hinged,
front door and the latches.
WARNING – Install, wire, power up, and test the Mac Victor 2.0 completely before the installation of
the UPS battery backup which is detailed in Section 5.
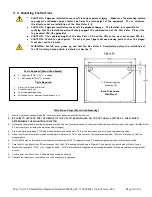
Parts Required (Wood Stud Mount)
2 - Lag bolts (5/16” x 3½”) – included
2 – Flat washers (5/16”) – included
Tools Required
Electric drill and drill bit set
Socket wrench set
Level and marking device
Misc hand tools – hammer, screwdrivers, etc.
Installation Steps (Wood Stud Mounting)
1.
Locate 2 adjacent wooden studs (16” on center) at the desired installation location.
2.
BE SURE TO ACCOUNT FOR THE HEIGHT OF THE UPS TO BE INSTALLED ON TOP OF THE MAC VICTOR 2.0 SHELF WHEN
DETERMINING THE MOUNTING LOCATION.
3.
Determine the desired mounting height and mark on the wall (centered on one of the wood studs) the desired location of the top of the Mac Victor
2.0 enclosure (not including the mounting shelf flanges).
4.
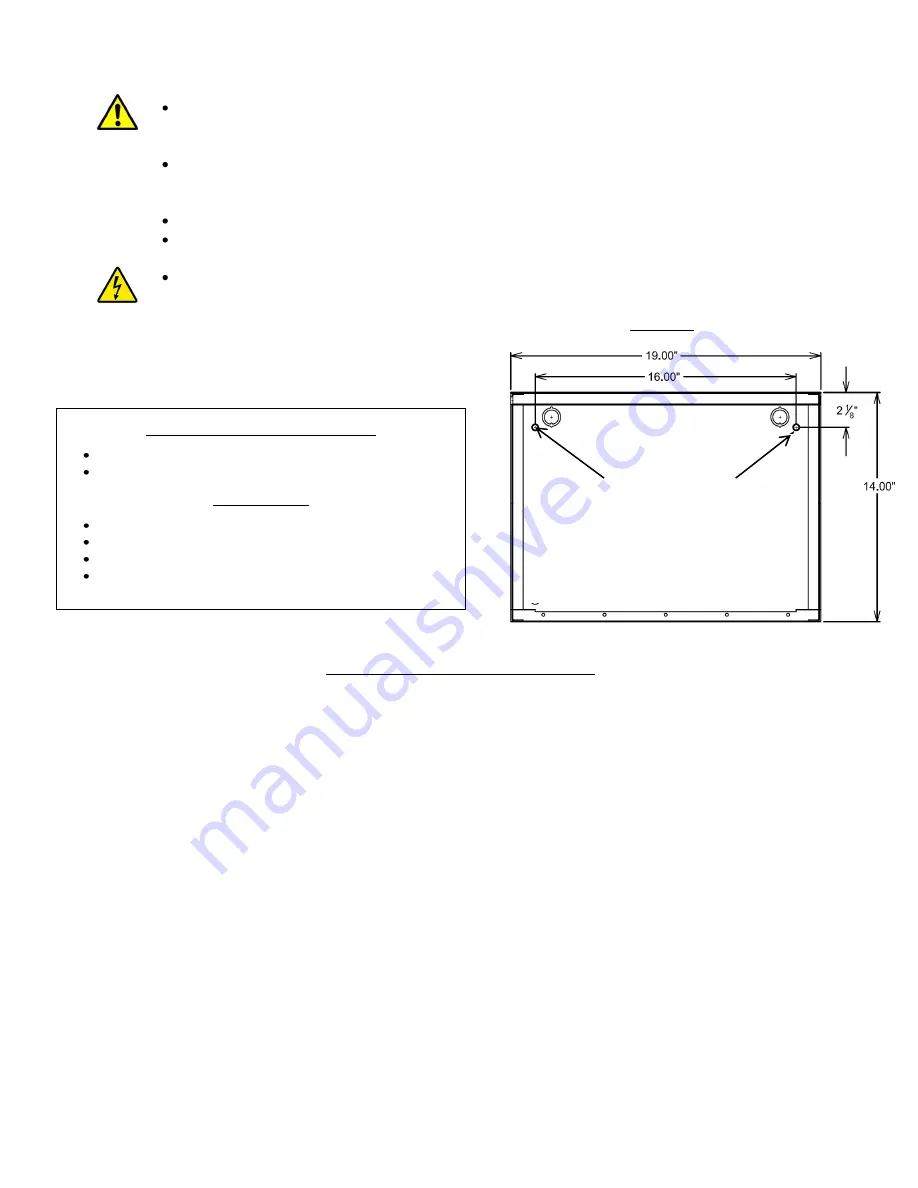
From this mark drop down 2 1/8” and make another mark on the wall. This is the location of one of the top two mounting holes.
5.
Use a level from this mark to make a second mark a distance of 16” to the center of the adjacent wood stud. This is the location of the 2nd
mounting hole.
6.
Drill 2 pilot holes on the centerline wood stud marks using a 3/16” bit approximately 3” deep through the wall and into the wood studs.
7.
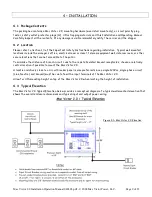
Carefully lift the Mac Victor 2.0 enclosure so that the 3/8” mounting holes shown in Figure 4.2 line up with the pilot holes drilled in Step 6.
8.
Install the supplied 2 - 5/16” x 3 ½” lag bolts and 2 - 5/16” flat washers through the two mounting holes and into the wood studs using a socket
wrench.
9.
At this point, the Mac Victor 2.0 should hang freely on the wall.
10.
Check the 2 lag bolts to insure they are fully and securely tightened.
Figure 4.2
3/8” Mounting holes
Quantity (2)
Back Dimensions;
Wall Mount


