10
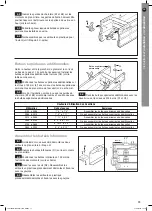
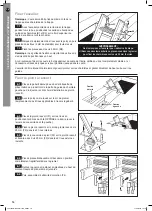
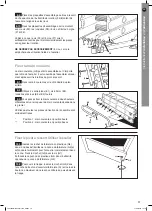
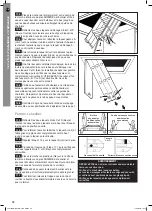
Installation
and
operating
instructions
F4
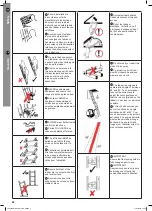
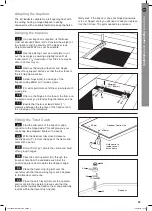
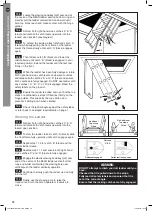
Position the ladder in its fully stowed (closed)
position carefully in the loft.
Remove the stud and plastic top tip from the
top of the required side stile of the rear ladder frame
and discard.
In their place fit Pivot Tip (F4).
8.8
8.7
8.6
F2
F3
F1
F3
F3
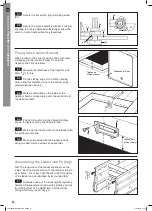
Place the spring housing (F1) in position over
the holes ensuring the arm points AWAY from the loft
opening (with slot in cover on the left-hand side).
Fix the spring housing to the loft floor with 4 x
20mm screws (F3) through the 4 inner holes.
Place the housing cover (F2) over the spring
housing and fix down using 2 x 20mm (F3) screws
through the 2 remaining outer holes.
8.5
8.4
8.3
Installing the Power Pivot System
Position the template cut from the rear of the
header card against either the left or right hand hinge
guide bracket (depending on which chosen side the
power pivot system is to be fitted).
Using a bradawl mark the 6 applicable holes
through the template on to the loft floor.
8.2
8.1
For Right
Hand Fixing
For Left
Hand Fixing
WARNING:
Do Not stand on the ladder to do this. Either using a
second ladder, or from inside the loft space, secure
the hinges using six 35mm screws supplied.
B3
B1
B2
If flooring material covers the top edge of the loft hatch frame ensure that it is completely stable and if necessary
use longer screws to penetrate the frame itself.
The ladder should now be free to swing from the hinges and slide freely up and down the guides.
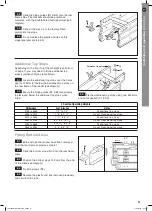
Installing the Ladder
N.B.
The ladder should be installed on the same side
of the trap as the trapdoor hinges.
With the ladder preferably centred in the
opening, and the trapdoor hanging down, locate the
hinge guide bracket arms (B1 & B2) on the top edge
of the loft hatch frame (see diagram).
Make guide holes with the bradawl then pre
drill pilot holes (2mm diameter) for all screws.
Fix using 35mm screws (B3).
N.B.
the bracket arms with two screw holes should be
on top.
7.3
7.2
7.1
E2
E1
E2
E1
G6
F5
F8 F7 F6
F4
F6
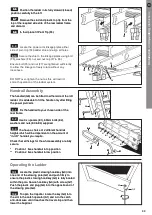
Handrail Assembly
The handrail (G6) can be fitted to either side of the loft
ladder. It is advisable to fit the handle only after fitting
the power pivot arm.
Fix the handrail to your chosen side of the
rear frame.
Use 3 x spacers (E1), 60mm bolts (E2),
washers and nuts (E3 & E4) supplied.
You have a choice of 2 different handrail
heights which will be dependent on the amount of
“in-loft” handrail you require.
Check that all fixings for the whole assembly are fully
secure.
9.3
9.2
9.1
Locate the power arm linkage plates either
side of pivot tip (F4)/ladder stile and align all holes.
Secure the stile to the linkage plates using bolt
(F5), washers (F6), nut and nut cap (F7 & F8).
Ensure bolt (F5) and nut (F7) are tightened sufficiently
to allow the linkage to freely rotate without any
looseness.
DO NOT over-tighten the nut as this will restrict
smooth operation of the ladder system.
8.10
8.9
G3
A1
G2
G3
1*
1*
1*
2**
2**
2**
*
Position 1 fixes handrail in top position
** Position 2 fixes handrail in low position
G6
E1
E2
E2
E1
E3
E4
IMPORTANT
DO NOT attempt to climb your loft ladder until installation is
complete and the ladder is pulled down to appropriate top
stops. Then ensure that the locking catches are engaged.
TWIST
CA
TCH
ASSEMBL
Y
HANDRAIL
ASSEMBL
Y
BO
TTOM
STOPS
ADDITIONAL
TOP
STOPS
HINGE
GUIDE
ASSEMBL
Y
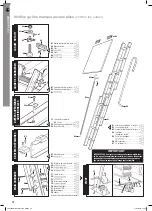
A1
Catch Operator
. . . . . . . . . . . .
x1
A2
Travel Stop Ring
. . . . . . . . . . .
x1
A3
Catch Lever
. . . . . . . . . . . . . . .
x1
A4
Nut (M12)
. . . . . . . . . . . . . . . . .
x1
A5
Location Bracket
. . . . . . . . . .
x1
A6
Screw (20mm)
. . . . . . . . . . . .
x2
A7
Screw (12mm)
. . . . . . . . . . . .
x1
C1
Top Stop Bolt (M4 x 8mm)
.
x2
C2
Additional Top Stop
. . . . . . . .
x2
C3
Locking Nut (M4)
. . . . . . . . . .
x2
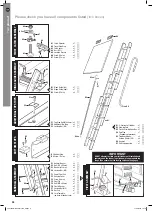
A
B
D
E
F1
Power Pivot Unit
. . . . . . . . . .
x1
F2
Housing Cover
. . . . . . . . . . . .
x1
F3
Screw (20mm)
. . . . . . . . . . . .
x6
F4
Pivot Tip
. . . . . . . . . . . . . . . . . .
x1
F5
Bolt (M6 x 40mm)
. . . . . . . .
x1
F6
Plastic Washer
. . . . . . . . . . . .
x2
F7
Locking Nut (M6)
. . . . . . . . . .
x1
F8
Nut Cap
. . . . . . . . . . . . . . . . . . .
x1
F9
Card Template
. . . . . . . . . . . . .
x1
(on back of header card)
PIVO
T
ASSEMBL
Y
E1
Handrail Spacer
. . . . . . . . . . .
x3
E2
Bolt (M5 x 60mm)
. . . . . . . .
x3
E3
Washer (
ø
25mm)
. . . . . . . . .
x3
E4
Locking Nut (M5)
. . . . . . . . .
x3
D1
Bottom Stop
. . . . . . . . . . . . . . .
x2
D2
Screw (12mm)
. . . . . . . . . . . .
x4
B1
Hinge Guide (left)
. . . . . . . . . .
x1
B2
Hinge Guide (right)
. . . . . . . .
x1
B3
Screw (35mm)
. . . . . . . . . . . .
x6
F
B2
B3
C1
C2
G2
C3
D2
G1
G6
G5
D1
G6
C
E1
E2
E2
E1
E3
F2
F5
F6
F3
F1
F8
F7
F6
E4
G
G1
3-Section Loft Ladder
. . . . .
x1
G2
Stowing Pole
. . . . . . . . . . . . .
x1
G3
Plastic Stowing Hook/Key
.
x1
G4
End Plug
. . . . . . . . . . . . . . . . . .
x1
(Trapdoor not provided)
G5
Trapdoor Hinges
. . . . . . . . . .
x2
Screws (20mm
. . . . . . .
x8
G6
Handrail
. . . . . . . . . . . . . . . . . . .
x1
G7
Self-tapping screw
. . . . . . . .
x1
F3
F4
A2
A4
A5
A6
A3
A1
G4
A7
B1
Additional
Top stops
Fitted
No Additional
Top stops
Fitted
B
A
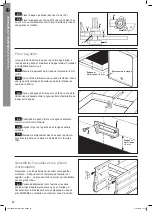
Operating the Ladder
Locate the plastic stowing hook/key (G3) into
one end of the stowing pole (G2) and push firmly to
ensure the plastic stowing hook/key (G3) is fully located
within the pole. Secure hook/key (G3) with screw (G7).
Push the plastic end plug (G4) into the opposite end of
the stowing pole (G2).
To open the trapdoor locate the key (G3) into
the slot in the catch operator (A1) and turn the catch
anti-clockwise until it reaches the travel stop and then
lower the trapdoor.
10.2
10.1
Stowing the Ladder
Retract both right-hand side catches
‘
C
’
&
‘
D
’
(blue) and rotate both catch levers upwards into the
locked open position.
To stow the ladder, retract catch
‘
A
’
(black), slide
the front frame fully upwards until catch engages again.
Repeat step 11.2 for catch
‘
B
’
(black) and the
middle ladder frame.
Engage the plastic stowing hook/key (
G3
) over
and at the centre of the REAR ladder section bottom
rung and whilst maintaining the stowing pole near
vertical push the ladder vertically upwards.
Continue to slowly push the ladder up and fully
into the loft.
11.6
11.5
11.3
11.2
11.1
G3
G7
Catches
‘C’ & ‘D’
Released/engaged
Retracted/locked open
WARNING:
DO NOT attempt to climb your loft ladder until you
have:
Checked that it is pulled down to the stops.
Fully read all safety labels and ensured that it is
set at the correct angle.
Ensure that the locking catches are fully engaged.
Locate the stowing hook/key (
G
3) over and at
the centre of the REAR ladder section bottom rung and
steadily pull the ladder outward and downward until
both top stops reach and make contact with the hinge
guides.
10.3
To extend the ladder, retract left-hand catch
‘
A
’
(black) while supporting the front frame of the ladder.
Lower the frame slowly until catch
‘
A
’
(black) engages
again.
Then retract catch
‘
B
’
(black) and lower the
middle frame until catch
‘
B
’
(black) is engaged in your
required position. Extend the ladder until the feet rest
firmly on the floor.
When the ladder has been fully deployed, rotate
both right-hand side catch levers downward to unlock
and release both catches
‘
C
’
and
‘
D
’
(blue) and ensure
both catches are fully engaged. Do NOT use ladder with
any catches (
‘
A
’
,
‘
B
’
,
‘
C
’
or
‘
D
’
) disengaged. Read the
safety labels on the product.
10.5
10.6
Ensure the ladder is pulled down so that the top
stops or additional top stops if fitted rest firmly on the
hinge guides. This supports the top section and
prevents it sliding down when climbed.
Check the ladder angle against the safety label
or refer back to deployed requirements on page 1.
10.9
10.8
Retract both right-hand side catches
‘
C
’
&
‘
D
’
(blue) and rotate both catch levers upwards into the
locked open position (see diagram).
10.4
10.7
C
D
Finally, use the stowing pole to raise the
trapdoor and turn the catch operator clockwise to
close.
11.7
Reverse step 11.1 and ensure both right-hand
side catches
‘
C
’
and
‘
D
’
(blue) are fully engaged.
11.4
CSK)
Please check you have all components listed (tick boxes)
28/04/2016 14:52
11
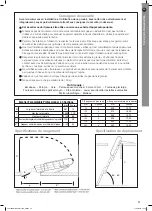
Consignes
de sécurité
B1
B2
4.2
C1
C2
C3
Butée supérieure
permanente
4.3
4.4
Hauteurs d’utilisation des 3 sections
Millimètres
Pieds et pouces
Remarques
2133 à 2286
7
’
0” à 7
’
6”
Assembler les butées supérieures additionnelles
Ne pas assembler les butées supérieures additionnelles
Assembler les butées supérieures additionnelles
Ne pas assembler les butées supérieures additionnelles
Assembler les butées supérieures additionnelles
Ne pas assembler les butées supérieures additionnelles
2286 à 2415
7
’
6” à 7
’
11”
2415 à 2565
7
’
11” à 8
’
5”
2565 à 2705
8
’
5” à 8
’
10½”
2705 à 2845
8
’
10½” à 9
’
4”
2845 à 3000
9
’
4” à 9
’
10”
5.2
5.1
5.3
6.2
6.1
6.5
6.4
6.3
D1
D2
Côté droit
Côté gauche
150 mm
Adapter la trappe
Installer la trappe
G5
26 mm (1”)
au minimum
1.2
1.3
1.4
1.5
1.6
1.7
A1
A2
A4
A3
2.1
2.2
2.3
2.4
2.5
2.6
Trappe
Ligne centrale de la trappe
26
ø13
Trou centré par rapport au
côté interne du cadre de
la trémie
Spécifications de rangement
Spécification de déploiement
68°- 80°
*
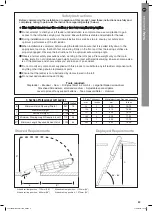
Consignes de sécurité
Avant de commencer l’installation et l’utilisation de ce produit, lisez cette notice attentivement et
intégralement, soyez particulièrement attentif aux consignes de sécurité (ci-dessous).
Cet escalier ne doit jamais être utilisé comme une échelle d’appui autoportante.
N’essayez pas de monter sur votre escalier escamotable tant que son installation n’est pas terminée.
Utilisez une autre échelle pour accéder au grenier pendant le travail d’installation. Veillez à ce qu’elle soit
stable et appropriée pour la tâche.
Pendant l’installation et l’utilisation, respectez toutes les instructions étape par étape pour garantir votre
sécurité et les performances optimales de votre escalier escamotable.
Une fois l’installation terminée et avant d’utiliser l’escalier, vérifiez qu’il est complètement abaissé jusqu’aux
butées supérieures appropriées, que ses deux pieds reposent fermement sur le sol et que les taquets de
blocage sont verrouillés. Respectez les instructions concernant l’angle d’utilisation de sécurité optimal.
Respectez les précautions de sécurité normales lors du travail dans le grenier. Positionnez le poids
exclusivement sur les solives porteuses du plafond. Ne percez pas plus haut que votre tête. Évitez tout
contact avec des fils électriques. Veillez à ce qu’il y ait une autre personne dans les locaux et à ce qu’elle
sache où vous êtes, au cas où il y aurait un accident.
Ne modifiez aucune pièce fournie avec ce produit et ne substituez aucune pièce de l’escalier escamotable
par quelque chose autre qu’une pièce de rechange d’origine.
Veillez à ce que l’escalier ne soit pas bloqué par des articles rangés dans le grenier.
Ne pas dépasser la charge maximale de 150 kg.
Outil requis :
Escabeau • Poinçon • Scie • Perceuse avec mèches 13 mm et 2 mm • Tournevis plat large
Tournevis cruciformes petit et moyen • Clé à molette • Levier pour décoller les lattes éventuelles
Mètre ruban/Règle • Marteau
Escalier Escamotable Professionnel à 3 Sections
mm
Pouces
B
Largeur minimale de la trémie
381
15
C
Hauteur maximale
3000
118
Hauteur minimale
2133
84
D*
Hauteur de rangement minimale requise dans le grenier
710
28
E**
Longueur minimale requise en arrière de la trappe
1120
44
C
**
3.4
Épaisseur de la trappe
Épaisseur
de la 9 mm
Épaisseur
de la trappe
+ 9 mm
A6
A5
3.3
3.1
3.2
3.5
3.6
2.7
2.8
Plan arrière
Plan avant
4.1
A1
A4
A7
A3
A2
A3
A2
45°
F (Épaisseur du plancher)
A (Longueur minimale de la trémie)
mm
Pouces
mm
Pouces
76
3
400
15,75
102
4
412
16,25
127
5
425
16,75
153
6
438
17,25
178
7
450
17,75
203
8
463
18,25
1.1
Si une trappe neuve est requise, son épaisseur ne
doit pas dépasser 20 mm (3/4”). Prenez en compte le poids
de la trappe et la sécurité des vis de charnière. Les trappes
en MDF ou panneau d’aggloméré peuvent ne pas conveni
r.
Utilisez le panneau existant comme gabarit pour
découper une pièce neuve en veillant à ce qu’elle puisse
s’insérer facilement dans l’ouverture de la trémie (3 mm
(1/8”) maximum). Votre magasin de bricolage peut peut-être
le faire pour vous.
Démontez la trappe et les charnières existantes.
Décollez les lattes éventuelles en sorte que les quatre côtés
de la trémie soient plats.
V
issez les charnières (G5) sur l’un des bords de la
trappe avec les vis à bois 20 mm (3/4”).
Pour optimiser les performances, remplissez les trous
de vis avec de la colle à bois.
Placez les charnières relevées sur le côté du cadre
de la trémie d’installation de l’escalier et fixez les charnièr
es.
V
eillez à ce qu’il y ait un espace de 26 mm (1”) au
minimum entre le côté supérieur de la trappe fermée et le
bord supérieur de la trémie.
Assembler le loquet rotatif
Mesurez le centre du côté de la trappe opposé au
côté où se trouvent les charnières. Cela vous permet
d‘obtenir la ligne centrale de la trappe (voir le schéma).
Tracez-la au crayon.
Avec la trappe complètement fermée, mesurez
exactement 26 mm (1”) depuis le bord du cadre de la trémie
et tracez une droite au crayon.
Percez un trou de 13 mm (½”) au croisement des
deux droites et poncez les rugosités du bord s’il y en a.
Insérez le bouton d’ouverture/fermeture (A1) dans le
trou de la trappe par le dessous en positionnant son pointeur
vers le bord de la trappe.
Insérez la bague de butée (A2) sur la tige du bouton
d’ouverture/fermeture en sorte que la languette de fixation
fasse un angle de 45° par rapport à la ligne centrale de la
trappe.
Insérez le pêne (A3) sur la tige du bouton d’ouver
-
ture/fermeture en l’insérant dans sa rainure en sorte qu’il soi
t
dirigé vers le bord le plus proche de la trappe et enfoncez-le
jusqu’à ce qu’il soit complètement positionné dans la bague
de butée (A2).
L
’escalier escamotable convient pour une ouverture
d’accès à un grenier au ras du plafond pourvue d’une
trappe à charnière s’ouvrant vers le bas et solidement
maintenue fermée par un loquet approprié. Si la trappe à
charnière ne s’ouvre pas vers le bas ou si elle ne comporte
pas de charnière, vous devez la modifier ou la remplacer
pour qu’elle satisfasse à cette exigence. Les pièces
requises sont fournies.
Fixez la bague de butée (A2) avec la vis (A7).
Fixez le loquet avec l’écrou M12 (A4) en veillant à ce
que l’écrou soit su
ffisamment serré pour maintenir le loquet
sans gêner sa rotation.
Fixer la gâche
Lorsque le pêne est tourné dans la position appropriée, il
rentre dans la gâche et maintient la trappe fermée. Procédez
à l’installation comme suit :
Mesurez l’épaisseur de la trappe et ajoutez-lui 9 mm
(3/8”).
Sur le côté de fermeture du cadre de la trémie, tracez
une ligne horizontale à cette distance du bord inférieur du
cadre de la trémie.
Tracez une ligne verticale sur ce côté du cadre de la
trémie dans l’alignement de la ligne centrale d’installation du
loquet sur la trappe.
Positionnez la gâche (A5) sur la ligne horizontale
comme montré sur le schéma.
Alignez l’ergot de la gâche avec la ligne centrale
verticale.
Marquez l’emplacement des trous avec le poinçon,
puis fixez la gâche avec deux vis à bois 20 mm fournies
(A6).
Assembler l’escalier et les pièces d’articulation
Remarque : Les longs bords de l’escalier sont appelés «
montants ». Chaque section complète de l’escalier est
appelée « plan ». Le plan avant de l’escalier est identifiable
par ses pieds ronds.
Poussez délicatement vers l’extérieur les deux
goujons (tapez légèrement dessus avec un marteau si
nécessaire) et retirez les embouts en plastique du bas du
plan
ARRIÈRE de l’échelle en notant leur sens d’insertion.
Butées supérieures additionnelles
Selon la hauteur entre le plancher du grenier et le sol (voir
au bas de la page 1), il peut être nécessaire d’installer les
butées supérieures additionnelles fournies (C2) (voir le
tableau ci-dessous).
Positionnez les butées supérieures additionnelles sur
les trous à 150 mm (6") environ sous les butées supérieures
permanentes du plan arrière de l’escalier (voir le schéma).
Lors de l’installation, veillez à ce que les guides de
charnière (B1 et B2) soient déjà insérés et positionnés sous
les butées supérieures additionnelles.
Insérez les guides de charnière (B1 et B2) sur les
montants du plan arrière. Les pattes de fixation doivent être
positionnées vers l’extérieur avec les pattes à deux trous en
haut (voir le schéma).
Faites-les glisser jusqu’aux butées supérieures
permanentes installées en usine.
Ne réassemblez pas les embouts en plastique pour
l’instant (voir l’étape 6.5 ci-après).
Fixez les butées supérieures additionnelles avec les
deux écrous et les deux vi
s M
4 fournis (C1 et C3).
Assembler les butées inférieures
Normalement vous avez déjà démonté les deux
embouts du plan arrière à l’étape 4.1.
Insérez les butées inférieures (D1) sur les montants
du plan arrière.
Positionnez les butées inférieures à 150 mm de
l’extrémité des montants (voir le schéma).
Fixez-les avec les vis (D2). Réassemblez les
embouts en plastique précédemment démontés et fixez-les
avec les goujons.
Réassemblez les embouts en plastique
précédemment démontés et fixez-les avec les goujons.
D
*
E**
A
B
F
FR
F4
Position the ladder in its fully stowed (closed)
position carefully in the loft.
Remove the stud and plastic top tip from the
top of the required side stile of the rear ladder frame
and discard.
In their place fit Pivot Tip (F4).
8.8
8.7
8.6
F2
F3
F1
F3
F3
Place the spring housing (F1) in position over
the holes ensuring the arm points AWAY from the loft
opening (with slot in cover on the left-hand side).
Fix the spring housing to the loft floor with 4 x
20mm screws (F3) through the 4 inner holes.
Place the housing cover (F2) over the spring
housing and fix down using 2 x 20mm (F3) screws
through the 2 remaining outer holes.
8.5
8.4
8.3
Installing the Power Pivot System
Position the template cut from the rear of the
header card against either the left or right hand hinge
guide bracket (depending on which chosen side the
power pivot system is to be fitted).
Using a bradawl mark the 6 applicable holes
through the template on to the loft floor.
8.2
8.1
For Right
Hand Fixing
For Left
Hand Fixing
WARNING:
Do Not stand on the ladder to do this. Either using a
second ladder, or from inside the loft space, secure
the hinges using six 35mm screws supplied.
B3
B1
B2
If flooring material covers the top edge of the loft hatch frame ensure that it is completely stable and if necessary
use longer screws to penetrate the frame itself.
The ladder should now be free to swing from the hinges and slide freely up and down the guides.
Installing the Ladder
N.B.
The ladder should be installed on the same side
of the trap as the trapdoor hinges.
With the ladder preferably centred in the
opening, and the trapdoor hanging down, locate the
hinge guide bracket arms (B1 & B2) on the top edge
of the loft hatch frame (see diagram).
Make guide holes with the bradawl then pre
drill pilot holes (2mm diameter) for all screws.
Fix using 35mm screws (B3).
N.B.
the bracket arms with two screw holes should be
on top.
7.3
7.2
7.1
E2
E1
E2
E1
G6
F5
F8 F7 F6
F4
F6
Handrail Assembly
The handrail (G6) can be fitted to either side of the loft
ladder. It is advisable to fit the handle only after fitting
the power pivot arm.
Fix the handrail to your chosen side of the
rear frame.
Use 3 x spacers (E1), 60mm bolts (E2),
washers and nuts (E3 & E4) supplied.
You have a choice of 2 different handrail
heights which will be dependent on the amount of
“in-loft” handrail you require.
Check that all fixings for the whole assembly are fully
secure.
9.3
9.2
9.1
Locate the power arm linkage plates either
side of pivot tip (F4)/ladder stile and align all holes.
Secure the stile to the linkage plates using bolt
(F5), washers (F6), nut and nut cap (F7 & F8).
Ensure bolt (F5) and nut (F7) are tightened sufficiently
to allow the linkage to freely rotate without any
looseness.
DO NOT over-tighten the nut as this will restrict
smooth operation of the ladder system.
8.10
8.9
G3
A1
G2
G3
1*
1*
1*
2**
2**
2**
*
Position 1 fixes handrail in top position
** Position 2 fixes handrail in low position
G6
E1
E2
E2
E1
E3
E4
IMPORTANT
DO NOT attempt to climb your loft ladder until installation is
complete and the ladder is pulled down to appropriate top
stops. Then ensure that the locking catches are engaged.
TWIST
CA
TCH
ASSEMBL
Y
HANDRAIL
ASSEMBL
Y
BO
TTOM
STOPS
ADDITIONAL
TOP
STOPS
HINGE
GUIDE
ASSEMBL
Y
A1
Catch Operator
. . . . . . . . . . . .
x1
A2
Travel Stop Ring
. . . . . . . . . . .
x1
A3
Catch Lever
. . . . . . . . . . . . . . .
x1
A4
Nut (M12)
. . . . . . . . . . . . . . . . .
x1
A5
Location Bracket
. . . . . . . . . .
x1
A6
Screw (20mm)
. . . . . . . . . . . .
x2
A7
Screw (12mm)
. . . . . . . . . . . .
x1
C1
Top Stop Bolt (M4 x 8mm)
.
x2
C2
Additional Top Stop
. . . . . . . .
x2
C3
Locking Nut (M4)
. . . . . . . . . .
x2
A
B
D
E
F1
Power Pivot Unit
. . . . . . . . . .
x1
F2
Housing Cover
. . . . . . . . . . . .
x1
F3
Screw (20mm)
. . . . . . . . . . . .
x6
F4
Pivot Tip
. . . . . . . . . . . . . . . . . .
x1
F5
Bolt (M6 x 40mm)
. . . . . . . .
x1
F6
Plastic Washer
. . . . . . . . . . . .
x2
F7
Locking Nut (M6)
. . . . . . . . . .
x1
F8
Nut Cap
. . . . . . . . . . . . . . . . . . .
x1
F9
Card Template
. . . . . . . . . . . . .
x1
(on back of header card)
PIVO
T
ASSEMBL
Y
E1
Handrail Spacer
. . . . . . . . . . .
x3
E2
Bolt (M5 x 60mm)
. . . . . . . .
x3
E3
Washer (
ø
25mm)
. . . . . . . . .
x3
E4
Locking Nut (M5)
. . . . . . . . .
x3
D1
Bottom Stop
. . . . . . . . . . . . . . .
x2
D2
Screw (12mm)
. . . . . . . . . . . .
x4
B1
Hinge Guide (left)
. . . . . . . . . .
x1
B2
Hinge Guide (right)
. . . . . . . .
x1
B3
Screw (35mm)
. . . . . . . . . . . .
x6
F
B2
B3
C1
C2
G2
C3
D2
G1
G6
G5
D1
G6
C
E1
E2
E2
E1
E3
F2
F5
F6
F3
F1
F8
F7
F6
E4
G
G1
3-Section Loft Ladder
. . . . .
x1
G2
Stowing Pole
. . . . . . . . . . . . .
x1
G3
Plastic Stowing Hook/Key
.
x1
G4
End Plug
. . . . . . . . . . . . . . . . . .
x1
(Trapdoor not provided)
G5
Trapdoor Hinges
. . . . . . . . . .
x2
Screws (20mm
. . . . . . .
x8
G6
Handrail
. . . . . . . . . . . . . . . . . . .
x1
G7
Self-tapping screw
. . . . . . . .
x1
F3
F4
A2
A4
A5
A6
A3
A1
G4
A7
B1
Additional
Top stops
Fitted
No Additional
Top stops
Fitted
B
A
Operating the Ladder
Locate the plastic stowing hook/key (G3) into
one end of the stowing pole (G2) and push firmly to
ensure the plastic stowing hook/key (G3) is fully located
within the pole. Secure hook/key (G3) with screw (G7).
Push the plastic end plug (G4) into the opposite end of
the stowing pole (G2).
To open the trapdoor locate the key (G3) into
the slot in the catch operator (A1) and turn the catch
anti-clockwise until it reaches the travel stop and then
lower the trapdoor.
10.2
10.1
Stowing the Ladder
Retract both right-hand side catches
‘
C
’
&
‘
D
’
(blue) and rotate both catch levers upwards into the
locked open position.
To stow the ladder, retract catch
‘
A
’
(black), slide
the front frame fully upwards until catch engages again.
Repeat step 11.2 for catch
‘
B
’
(black) and the
middle ladder frame.
Engage the plastic stowing hook/key (E3) over
and at the centre of the REAR ladder section bottom
rung and whilst maintaining the stowing pole near
vertical push the ladder vertically upwards.
Continue to slowly push the ladder up and fully
into the loft.
11.6
11.5
11.3
11.2
11.1
G3
G7
Catches
‘C’ & ‘D’
Released/engaged
Retracted/locked open
WARNING:
DO NOT attempt to climb your loft ladder until you
have:
Checked that it is pulled down to the stops.
Fully read all safety labels and ensured that it is
set at the correct angle.
Ensure that the locking catches are fully engaged.
Locate the stowing hook/key (E3) over and at
the centre of the REAR ladder section bottom rung and
steadily pull the ladder outward and downward until
both top stops reach and make contact with the hinge
guides.
10.3
To extend the ladder, retract left-hand catch
‘
A
’
(black) while supporting the front frame of the ladder.
Lower the frame slowly until catch
‘
A
’
(black) engages
again.
Then retract catch
‘
B
’
(black) and lower the
middle frame until catch
‘
B
’
(black) is engaged in your
required position. Extend the ladder until the feet rest
firmly on the floor.
When the ladder has been fully deployed, rotate
both right-hand side catch levers downward to unlock
and release both catches
‘
C
’
and
‘
D
’
(blue) and ensure
both catches are fully engaged. Do NOT use ladder with
any catches (
‘
A
’
,
‘
B
’
,
‘
C
’
or
‘
D
’
) disengaged. Read the
safety labels on the product.
10.5
10.6
Ensure the ladder is pulled down so that the top
stops or additional top stops if fitted rest firmly on the
hinge guides. This supports the top section and
prevents it sliding down when climbed.
Check the ladder angle against the safety label
or refer back to deployed requirements on page 1.
10.9
10.8
Retract both right-hand side catches
‘
C
’
&
‘
D
’
(blue) and rotate both catch levers upwards into the
locked open position (see diagram).
10.4
10.7
C
D
Finally, use the stowing pole to raise the
trapdoor and turn the catch operator clockwise to
close.
11.7
Reverse step 11.1 and ensure both right-hand
side catches
‘
C
’
and
‘
D
’
(blue) are fully engaged.
11.4
CSK)
Please check you have all components listed (tick boxes)
LF37093 MacAllister.indd 11
28/04/2016 14:52
LF37093 MacAllister 1219_PRINT
12
11/12/2019 14:18


