EN
•
Remove the dust collection bag and install the foam sleeve as described previously in
Operation Section.
START VACUUMING
The vacuum cleaner is equipped with an automatic shut-off system that works when you vacuum
up liquids. When the liquid reaches a certain level in the tank, an internal float closes against a
joint which cuts off the motor intake and suction.
1. Turn off the vacuum cleaner.
2. Unplug the vacuum cleaner from the power source.
3. Raise the hose so that it drains into the tank.
4. Remove the motor assembly from the tank.
5. Be careful when emptying heavy tanks. Drain the tank into an appropriate drain. Place the
motor assembly back on the tank. Engage the locking clamps.
BLOWER FEATURE
This vacuum can be used as a powerful blower. To use your unit as a blower insert hose end into
blower port on rear of unit. Clear hose of any obstructions before attaching to blower port. Caution
should be used when using as a blower due to the powerful force of air when using certain
attachments.
WARNING :
ALWAYS WEAR EYE PROTECTION TO PREVENT DEBRIS FROM BEING BLOWN
OR RICOCHETING INTO THE EYES OR FACE WHICH CAN RESULT IN SERIOUS INJURY.
EMPTYING LIQUID WASTE FROM THE TANK
Use special care when emptying heavily loaded tanks. Your Wet/Dry Vacuum may be emptied of
waste by removing the tank cover. To empty, stop the motor and remove the plug from the wall
receptacle. Remove the tank cover and deposit the liquid waste contents into a suitable drain.
Your Wet/Dry Vac also comes standard with a convenient tank drain.
NOTE: THE TANK DRAIN
FEATURE IS NOT STANDARD ON ALL MODELS.
Simply remove the drain cap and empty the
liquid contents into a suitable drain. After the tank is empty, return the cover to its original position.
To continue use, plug the cord into the wall receptacle and start the motor.
REPAIR OR REPLACEMENT OF PARTS
Never attempt any service to the unit unless the power cord is disconnected from the power
receptacle.
These units incorporate electrical components that can be replaced. It is recommended that
repair or part replacement be performed by a skilled technician. Only use original manufacturer
recommended replacement parts. If the receptacle cover becomes detached, broken or damaged,
or clear boot over switch would be damaged or missing, discontinue operation and have the unit
repaired.
Maintenance and Repair
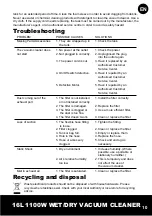
The vacuum cleaner does not require lubrication or supplementary maintenance. Before storing
the vacuum cleaner, always empty and clean the tank. Never leave any liquids standing in the
9
Summary of Contents for MWDV16L
Page 46: ...PL 15...
Page 63: ...16 1100 MWDV16L EAN 3663602798132 MNL_MWDV16L_V01...
Page 64: ...1 8...
Page 65: ...16 1100 2 1 2 3 4 5 6 7 8 9 10 11 12 13...
Page 66: ...3 14 15 16 17 18 19 20 21 22 23 24 25 26 27 28 29 30 31 32 33 34...
Page 67: ...16 1100 4 35 36 37 38 COSHH 1 2 3...
Page 68: ...5 www hse gov uk...
Page 69: ...16 1100 6 10 C C 150 yyWxx yy W xx Type ES CEE7 Europe MWDV16L M MacAllister WDV 16L IPX4...
Page 71: ...16 1100 8 1 2 A 3 4 B 5 6 A A A A A A A B B B B B A A...
Page 72: ...9 1 2 3 4 1 2 3...
Page 73: ...16 1100 10 1 2 3 4 5...
Page 74: ...11...
Page 75: ...16 1100 1 1 2 3 4 5 1 2 3 4 1 2 3 4 5 1 2 1 1 1 2 3 4 5 1 2 3 4 1 2 3 4 5 1 2 1 12...
Page 76: ...MacAllister 2 MacAllister 2 MacAllister MacAllister MacAllister 13...
Page 78: ...15...
Page 94: ...RO 15...
Page 110: ...ES 15...
Page 126: ...PT 15...
Page 142: ...TR 15...


