background image

40

LEO 55 - LEO 55 essential

EN

?

fig_5.3

MACCHINA

IN

MANUTENZIONE

VIETATO

L’ACCESSO

oltre questo limite

ATTENZIONE

ORGANI

IN MOVIMENTO

ATTENZIONE

CORRENTE

ELETTRICA

MANUTENZIONE ORDINARIA

OLIARE INGRASSARE

TUTTE LE PARTI IN MOVIMENTO

OGNI 30 GG

MACCHINA

IN

MANUTENZIONE

VIETATO

L’ACCESSO

oltre questo limite

ATTENZIONE

ORGANI

IN MOVIMENTO

ATTENZIONE

CORRENTE

ELETTRICA

MANUTENZIONE ORDINARIA

OLIARE INGRASSARE

TUTTE LE PARTI IN MOVIMENTO

OGNI 30 GG

fig_5.4

fig_5.2

MACCHINA

IN

MANUTENZIONE

VIETATO

L’ACCESSO

oltre questo limite

ATTENZIONE

ORGANI

IN MOVIMENTO

ATTENZIONE

CORRENTE

ELETTRICA

MANUTENZIONE ORDINARIA

OLIARE INGRASSARE

TUTTE LE PARTI IN MOVIMENTO

OGNI 30 GG

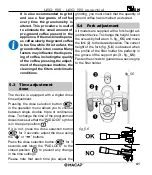
The machine is factory calibrated with an es

-

presso grinding. To adjust the granulometry, 

use the continuous dose and a precision scale 

to weigh the exact grammage. Every time a 

grinding adjustment is required, the first two 

double doses must be discarded because they 

might still contain parts of the previous grinding 

adjustment. After pressing the coffee and check

-

ing that the extraction time is the desired one, 

proceed with the adjustment of the times of the 

programmed doses.

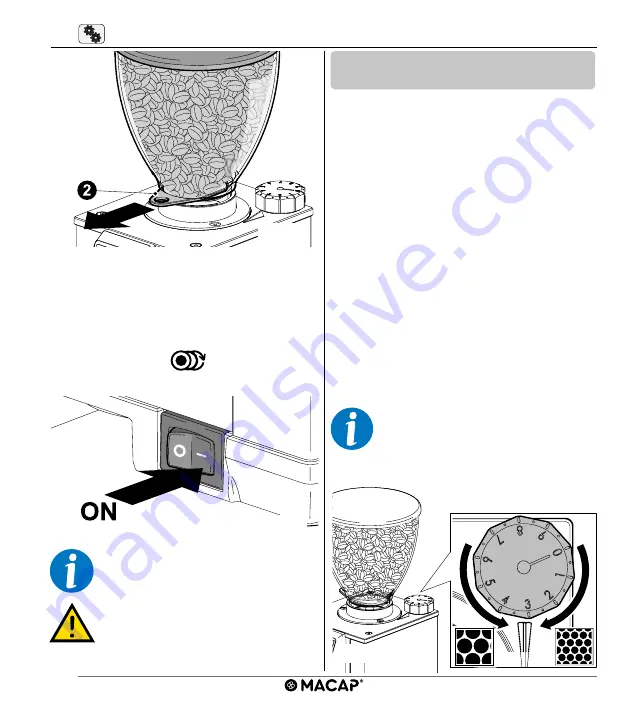
To modify grinding:

 Rotate the adjustment 

knob clockwise for a 

FINER

 granulometry and 

anticlockwise for a 

COARSER

 granulometry 

(fig._

5.4

). Adjust the grinding with the motor 

switched on if there is coffee between the grind

-

ers, and with the motor switched off if there is 

no coffee.

The adjustment from coarse to fine 

is best done while the machine is 

grinding or with an empty grinding 

chamber. 

■  Activate the device by moving the switch to 

the 

I

 - 

ON

 (

3

 - fig._5.3). When starting the 

device, a short welcome message appears 

on the display and after a few seconds one 

of the pre-set functions appears; to switch 

from one function to another, press the dose 

selection button  

.

5.2 Grinding 

 adjustment 

At night or when there are no oper

-

ators in the room, move the switch 

to the 


O  - 

OFF


(see figure 4.4).

Never operate without the 

hopper or without its cover.

Summary of Contents for LEO 55

Page 1: ...LEO 55 LEO 55 essential...

Page 2: ...TION OF THE ON DEMAND COFFEE GRINDER 35 3 1 Intended use 35 3 2 Technical specifications 35 3 3 Main parts 36 3 4 Noise level 36 4 INSTALLATION 37 4 1 Coffee hopper installation 38 4 2 Electrical powe...

Page 3: ...EN 6 PROGRAMMING 43 6 1 Operation menu 43 6 2 Dose counter 44 6 3 Triple dose 44 6 4 Continuous dose 45 6 5 Release 45 7 CLEANING 46 8 TROUBLESHOOTING 46 8 1 Troubleshooting 46 8 2 Inactivity 47 9 DI...

Page 4: ...ATTENZIONE ORGANI IN MOVIMENTO ATTENZIONE CORRENTE ELETTRICA MANUTENZIONE ORDINARIA OLIARE INGRASSARE TUTTE LE PARTI IN MOVIMENTO OGNI 30 GG CAUTION this symbol indicates information or procedures whi...

Page 5: ...e all the changes it deems appropriate to mass production and the related manuals without the obligation to update previous production and manuals The manufacturer shall not be liable for any damage c...

Page 6: ...6 The on demand coffee grinder must be installed after reading and understanding this publication 1 4 Safety instructions 1 3 Warranty The warranty does not cover all parts subject to wear parts damag...

Page 7: ...ent The power cable must not be replaced by the user 10 This appliance was designed exclusively to grind coffee beans All other uses are inappropriate and dangerous The manufacturer shall not be held...

Page 8: ...they are supervised or have been given instruction 16 Keep the appliance and relevant cable out of reach of children 17 Children must not play with the appliance 18 Do not pull the power cable to disc...

Page 9: ...experience of the appliance in particular with regard to safety and hygiene also see point 19 25 This appliance can be used by children aged 8 years and over and by persons with reduced physical sens...

Page 10: ...rtons etc must not be left within the reach of children as they are potential sources of danger These elements must be disposed of in accordance with the local regula tions in force ATTENZIONE ORGANI...

Page 11: ...and businesses such as bakeries butcher shops etc but not for the continuous mass production of food This de vice was only designed to grind coffee beans Any other use is to be considered unsuitable a...

Page 12: ...determined that the coffee grinder does not exceed 72 3dB A 1 Coffee hopper cover 2 Coffee hopper 3 Hopper locking slide 4 Display 5 Dispensing cone 6 Filter holder support pin 7 Grinding start butto...

Page 13: ...not use or install where water jets are used In order to ensure normal operation the machine mustbeinstalledinareaswheretheroomtemper ature is between 5 C and 36 C and humidity does not exceed 70 Ens...

Page 14: ...wash them with water and mild detergent to remove any processing residues Place the hopper 1 fig _4 3 correctly and stably inside the rubber collar with the hopper locking slide inserted 2 fig _4 3 f...

Page 15: ...en installed correctly Remove the cover from the coffee hopper 1 fig _5 1 and insert the coffee beans Close the cover 5 1 Preparation and start up Open the coffee hopper locking slide 2 fig _5 2 allow...

Page 16: ...s of the programmed doses To modify grinding Rotate the adjustment knob clockwise for a FINER granulometry and anticlockwise for a COARSER granulometry fig _5 4 Adjust the grinding with the motor swit...

Page 17: ...antity of ground coffee has remained as desired fig_5 5 fig_5 6 It is also recommended to grind and use a few grams of coffee every time the granulometry is altered This procedure is useful to elimina...

Page 18: ...electing one of the working modes with the dose selection button 1 fig _5 8 and starting grinding by pressing the relative start button 2 fig _5 8 Grinding of the programmed doses will automatically s...

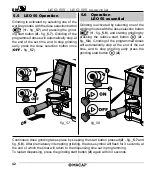
Page 19: ...functions activate triple dose as well as continuous dose To exit the programming menu scroll to the EXIT screen and press the dose selection button to return to the op eration menu 6 1 Operation menu...

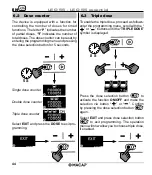
Page 20: ...the DOSE to exit pro gramming To enable the triple dose proceed as follows enter the programming menu scroll with the or buttons until the TRIPLE DOSE symbol is displayed 8 S Press the dose selection...

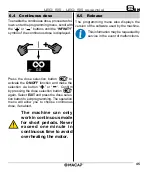
Page 21: ...ion menu will allow you to choose continuous dose if enabled The machine can only work in continuous mode for short periods Never exceed one minute in continuous time to avoid overheating the motor VI...

Page 22: ...ower switch In case of a problem or malfunc tion switch off and disconnect the appliance from the electrical mains A list of possible actions to perform in case of possible malfunctions is shown below...

Page 23: ...waste The user must therefore transport the equip ment at the end of its service life to the appro priate separate collection centres for electronic electro technical waste products or return it to th...

Page 24: ...10 2022 Ed 01 MACAP s r l Via Toniolo 18 30030 Maerne di Martellago VE ITALY Tel 39 041 5030466 Fax 39 041 5030477 www macap it info macap it...

Reviews: