background image

FRANÇAIS

12

P507

ROBOT MULTI-FONCTIONS
Hachoir à glace / hachoir

P508

ROBOT MULTI-FONCTIONS
Hachoir à glace / mixer

P510

ROBOT MULTI-FONCTIONS
Hachoir à glace / mixer / hachoir

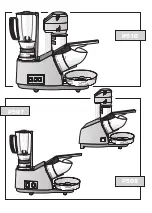
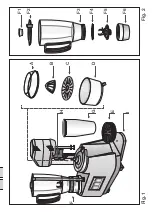
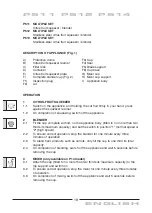
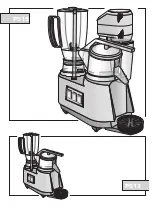
DESCRIPTION DE L'APPAREIL (fig. 1)

A)

Trémie introduction glace

C4)Joint

B)

Cuve pile-glace

C5)Support couteaux

C)

Bol mixer complet (fig. 2)

C6)Socle bol

C1)

Bouchon d'inspection

D) Bol 

C2)

Couvercle

E) Support bol hachoir

C3)

Bol

F) Corps appareil

FONCTIONNEMENT

1

HACHOIR À GLACE

1-1

Introduisez la glace à piler dans la trémie, fermez le couvercle et agissez sur le
commutateur.

1-2

Appuyez avec force sur le levier jusqu'à ce que toute la glace pilée soit
descendue dans la cuve.

1-3

Lorsque l'opération est terminée, éteignez l'appareil en agissant sur le
commutateur et attendez 5 secondes avant d'ouvrir le couvercle.

2

MIXER (uniquement sur P508-P510)

2-1

Introduisez le bol muni de son couvercle dans le corps de l'appareil (rempli au
maximum aux 2/3 de sa capacité) et mettez en marche en agissant sur le
commutateur pour le mettre en position "1" (vitesse normale) ou "2" (grande
vitesse).

2-2

Pour assurer le bon fonctionnement de l'appareil, faites fonctionner le moteur
pendant 3 minutes et laissez-le reposer pendant 1 minute avant de le remettre
en marche.

2-3

Pour hacher des matières très consistantes (ex. carottes), réduisez de 1/3 la
quantité de produit introduite dans le bol.

2-4

Lorsque vous éteignez le mixer, attendez 5 secondes avant de retirer le bol.

3

HACHOIR (uniquement sur P507-P510)

3-1

Accrochez le bol (rempli au maximum aux 2/3) au support supérieur, mettez
l'appareil en marche en agissant sur le commutateur.

3-2

Pour assurer le bon fonctionnement de l'appareil, faites fonctionner le moteur
pendant 3 minutes et laissez-le reposer pendant 1 minute avant de le remettre
en marche.

3-3

Lorsque vous éteignez le hachoir, attendez 5 secondes avant de retirer le bol.

P 5 0 7   P 5 0 8   P 5 1 0

Summary of Contents for P507

Page 1: ...511 P512 P513 P514 P515 P520 P550 GRUPPI MULTIPLI MULTIPLE SET GRUPE MULTIPLE MULTI MIXER GRUPO M LTIPLE MACAP Srl info macap it www macap it Via Toniolo 18 30030 Maerne Venezia Italy Tel 041 5030466...

Page 2: ...P514 GRUPPO MULTIPLO pag 18 GB P511 P512 P514 MULTIPLE SET pag 19 FR P511 P512 P514 ROBOT MULTI FONCTIONS pag 20 DE P511 P512 P514 MULTIFUNKTIONSSET pag 21 ES P511 P512 P514 GRUPO M LTIPLE pag 22 P51...

Page 3: ...spina nella presa di alimentazione 2 6 Qualsiasi manomissione o allacciamento non conforme fonte di pericolo e annulla la garanzia del costruttore 3 PULIZIA 3 1 TOGLIETE LA SPINA DALLA PRESA DI ALIME...

Page 4: ...and consequently renders the manufacturer s guarantee null and void 3 CLEANING 3 1 ALWAYS REMOVE THE PLUG FROM THE POWER INLET BEFORE CLEANING THE APPLIANCE 3 2 Detach all removable parts from the ap...

Page 5: ...ntation 2 6 Toute modification effectu e sur l appareil ou tout branchement non conforme est source de danger et annule la garantie assur e par le constructeur 3 NETTOYAGE 3 1 RETIREZ LA FICHE DE LA P...

Page 6: ...sgeschaltet sind Position 0 2 5 Den Netzstecker anschlie en 2 6 Der unsachgem e Gebrauch bzw unvorschriftsm ige Anschlu ist eine Gefahrenquelle Der Hersteller bernimmt in diesem Fall keine Haftung 3 R...

Page 7: ...este manual representa una fuente de peligro y anula la garant a del fabricante 3 LIMPIEZA 3 1 EXTRAIGA EL ENCHUFE DE LA TOMA DE RED ANTES DE EFECTUAR CUALQUIER OPERACI N DE LIMPIEZA 3 2 Retire las p...

Page 8: ...P510 P507 0 I P508 I 0 II 0 I I 0 II I 0 II 0 I...

Page 9: ...Fig 2 C1 C2 C3 C4 C5 C6 A D E F B Fig 3 Fig 1 C I 0 II 0 I I 0 II...

Page 10: ...tendete 5 secondi prima di aprire il coperchio 2 FRULLATORE solo su P508 P510 2 1 Inserite il bicchiere completo di coperchio nel corpo macchina riempito al massimo per 2 3 della capacit e accendete l...

Page 11: ...e on P508 P510 model 2 1 Fit the cup complete with lid on the appliance body filled to no more than two thirds its maximum capacity and set the switch to position 1 normal speed or 2 high speed 2 2 To...

Page 12: ...bol muni de son couvercle dans le corps de l appareil rempli au maximum aux 2 3 de sa capacit et mettez en marche en agissant sur le commutateur pour le mettre en position 1 vitesse normale ou 2 grand...

Page 13: ...bis zu max 2 3 seines Fassungsverm gens gef llt werden mit Deckel in den Ger tekorpus einsetzen und den Schalter auf 1 normale Geschwindigkeit oder 2 hohe Geschwindigkeit stellen 2 2 Damit das Ger t...

Page 14: ...ruptor y espere 5 segundos antes de abrir la tapa 2 LICUADORA s lo en el mod P508 P510 2 1 Inserte en el cuerpo de la m quina el vaso con la tapa llenado m ximo 2 3 de su capacidad y sit e el interrup...

Page 15: ...Kg Gross weight Kg Bicchiere inox Stainless Steel Container Bicchiere Plastica Plastic Container P507X P508 P508X 14 5 16 5 Tritaghiaccio Ice crusher Spremiagrumi Citrus fruit squeezer Frullino Mixer...

Page 16: ...P514 P512 P511...

Page 17: ...Fig 2 Fig 1 F1 F3 F4 F5 F6 A E I G F H B C D F2...

Page 18: ...l interruttore 2 FRULLATORE 2 1 Inserite il bicchiere completo di coperchio nel corpo macchina riempito al massimo per 2 3 della capacit e accendete l interruttore in posizione 1 velocit normale o 2 a...

Page 19: ...h off the appliance 2 BLENDER 2 1 Fit the cup complete with lid on the appliance body filled to no more than two thirds its maximum capacity and set the switch to position 1 normal speed or 2 high spe...

Page 20: ...aux 2 3 de sa capacit et mettez en marche en agissant sur le commutateur pour le mettre en position 1 vitesse normale ou 2 grande vitesse 2 2 Pour assurer le bon fonctionnement de l appareil faites f...

Page 21: ...n Ger tekorpus einsetzen und den Schalter auf 1 normale Geschwindigkeit oder 2 hohe Geschwindigkeit stellen 2 2 Damit das Ger t immer einwandfrei funktioniert sollte der Motor 3 Minuten lang mit 1 Min...

Page 22: ...on las manos 1 2 Cuando termine de exprimir apague el interruptor 2 LICUADORA 2 1 Inserte en el cuerpo de la m quina el vaso con la tapa llenado m ximo 2 3 de su capacidad y sit e el interruptor en la...

Page 23: ...tica Plastic Container P512 P512X P514 12 14 Tritaghiaccio Ice crusher Spremiagrumi Citrus fruit squeezer Frullino Mixer Frullatore Blender 220x440 h 460 700 12 5 14 5 265x440 h 460 820 16 18 265x440...

Page 24: ...P515 P513...

Page 25: ...Fig 2 D1 D2 D3 D4 D5 D6 Fig 3 B A Fig 1 D G E C F...

Page 26: ...l coperchio 2 FRULLATORE 2 1 Inserite il bicchiere completo di coperchio nel corpo macchina riempito al massimo per 2 3 della capacit e accendete l interruttore in posizione 1 velocit normale o 2 alta...

Page 27: ...1 Fit the cup complete with lid on the appliance body filled to no more than two thirds its maximum capacity and set the switch to position 1 normal speed or 2 high speed 2 2 To ensure correct operati...

Page 28: ...le corps de l appareil rempli au maximum aux 2 3 de sa capacit et mettez en marche en agissant sur le commutateur pour le mettre en position 1 vitesse normale ou 2 grande vitesse 2 2 Pour assurer le b...

Page 29: ...werden mit Deckel in den Ger tekorpus einsetzen und den Schalter auf 1 normale Geschwindigkeit oder 2 hohe Geschwindigkeit stellen 2 2 Damit das Ger t immer einwandfrei funktioniert sollte der Motor 3...

Page 30: ...ntes de retirar la tapa 2 LICUADORA 2 1 Inserte en el cuerpo de la m quina el vaso con la tapa llenado m ximo 2 3 de su capacidad y sit e el interruptor en la posici n 1 velocidad normal o 2 velocidad...

Page 31: ...inless Steel Container Bicchiere Plastica Plastic Container P513X P515 P515X 12 5 15 Tritaghiaccio Ice crusher Spremiagrumi Citrus fruit squeezer Frullino Mixer Frullatore Blender 190x440 h 460 740 12...

Page 32: ...P550 P520...

Page 33: ...C D H F G A B E I Fig 1 Fig 2 F1 F2 F3 F4 F7 F5 F6 Fig 3...

Page 34: ...SPREMIAGRUMI 2 1 Introducete il frutto gi tagliato nel filtro rotante inox chiudete il coperchio e accendete l interruttore 2 2 Ad operazione ultimata spegnete l interruttore e attendete 5 secondi pr...

Page 35: ...ruit in the stainless steel rotating filter close the lid and switch on 2 2 When you have finished switch off and wait 5 seconds before opening the lid 3 BLENDER 3 1 Fit the cup complete with lid on t...

Page 36: ...tion teindre l appareil et attendre 5 secondes avant d ouvrir le couvercle 3 MIXER 3 1 Introduisez le bol muni de son couvercle dans le corps de l appareil rempli au maximum aux 2 3 de sa capacit et m...

Page 37: ...den Deckel schlie en und einschalten 2 2 Danach ausschalten und vor ffnen des Deckels 5 Sekunden warten 3 MIXER 3 1 Den Becher darf nur bis zu max 2 3 seines Fassungsverm gens gef llt werden mit Decke...

Page 38: ...abrir la tapa 2 EXPRIMIDOR 2 1 Introducir la fruta ya cortada en el filtro rotatorio inoxidable cerrar la tapa y activar el interruptor 2 2 Terminada la operaci n desactivar el interruptor y esperar...

Page 39: ...nless Steel Container Bicchiere Plastica Plastic Container P520X P550 P550X 24 27 Tritaghiaccio Ice crusher Spremiagrumi Citrus fruit squeezer Frullino Mixer Frullatore Blender 320x550 h 465 1080 24 2...

Page 40: ...iguientes normas Direttiva Bassa Tensione 2006 95 CE Low Voltage Directive 73 23 CEE Directive Basse Tension 93 68 CEE Niederspannungsrichtlinie Norma para Baja Tensi n La conformit stata verificata c...

Reviews: