background image

3

Thanks


For choosing our product

PRISMA Series Desktop 3D Printers inheriting the design concept of the simple to the extreme. 
Use it can build parts quickly and easily, even if you’ve never used a 3D Printer.
The printer use the ABS or PLA to produce the model, so the parts are strong and durable. ABS or 
PLA material also ensures that you can model for drilling, tapping, grinding and painting. PRISMA 
Series Desktop 3D Printers creatively proprietary hardware, software and materials technology 
together. Welcome to a new realm of 3D modeling!

INDEX

User-Guide Instructions   


Learn More Information
Safety Precautions

Chapter 1 

Overview 


1.1 Overview


1.2 Front, Left and Back View


1.3 Start Kit Contents

Chapter 2 

Installation


2.1 Install Machinery


2.2 Install the Material Shelf 


2.3 Dismantle the Model 


2.4 Paste the Masking Tape


2.5 Install the Material (for example, PLA materials) 


2.6 Manual Calibration 


2.6.1 Preparation for Calibrating


2.6.2 Adjusting the overall height of the Printing Platform


2.6.3 Fine Tune the Printing Platform


2.7 Printing the Test File

Chapter 3 

Printing Operation


3.1 Display Panel


3.2 Display Panel HOME Overview


3.2.1 Install filament 


3.2.2 Value input


3.2.3 Application


3.2.3.1 Manual

Chapter 4 

SD card file list 


4.1 SD card file list 


4.2 Printing Display

Chapter 5 

System

Chapter 6 

Power Outages  

Chapter 7 

General Maintenance


7.1 Daily Preventive Maintenance


7.2 Maintenance


7.2.1 About every 500 hours should clean up the nozzle parts 


7.2.2 2000 Hours Maintenance

Chapter 8 

Trouble Removal

Chapter 9 

Support


04

04
04

05

05
05
05

06

06
06
06

07

07

08

08
08
08

09

09
09
09
09

010

010

011

011
011

012

012

013

013
013
013
013
013

014 

014

Summary of Contents for Prisma EB-3DP16-016

Page 1: ......

Page 2: ...2 REV 020817...

Page 3: ...Machinery 2 2 Install the Material Shelf 2 3 Dismantle the Model 2 4 Paste the Masking Tape 2 5 Install the Material for example PLA materials 2 6 Manual Calibration 2 6 1 Preparation for Calibrating...

Page 4: ...or electric shock Please use approved power cord replace damaged power cords Do not allow metal or liquids to touch the internal parts of the printer Otherwise it may result in fire electric shock or...

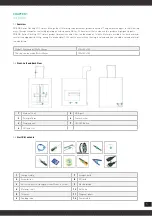
Page 5: ...material carrier is equipped with 1000g enough to make about 120 hours in a row without having to reload and you can add a second material to extend time Product Dimensions W D H mm 300 350 380 The s...

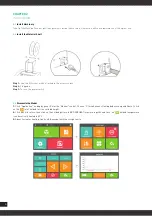
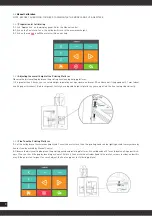
Page 6: ...Step 2 Plugged in Step 3 Turn on the power switch 2 3 Dismantle the Model 1 Click Application on display panel Enter the Manual control Choose Z which means Heating bed move up and Down click on the t...

Page 7: ...Click Control Panel from Unload to head preheat adjust the extrusion nozzle temperature to 205 C Turn ON left extrusion nozzle temperature is automatically heated to 205 C 2 Insert the material 3 When...

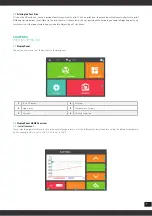
Page 8: ...n and reset Z Axis Home until the gap about 0 1 mm about one A4 paper thickness Before shipment factory has adjusted height of platform you can get into the fine tuning steps directly 2 6 3 Fine Tune...

Page 9: ...ise If the tape was broken you need to Adjust the nut clockwise CHAPTER3 PRINTING OPERATION 3 1 Display Panel The main user interface of the printer is a display panel 1 Install filament 4 Printing 2...

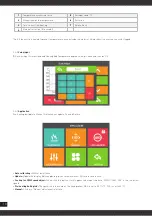
Page 10: ...ng Bed Temperature degree value pls write and confirm OK 3 2 3 Application Pre heating build plate Manual Auto manual update Fan and Return Auto calibrating Without installation Update Update the disp...

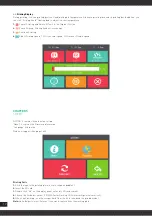
Page 11: ...Point located at the Left Front corner Pls select X Y or Z Axis first Then click or to move 4 Ruturn to the Original point When Choose X Y or Zaxis will move X Y Z back to Original Point accordingly...

Page 12: ...means Double speed CHAPTER5 SYSTEM NOTICE It contains three function setting About it contains the Firmware information Language Alternative We do not suggest changing at will Printing Parts 1 Stick t...

Page 13: ...thout accumulated materials if there is please clean the nozzle parts Because it will cause parts quality problems 3 Use a vacuum cleaner to clean the print production Chamber in order to absorb all r...

Page 14: ...aged power tube damaged CHAPTER9 SUPPORT Products from PRISMA by MachPower make use of the legal warranty offered by the reseller Returns are only possible in case of integrity items that is not assem...

Page 15: ......

Page 16: ...16...

Reviews: